background image

17 


www.spokey.eu


www.spokey.pl 

USER’S GUIDE 

NOTES  Please keep this operation manual for future use. This exercise machine is intended for home use only. 
 

TECHNICAL SPECIFICATIONS 

Dimensions of the assembled exercise machine: 187 x 87 x 118 cm 
Running belt: 136 x 48  cm 

Maximum weight of the user - 130 kg 
Voltage: ~ 220-240 V (50/60Hz) 


Prior  to  assembling  this  exercise  machine  and  before  the  start  of  the 
training,  you  should  read  carefully  the  following  instructions.  Safe  and 
effective  use  of  the  equipment  can  be  ensured  only  if  it  is  put  together, 
maintained, and used properly, as described herein. If you are not the user 
yourself,  please  pass this  operation manual  to  all  users  and  inform  them 
about all the hazards and precautions. 
Before  beginning  an  exercise  program,  consult  with  your  doctor  to 
determine whether there are any mental or physical conditions which could 
pose  a  risk  to  your  health  and  safety.  Talking  with  your  doctor  can  also 
protect  you  against  the  improper  use  of  the  equipment.  Your  doctor  will 
determine whether it is suitable to use medications that affect the heart rate, 
blood pressure or cholesterol. 
Pay attention to your body’s signals. Improper or excessive exercises can 
negatively  affect  your  health.  An  exercise  should  be  discontinued 
immediately  if  you  experience  any  of  the  following  symptoms:  pain, 
tightness  in  the  chest,  irregular  pulse,  particularly  shortness  of  breath, 
fainting,  dizziness,  nausea.  If  any  of  these  symptoms  occur,  you  should 
contact your doctor immediately and stop training theretofore.   
Children and pets should be kept away from the equipment. The exercise 
machine is intended only for adults. 
The equipment must be placed on a smooth, solid and hard surface, which 
is secured by a mat or carpet. The exercise machine is intended for internal 
use only. 
Before beginning an exercise program, make sure that all bolts and nuts 
are thoroughly tightened up. Please pay special attention to the parts that 
are most exposed to wear.    
Safety  of  the  equipment  can  be  guaranteed  only  if  it  is  maintained  and 
inspected on a regular basis.     
You should always use the equipment for its intended purpose. If during its 
installation  or  use  whichever  part  proves  to  be  defective,  or  it  produces 
disturbing sounds, you should stop using the equipment and return it to the 

service and repair shop. Damaged parts must be replaced immediately or 
you must stop using the exercise machine until it has been repaired. Do not 
use damaged equipment.    
During your training, you should wear proper exercise outfits. Avoid loose 
clothing that could catch on equipment and cause an injury or clothes that 
could  restrict  or  prevent  your  movements.  Make  sure  to  remove  any 
jewellery during your workout.   
When running, make sure the plastic clip is fastened on your clothing. It is 
for your safety, should you fall or move too far back on the treadmill. Keep 
hands away from all moving parts  
the  equipment  has  been  categorized  as  H  operational  use  class  and  C 
accuracy class, and it is designed exclusively for home use. It cannot be 
used  as  therapeutic  or  rehabilitation  equipment.  The  equipment  is  not 
suitable for therapeutic purposes.  
The maximum permissible weight of the user is 130 kg

’s. 

When  lifting  or  moving  the  equipment,  you  should  maintain  a  proper 
posture to prevent any damage to the spine. 
During  installation  of  the  equipment,  you  must  strictly  adhere  to  the 
enclosed  instructions  and  make  use  of  the  supplied  parts  only.  Before 
installation, check whether all the parts that are contained on the attached 
list, are included.    
It s not recommended to leave any adjustment device, which could interfere 
with the user’s movements, in such a position that protrude any part thereof 
WARNING:  Before  using  the  magnetic  treadmill,  please  read  these 
instructions.  We  do  not  accept  any  liability  arising  from  any  injury  or 
damage to any items that have been caused by misuse of this product. 
WARNING!  Heart  rate  monitoring  system  May  be  inaccurate.  Over 
excercising  May  result  In  serious  injury  or  death.  If  you  feel  faint  stop 
excercising immediately.  
Health injury may result from the incorrect or too intensive training.


ASSEMBLY 

PREPARATIONS 

1. Before assembly make sure there is enough space. 
2. Use the recommended tools.  
3. Before assembly check if there are all the parts in the box.  
It is recommended that product should be assembled by at least two people 
to avoid injuries.  

Most of the assembly equipment listed here has been packed separately, 
but some elements come preassembled in certain assembly parts. If it is 
required, dissassemble them and assemble again.   
Read  the  instructions  of  all  assembly  steps  and  familiarize  with  all  the 
devices installed.


ASSEMBLY INSTRUCTIONS (DRAWINGS 

– P. 4-6) 

ATTENTION! Do not connect the device to the power source until you finish 
the assembly.  

STEP 1

 Take out the main frame from the package box and put it onto the 

floor, and clear all the parts. 

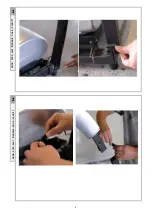
STEP 2

  Connect the signal wire between down pcb and console 

STEP  3

    Insert  the  computer  frame  into  up-right  tube,  and  fasten  it  with 

3pcs M8*20 screws each side, be careful not to break signal wire. 

STEP 4

  Put the up-right tube cover, and fasten it with 3pcs M4*15 screws 

to up-right 
tube each side, then cover it with the other part. 

STEP  5

    Put  the  2pcs  base  frame  cover,  and  fasten  it  with  2pcs  M4*15 

screws each side. 
.


FOLDING  AND TRANSPORT OF THE TREADMILL  

Don't try to move the treadmill if it's not folded and locked. Make sure that 
the  plug  is  disconnected  from  power  supply.  ATTENTION:  Be  sure  the 
power switch is OFF and the power cord is disconnected from the electric 
socket. Hold the rear part with one hand and lift the treadmill belt until the 
steel ball (cylinder) clicks into the locked position. 
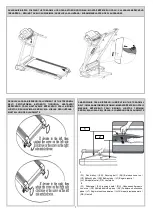
To set the treadmill in the vertical position it is necessary to fold the console 
handles. Then lift the treadmill belt in the direction indicated by the arrow - 
to  the  position  indicated  in  the  Figure.  (p.7).  Hold  the  rear  part  with  one 
hand and pull the cylinder to unfold the treadmill. 

Do not stand underneath the treadmill belt during unfolding. 
IN  ORDER  TO  PREVENT  ANY  INJURIES  DURING  LIFTING  OR 
SETTING  THE  TREADMILL  BE  SURE  YOUR  GRIP  IS  FIRM  AND 
STABLE. 
ATTENTION:  Folded  treadmill  cannot  be  operated  and  utilized.  Stop  the 
treadmill  belt  before  folding  the  equipment.  Folded  treadmill  should  be 
disconnected from power supply. Don't start the treadmill when it's folded. 
To move the treadmill, raise it gently onto the rear transport rolls and move 
it to the desired location, holding on both sides.  

TREADMILL SPOKEY AURIS 

– SPECIFICATION 

SAFETY NOTES

ASSEMBLY, SETUP AND MAINTENANCE 

EN 

Summary of Contents for AURIS

Page 1: ...DIAGRAM SCH MA SCHEMA SH MA 3 PL BIE NIA ELEKTRYCZNA 12 EN ELECTRIC TREADMILL 18 RU 23 CZ ELEKTRICK B ECK P S 29 SK ELEKTRICK BE ECK TRENA R 34 LT ELEKTRINIS B GIMO TAKELIS 39 LV ELEKTRISKS SKREJCE 44...

Page 2: ...2...

Page 3: ...s neigungswinkels 7 Pr dko Speed Rychlost R chlos Greitis trums Geschwindigkeit 8 Pas bie ny Running belt B eck p s Be eck p s B gimo juosta Skrejce a josta Laufband Specyfikacje tego produktu mog si...

Page 4: ...4 1 KROK STEP INGSNIS SOLIS SCHRITT 2 KROK STEP INGSNIS SOLIS SCHRITT...

Page 5: ...5 3 KROK STEP INGSNIS SOLIS SCHRITT 4 KROK STEP INGSNIS SOLIS SCHRITT...

Page 6: ...6 5 KROK STEP INGSNIS SOLIS SCHRITT...

Page 7: ...running board RU CZ Z klad b c ho p su SK Podstavec be eck ho p sa LT B gimo juostos pamatas LV Skrejce a joslas pamats DE Gestell SMAROWANIE PASA BIE NEGO LUBRICATING THE TREADMILL BELT MAZ N B ECK...

Page 8: ...ba m4 15 22 17 Klucz 6mm 1 18 Klucz 5mm 1 19 Olej silikonowy 30ml 1 20 rubokr t 13 14 17 1 LIST OF PARTS nr Nazwa cz ci Opis Szt 1 Base right side cover r l 1 2 Base right side cover r r 1 3 Up right...

Page 9: ...ladny p l 1 2 Prav kryt z kladny p p 1 3 Prav kryt z kladny p l 1 4 Prav kryt z kladny p p 1 5 Lev kryt z kladny l p 1 6 Lev kryt z kladny l l 1 7 Lev kryt z kladny l p 1 8 Lev kryt z kladny l l 1 9 P...

Page 10: ...ik nov olej 30 ml 1 20 Skrutkova 13 14 17 1 KOMPONENT S RA AS Nr Dalies pavadinimas Apra ymas Vnt 1 De inysis pagrindo apdangalas p l 1 2 De inysis pagrindo apdangalas p p 1 3 De inysis kolonos apdang...

Page 11: ...6 x T1 5 14 16 Skr ve m4 x 15 22 17 Atsl ga 6 mm 1 18 Atsl ga 5 mm 1 19 Silikona e a 30 ml 1 20 Skr vgriezis 13 x 14 x 17 1 BERSICHT DER TEILE Nr Name des Teiles Beschreibung St ck 1 Rechte Basisabdec...

Page 12: ...Zaleca si r wnie wiczy w odpowiednim obuwiu sportowym Podczas wiczenia nale y mie przypi ty do ubrania klucz bezpiecze stwa i trzyma si uchwyt w Podczas dzia ania bie ni prosz nie dotyka element w ru...

Page 13: ...znajduj cych si pomi dzy pasem a g wn ram Jest to niezb dne aby bie nia dzia a a prawid owo WY RODKOWANIE PASA BIE NEGO RYSUNEK STR 7 Bie nia jest skonstruowana w taki spos b aby pas bie ny by maksyma...

Page 14: ...la wybranego programu Naci nij by zako czy trening Bie nia b dzie zwalnia a do zupe nego zatrzymania SPEED w trybie u pienia u ywany do ustawienia warto ci W trakcie pracy bie ni przyci ni cie przycis...

Page 15: ...wy p yty za wysoki Wyregulowa moment obrotowy B Zwarcie silnika Wymieni silnik C Silnik ma op r Wyregulowa silnik lub naoliwi E 11 Napi cie wej ciowe przekroczone Wezwa elektryka E 14 Napi cie wej cio...

Page 16: ...wid ow prac mi ni Rozgrzewka redukuje ryzyko powstania skurczu i uszkodzenia mi nia Zalecane jest wykonanie kilku wicze rozci gaj cych zgodnie z rysunkami przedstawionymi poni ej Ka da pozycja powinna...

Page 17: ...When lifting or moving the equipment you should maintain a proper posture to prevent any damage to the spine During installation of the equipment you must strictly adhere to the enclosed instructions...

Page 18: ...necessary The procedures are as below First set speed at lowest position Second check the belt shifts to which side If the belt shifts to right tighten the right bolt and loosen the left bolt by usin...

Page 19: ...While in operation pressing the buttons increases decreases the inclination angle by 1 level Pressing the button for more than 5 seconds will make the value increase decrease in continuous mode DISPL...

Page 20: ...your heart rate will be shown on the mobile phone or tablet The running speed can then be adjusted to your heart rate You can also control the speed with your hand gestures PLACING THE TREADMILL SCOP...

Page 21: ...strain your muscles It is recommended to train at least three times a week HOW TO GET OFF THE TREADMILL a standard stopping procedure Press the STOP button Attention Wait till the running belt is comp...

Page 22: ...22 www spokey eu 187 x 87 x 118 cm 136 x 48 cm 130 220 240 V 50 60Hz 2 H C 130 1 2 3 P C 4 6 1 1 2 M8 20 M8 40 2 3 M8 20 4 M4 15 5 M4 15 SPOKEY AURIS RU...

Page 23: ...23 www spokey eu P C 7 P C 7 6 P C 7 50 120...

Page 24: ...24 www spokey eu START STOP 3 Start START STOP INCLINE SPEED 0 16 15 levels 5 30 START STOP START STOP 10 START 3 SPEED 0 1 5 INCLINE 1 5 SPEED TIME INCLINE 0 16 SPEED 3 START STOP...

Page 25: ...25 www spokey eu B D E F A IC B C IC A B C E00 E07 A B E01 E13 A B C D E02 A Przew d silnikowy le po czony B IGBT C E04 A B C E05 A A C D E 06 A E 08 A IC B IC IC E 09 A B E 10 B A E 11 E 14...

Page 26: ...26 www spokey eu GFIT APP a QR Gfit Google Play Apple store Android store b Bluetooth Gfit c Bluetooth d e Free Run f GFIT APP Bluetooth 8 2 2 x 1 10 15 5 BLUETOOTH...

Page 27: ...27 www spokey eu a STOP b WEE...

Page 28: ...a n za zen Za zen nen vhodn pro terapeutick ely B eck p s je ur en pro dom c pou it Maxim ln p pustn hmotnost u ivatele in 130 kg B hem zved n a p en en za zen je nutn db t na spr vn postoj aby nedo l...

Page 29: ...Norm ln vlastnost p s je to e kdy jsou v pohybu tak se pohybuj u jednoho z okraj Po n kolika minut ch se p s s m vycentruje Jestli e se b hem pou v n p s i nad le pohybuje bl e okraje pak je nutn prov...

Page 30: ...m re imu INFORMACE NA DISPLEJI SPEED aktu ln rychlost TIME okno zobrazuje hodnotu ozna enou sv t c diodou tr ninkov as b hem aktu ln tr ninkov jednotky INCLINE okno zobrazuje hodnotu ozna enou sv t c...

Page 31: ...m na J m ete sp rovat p ipojen k chytr m hodink m nebo jin m za zen m Po nastaven v ech parametr m ete za t b hat vyberte si cyklus b hu v tr ninkov m programu nebo za n te b hat podle sebe POU V N T...

Page 32: ...ochlazen sval Je to opakov n rozcvi ky a mus trvat zhruba 5 minut Nutno zopakovat protahovac cviky maje na pam ti to e nep et ujeme svaly Je doporu eno tr novat alespo t ikr t v t dnu SESTUP Z B ECK...

Page 33: ...n ania zariadenia udr ujte pr slu n polohu tela aby nedo lo k po kodeniu Va ej chrbtice Po as mont e zariadenia dodr ujte prilo en n vod a pou vajte v lu ne s iastky ktor boli dodan spolu so zariaden...

Page 34: ...ej pres va pri jednej z hr n nevyhnutn je regul cia Vykon vajte ju t mto sp sobom Nastavte najni iu r chlos Overte si na ktorej strane vod tka sa p s pohybuje bl zko ktorej hrany ko ajnice Ak sa be ia...

Page 35: ...lh ie ako 5 sek nd sp sob e bude hodnota r s klesa v nep etr itom re ime DAJE NA OBRAZOVKE SPEED moment lna r chlos TIME okno zobrazuje hodnotu ozna en svietiacou di dou tr ningov as po as aktu lnej t...

Page 36: ...ograme alebo za nite beha pod a seba POU VANIE VYBAVENIA GFIT APP Vyu itie chytr ho n ramku Ako pou va funkciu riadenia r chlosti pomocou samotn ho pohybu ruky Po pripojen chytr ch hodiniek alebo in c...

Page 37: ...om si pam tajte e nesmiete presilova svaly Odpor a sa tr ning aspo trikr t t denne ZOSTUPOVANIE Z BE ECK HO P SA a z kladne zostupovanie Stla te tla idlo STOP Upozornenie akajte a sa be eck p s plne...

Page 38: ...aikyti tinkam pozicij kad nepa eist stuburo Montuojant rengin privaloma tiksliai laikytis prid tos instrukcijos ir naudoti tik rinkinyje esan ias dalis Prie pradedant montuoti reikia patikrinti ar vis...

Page 39: ...io Jeigu juosta juda prie de inio kra to prisukite de in var t ir paleiskite kair naudodami 6 mm e iakamp rakt iki momento kai juosta susicentruos Jeigu juosta juda prie kairio kra to prisukite kair v...

Page 40: ...elyje yra rodoma diodo ap viesta vert b gimo dir o nuolyd io kampas arba aktualus pulso lygis treniruot s metu Nor dami gauti tinkam matavim lieskite abu pulso jutiklius tuo pat metu Rodmuo pasirodys...

Page 41: ...tidarykite Gfit ir prisijunkite bet pirmiausia priregistruokite savo el pa to adres c Paspauskite a norint sujungti b gtak per Bluetooth d Nustatykite b gimo cikl pagal savo am i auk t lyt ir pan e Nu...

Page 42: ...stang Su laiku reguliariai treniruojant Tavo koj raumenys taps labiau elastingi Reikia mank tintis pagal savo temp bet svarbu kad pastoviai palaikyt t pat temp Poilsis leid ia atgauti normal puls ir a...

Page 43: ...instrukcija un j lieto tikai komplekt eso as sast vda as Pirms mont as j p rbauda vai komplekt ir visas sast vda as kas nor d tas saist t sarakst Neieteicams palikt regul anas ier ces kas var tu trauc...

Page 44: ...Pieskr v t mugurpuses rulli tik stipri lai josla nevar tu sl d t uz priek puses ru a Delik ti regul t abas skr ves labu un kreisu pulkste r d t ja kust b s virzien un kontrol t attiec gu joslas sprie...

Page 45: ...DZAMA INFORM CIJA SPEED pa reiz jais trums TIME ekr na lodzi par d s ar gaismas diodi izgaismotas v rt bas treni a ilgums Incline ekr na lodzi par d s ar gaismas diodi izgaismotas v rt bas pa reiz j t...

Page 46: ...niet t lrun vai plan etdator atveriet Gfit un autoriz jieties bet vispirms re istr jiet savu e pasta adresi c Nospiediet ja lai sap rotu skrejce i u izmantojot Bluetooth d Iestatiet skr jiena ciklu at...

Page 47: ...5 min tes J atk rto izstiep an s vingrojumi atceroties par to lai nesasprindzin tu musku us Ieteicams tren t vismaz tr s reizes ned Lai izk ptu no skrejce a piem ja ier ce nepareizi darbojas vai par d...

Page 48: ...lichen Elemente des Laufbandes ber hren wenn die Anlage in Betrieb ist Das Ger t ist der Klasse H und C zugeordnet und ist ausschlie lich f r den Hausgebrauch bestimmt Es darf weder f r Therapie noch...

Page 49: ...ts runtergehen stellen Sie die Schraube auf der rechten Seite im Uhrzeigersinn ein oder die Schraube auf der linken Seite gegen den Uhrzeigersinn Wenn Sie nach links runtergehen dann Stellen Sie die S...

Page 50: ...das Laufbahn in den Ruhezustand der Z hler schaltet aus Um das Laufbahn wieder zu bet tigen dr cke eine beliebige Taste TASTEN FUNKTIONEN START STOP dr cken um mit dem Training zu beginnen 3 Sekunden...

Page 51: ...uptplatine austauschen E02 A Motorkabel falsch angeschlossen Trennen und Wiederverbinden B IGBT in der Platine defekt Platine austauschen C Eingangsspannung zu niedrig Nicht mehr benutzen und den Elek...

Page 52: ...das Laufen ersetzen siehe nachfolgende Abbildungen Zu intensives oder nicht richtiges Training kann zu Verletzungen f hren Befolgung des TRAININGSZYKLUS hat viele Vorteile f r die Gesundheit physisch...

Page 53: ...se Ger te anderweitig zu entsorgen Verbraucher d rfen ausgediente Elektroger te nun nicht mehr in den Hausm ll werfen sondern m ssen diese an speziellen Sammelstellen abgeben Zu diesem Zweck soll der...

Page 54: ...54 www spokey eu...
Reviews: