background image

| 11

EN | instructioni

EN  USE’S MANUAL

1. IMPORTANT 

     SAFETY INFORMATION                                     

Thank you for purchasing the Magnetic Bike. Before operating this unit, please 

read this manual carefully to ensure optimum performance and safety.

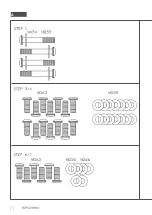
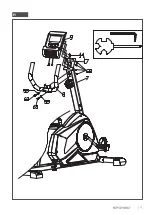
2. HARDWARE TOOLS FOR INSTALLATION

     (see fig A): 

1.  Be aware of your body’s signals. Incorrect or excessive ex-

ercise can damage your health. If you do experience any of 
these conditions you should consult your  doctor   before con-
tinuing with your exercise program.

2.  Keep children and pets away from the equipment. The equip-

ment is designed for adult use only. 

3.  Use the equipment on a solid, flat level surface with a pro-

tective cover for our floor or carpet. For safety, the equipment 
should have at least 0.5 meter of free space all around it.

4.  Before using the equipment, check the nuts and bolts are 

securely tightened. Some parts like pedals, etc. It’s easy to 
be ware away.

5.  Always use the equipment as indicated. If  you find any 

defective components whilst assembling or checking the 
equipment, or if you hear any unusual noise coming from the 
equipment during use, stop. Do not use the equipment until 
the problem has been rectified.

6.  Wear suitable clothing whilst using the equipment. 

Avoid wearing loose clothing which may get caught in 
the equipment or that may restrict or prevent movement. 

7.  The equipment has been tested and certified to EN957 under 

class H.C.  

Suitable for domestic, home use 

only.

 Maximum user weight 120 kg.

8.  The equipment is not suitable for therapeutic use.

3. ASSEMBLING INSTRUCTIONS
STEP 1 (see fig B):

•  Screw out all the screw (54) and flat washer (55) on the front 

stabilizer (2) and the rear stabilizer (3) by the Allen wrench and 
keep them well. 

Attach the front stabilizer (2) which is with transport wheel to the 
main frame (1) and fix it by wrench tightly with the kept hardwa-
re. Then attach and fix the rear stabilizer (3) to the main frame (1) 
in the same way

STEP 2 (see fig C):

Fix the pedal (11L) which is marked „L” onto the crank (26) marked 
„L” side by spanner tightly in anticlockwise; and then fix the pedal 

(11R) which is marked „R” onto the crank (26) marked „R” side by 
spanner tightly in clockwise.

STEP 3 (see fig D):

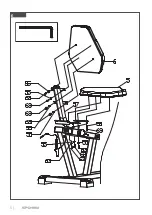
•  Screw out all the screw (63) and flat washer (55) on the saddle 

adjusting tube (4) by the  wrench and keep them well. 

•  Fix the saddle adjusting tube (4) on the main frame (1) with the 

screw (63) and flat washer (55) by wrench tightly.

STEP 4 (see fig E):

Fix the saddle (5) and back cushion (6) on the saddle support set 
(57) with screw (63) and flat washer (55) as shown separately and 
tightly by wrench.

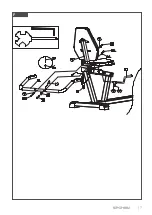
STEP 5 (see fig F):

•  Fix the rear handle bar (81) onto the saddle support set (57) 

with screw (58), curved washer (66) and cap nut (56) by wrench 
tightly.

•  Connect the pulse sensor wire (16&19) together correctly.

STEP 6 (see fig G):

•  Connect the console wires (14&15) together carefully. Also 

connect the sensor wires (16&17) and resistance adjusting 
wire(18&21) correctly. Please ensure that all the pins are stra-
ight when connecting 14 & 15, 16&17 and 18&21. Failure to do 
so will result in console malfunction.

•  Put the front post (7) on the main frame (1) as shown and ti-

ghten it with Screw (63) and flat washer (55) & curved washer 
(66) tightly by wrench.

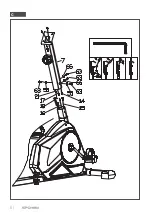
STEP 7 (see fig H):

•  Fix the handle bar (8) on the front post (7) with flat washer (55) 

and screw (63) tightly.

•  Connect the console wire-top(14), pulse sensor wire –top (17) 

together with the wire on the console (9) correctly, please ensu-
re that all the pins are straight when connecting. 

•  Fix the console (9) on the plate of the front post (7) with the 

screws (68) tightly.

Caution:

 Now the equipment is completed assembled, if you find 

it not leveled on the floor, you can adjust it by the adjusting re-
ar stabilizer tube plug(13). Make sure you have tightened all the 
screws and nuts well before beginning your workout.

Summary of Contents for SPECUS 928658

Page 1: ...Magnetick rotoped Magnetisches Heimtrainer Magnetick bicykel Magneettinen kiinte kuntopy r mag SPECUS 928658 EN PL CZ DE SK FI Magnetni stacionarni bicikl Magnetinis dviratis Magn tisks velotrena ier...

Page 2: ...2 A...

Page 3: ...3...

Page 4: ...4 B C...

Page 5: ...5 D...

Page 6: ...6 E...

Page 7: ...7 F...

Page 8: ...8 G...

Page 9: ...9 H...

Page 10: ...10 E...

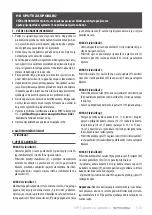
Page 11: ...nsportwheeltothe mainframe 1 andfixitbywrenchtightlywiththekepthardwa re Thenattachandfixtherearstabilizer 3 tothemainframe 1 inthesameway STEP 2 seefigC Fixthepedal 11L whichismarked L ontothecrank 2...

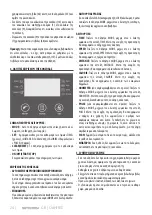
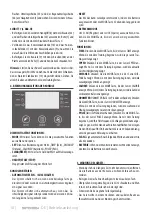
Page 12: ...ress the MODE key until the pointer advance to DISTANCE The distance of each workout will be displayed CALORIE PresstheMODEkeyuntilpointerlockontoCALORIE The calorie burned will be displayed when star...

Page 13: ...zem u ywaj c uprzednio wykr conych element w cznikowych Analogicznie zamocowa i przykr ci do ramy g wnej 1 sta bilizatortylny 3 WA NA INFORMACJA Dzi kujemy za zakup naszego produktu Prosimy o uwa ne p...

Page 14: ...ycisk MODE a kursor wska e polecenie TIME Po rozpocz ciu wicze b dzie pokazywany ca kowity czas wiczenia SPEED Naciska przycisk MODE a kursor wska e polecenie SPEED Po rozpocz ciu wicze b dzie pokazyw...

Page 15: ...n p epravn m kole kem na hlavn rameno 1 a pevn jej p i roubujte po moc p edem vy roubovan ch upev ovac ch prvk Stejn tak upevn te a p i roubujte zadn stabiliz tor 3 k hlavn mu r mu 1 KROK 2 vizobr C P...

Page 16: ...terii z konzoly aby se nevyb jela Rotoped byste m li asto istit ist m had kem Pravideln kontrolujte zda rouby a matice jsou pevn upevn ny Pohybliv sti pravideln promaz vejte P stroj by m l b t skladov...

Page 17: ...schr nken oder verhindernkann 7 Das Ger t wurde nach EN957 der Klasse H C gepr ft und zerti fiziert Nur f r den Hausgebrauch geeignet MaximalesBenutzergewicht120kg 8 DasGer tistnichtf rtherapeutischeZ...

Page 18: ...s Fahrrad l ngere Zeit nicht benutzt wird entfernen Sie die Batterie aus der Konsole um ihren Verbrauch zu ver meiden Reinigen Sie das Fahrrad h ufig mit einem sauberenTuch berpr fen Sie regelm ig ob...

Page 19: ...yvarujte sa nosenia vo n ho oble enia ktor by sa mohlo zachyti v zaria den aleboktor bymohloobmedzova alebobr ni vpohybe 7 Zariadenie bolo testovan a certifikovan v s lade s EN957 v triede H C Je vhod...

Page 20: ...a Zariadenie by sa malo skladova v suchej a istej miestnosti mimo dosahu det 5 DR BAZARIADENIA PREV DZKA KONZOLY AUTOMATICK ZAPNUTIE VYPNUTIE Syst m sa zapne ke stla te ktor ko vek tla idlo alebo ke s...

Page 21: ...ess silaitetta V lt l ysienva atteiden k ytt jotka voivat tarttua laitteeseen ja rajoittaa tai est liikkumista 7 Laitteet on testattu ja sertifioitu standardin EN957 muka isesti luokassa HC Soveltuu v...

Page 22: ...omennon Kun aloitetaan harjoittelu nykyinen no peus n ytet n ET ISYYS Paina MODE painiketta kunnes osoitin osoittaa DISTANCE komennon Kun aloitat harjoituksen nykyinen nopeus n ytet n CALORIE Paina MO...

Page 23: ...A 3 1 B 54 55 2 3 2 1 1 1 2 3 0 5 4 5 6 7 EN957 H C 120 8 3 1 2 C 11L L 26 L 11R R 26 R 3 D 63 55 4 4 1 63 55 4 E 5 6 57 63 55 5 F 81 57 58 66 56 16 19 6 G 14 15 16 17 18 21 14 15 16 17 18 21 7 1 63 5...

Page 24: ...13 4 MODE SET TIME DISTANCE CALORIES PULSE CLEAR RESET ON OFF START STOP TIME MODE TIME SPEED MODE SPEED DISTANCE MODE DISTANCE CALORIE MODE CALORIE ODOMETER MODE ODOMETER PULSE MODE PULSE 30 SCAN 4...

Page 25: ...varaju uodje udokkoristiteopremu Izbjegavajte no enje labave odje e koja bi mogla biti uvu ena u ure aj ili kojamo eograni itiilisprije itikretanje 7 OpremajetestiranaicertificiranauskladusEN957ukateg...

Page 26: ...Nakon po etka vje be pokazivat e trenutne brzine DISTANCE Pritisnite na tipku MODE dok pokaziva ne poka e DISTANCE Nakon po etka vje be pokazivat e pre ene udalje nosti Ako se bicikl ne e koristiti d...

Page 27: ...kuriegalib ti traukti rengin arbakuriegali apribotiaru kirstikeli jud jimui 7 rangabuvoi bandytairsertifikuotaH C klas jepagalEN957 Tinkanaudotitiknamuose Did iausiasnaudotojo svoris 120kg 8 8 rangane...

Page 28: ...Sistema sijungia paspaudus bet kur mygtuk arba kai grei io jutiklis pradeda perduoti signal Sistema automati kai i sijungia kai grei io signalas neperdu odamas arba 4 minutes nespaud iamas joks mygtuk...

Page 29: ...e ir test ta un sertific ta atbilsto i standartam EN957 H C klas T ir paredz ta tikai lieto anai m j saimniec b s Maksim lais lietot ja svars ir 120 kg 8 Ier ce nav paredz ta terapeitiskam lietojumam...

Page 30: ...u MODE l dz kur sorsr dakomandu ODOMETER P cvingro anass k anastiek r d ta kop j distance kas nobraukta vingro anas laik PULSE ja pieejams nospiediet pogu MODE l dz kursors r da komandu PULSE P c ving...

Page 31: ...possamficarpresasnodispositivoouquepos samrestringirouimpediromovimento 7 O equipamento foi testado e certificado de acordo com a EN957 na classe H C Adequado apenas para uso dom stico e dom stico Pes...

Page 32: ...cio a dist ncia total percorrida durante o exerc cio ser mostrada PULSE caso presente no produto Pressione o bot o MODE at o cursor indicar PULSE Quando come ar a se exercitar sua freq nciacard acase...

Page 33: ...U 2 A 3 1 B 54 55 2 3 2 1 1 1 2 3 0 5 4 5 6 7 EN957 H C 120 8 3 1 2 C 11L L 26 L 11R R 26 R 3 D 63 55 4 4 1 63 55 4 E 5 6 57 63 55 5 F 81 57 58 66 56 16 19 6 G 14 15 16 17 18 21 14 15 16 17 18 21 7 1...

Page 34: ...7 H 8 7 63 55 14 7 9 9 7 68 13 TIME MODE TIME SPEED Naciska przycisk MODE a kursor wska e polecenie SPEED Po rozpocz ciu wicze b dziepokazywanabie capr dko DISTANCE MODE SPEED CALORIE MODE CALORIES O...

Page 35: ...35...
Page 36: ...owice Polska tel 48323172000 www spokey pl www spokey eu e mail biuro spokey pl office spokey eu DISTRIBUTOR Spokeys r o Sadov 618 73801Fr dek M stek esk republika www spokey cz Kanluxs r o M R tef ni...

Reviews: