4
1-800-732-0144
WWW.SPORTDOG.COM
5
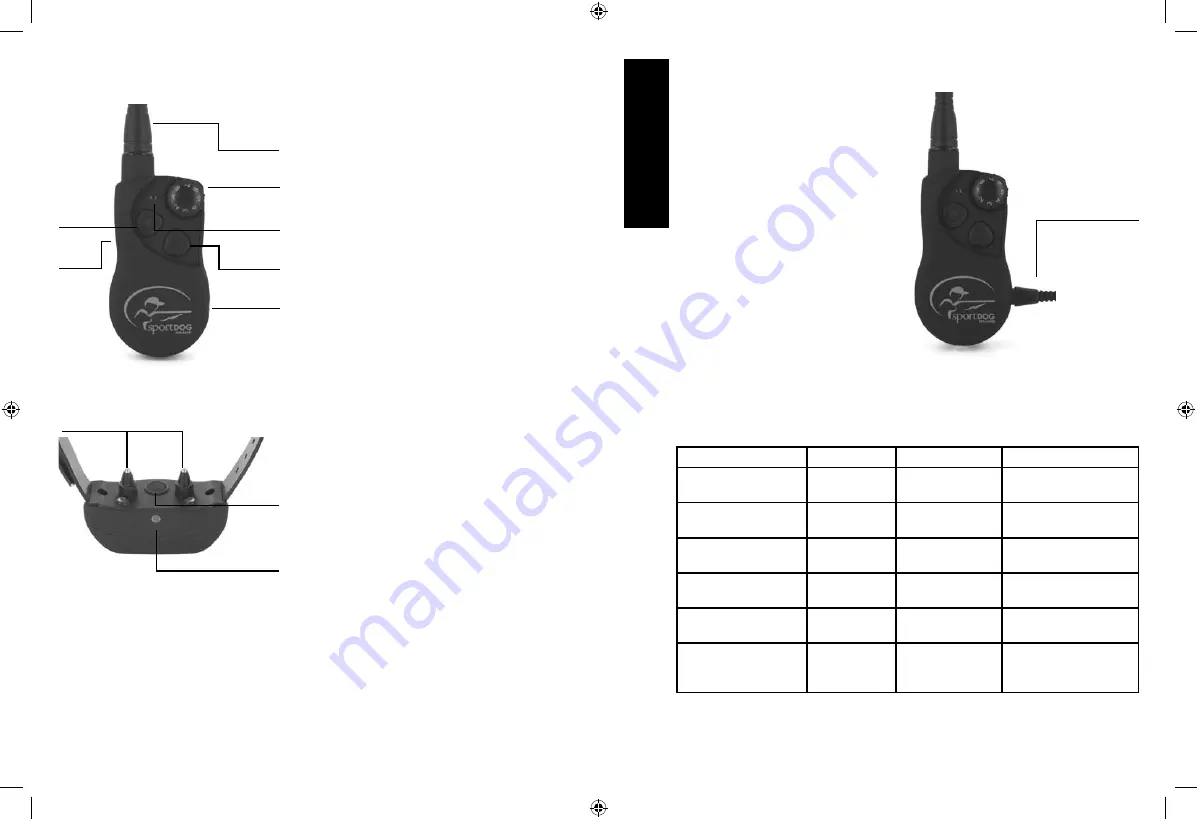
KEY DEFINITIONS
REMOTE TRANSMITTER:
Transmits the radio signal
to the Collar Receiver. It is waterproof and can be
submerged in water to a depth of 25 feet.
INTENSITY DIAL:
Provides multiple levels of stimulation
so you can match the correction to your dog’s
temperament.
TRANSMITTER INDICATOR LIGHT:
Indicates that a
button is pressed and also serves as a low-battery
indicator.
UPPER BUTTON:
This button is factory-set to deliver
continuous stimulation.
LOWER BUTTON:
This button is factory-set to deliver
momentary stimulation, or a “Nick.”
SIDE BUTTON:
This button is factory-set to deliver a
tone without stimulation.
CHARGING JACK:
For connecting the charger. Although
the Remote Transmitter is waterproof without it, keep
the cover in place when not charging to keep debris out
of the opening.
COLLAR RECEIVER:
Receives the radio signal from
the Remote Transmitter and delivers the stimulation,
vibration and/or a tone for correcting your dog. It is
waterproof and can be submerged in water to a depth of
25 feet.
RECEIVER INDICATOR LIGHT:
Indicates when the Collar
Receiver has been turned on or off and also serves as a
low-battery indicator.
CONTACT POINTS:
The contacts through which the
Collar Receiver delivers stimulation.
ON/OFF BUTTON:
Momentarily pressing and releasing
this button turns the Collar Receiver on and off.
THE COLLAR RECEIVER IS CAPABLE OF DELIVERING FOUR TYPES OF STIMULATION VIA THE CONTACT POINTS:
CONTINUOUS:
You control both when and how long stimulation is delivered, up to a maximum of 10
seconds. After 10 seconds, the stimulation will “time out” and the Transmitter button needs to be
released and then pressed again before additional stimulation can be delivered.
MOMENTARY (NICK):
Stimulation is delivered for 1/10 of a second, regardless of how long the button is
pressed.
TONE:
The Collar Receiver will make a rapid beeping noise when a Tone button is pressed, up to a
maximum of 10 seconds.
VIBRATION:
The Collar Receiver will vibrate when a Vibration button is pressed, up to a maximum of
10 seconds.
PREPARE THE REMOTE TRANSMITTER
CHARGE THE REMOTE TRANSMITTER
NOTE: Approximate battery life between charges is 40 to 60 hours, depending on frequency of use.
TRANSMITTER INDICATOR LIGHT
OPERATIONAL MODE
LIGHT COLOR
BATTERY STATUS
LIGHT FUNCTION
Continuous stimulation or
Tone only button pressed
Green
Good
Light is solid in color while
button is pressed
Continuous stimulation or
Tone only button pressed
Red
Low
Light is solid in color while
button is pressed
Momentary stimulation
button pressed
Green
Good
Light flashes once and
turns off
Momentary stimulation
button pressed
Red
Low
Light flashes once and
turns off
Unit is charging
Red
Low
Light is solid in color while
on the charger
Unit is fully charged
(charger still connected)
Green
Good
Light flashes once per
second once the battery is
completely charged
REMOTE TRANSMITTER
COLLAR RECEIVER
CHARGER
CONNECTOR PLACED
IN THE REMOTE
TRANSMITTER
CHARGING JACK
1. Lift the rubber cover protecting
the Charging Jack.
2. Connect one of the charger
connectors to the Charging Jack.
3. Plug the charger into a standard
120-volt AC wall outlet.
4. Charge the Remote Transmitter for
2 hours for the first charge and
every charge thereafter.
Using Li-Ion technology, the
Remote Transmitter only requires
a 2 hour charge. It is not harmful
to let the unit charge for more than
2 hours.
5. When charging is complete,
replace the rubber cover.
S
TE
P
::
01
TRANSMITTER
INDICATOR LIGHT
INTENSITY
DIAL
TRANSMITTER
ANTENNA
UPPER
BUTTON
LOWER
BUTTON
SIDE
BUTTON
CHARGING
JACK
CONTACT POINTS
RECEIVER
INDICATOR
LIGHT
ON/OFF
BUTTON
400-1155.indd 4-5
7/13/09 1:05:47 PM


