background image


28 


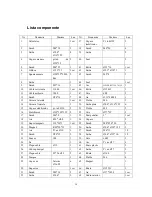
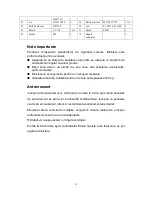
Lista componente


Nr. 

Denumire 

Marime 

buc. 

Nr. 

Denumire 

Marime 

buc. 

Calculator 


1set 

37 

Capace 

stabilizator 

Pt. tub Ø38   

Surub 

M8*30 

38 

Surub 

M8*50 

Saiba 

Ø8.4* 

Ø16*1.5T 

39 

Saiba 


Capace manere 

pt.tub 

de 

Ø22*1.5 

40 

Lant 


Surub 

M4*25 

41 

Rotita 

Ø35*16 

1set 

Ghidon 

Ø 22*1.5 

1set 

42 

Saiba 

Ø5.3* Ø10*1 

Spuma manere 

Ø20*5T*280L 

hdr 

43 

Surub 

M5*8 

Saiba 


44 

Lant 


1set 

Surub 

M5*16 

45 

Arc 

OD Ø10.5*55L* Ø1.5 

10 

Cablu rezistenta 

1100L 

1set 

46 

Rotita 

Ø150 J3 

11 

Cablu mijlociu 

1000 

47 

Osie 

608 

12 

Surub 

ST4*16 

48 

Ax 

Ø 11*94 M8 

13 

Carcasa laterala 


1set 

49 

Piulita 

M6 

14 

Carcasa frontala 


50 

Saiba plata 

Ø8.4* Ø 16*1.5T 

15 

Capace stabilizator 

pt. tub Ø38   

51 

Piulita 

M8 

16 

Stabilizaror 

Ø38*390*1.5T  2 

52 

Osie 

Ø77*3T 

17 

Surub 

M6*8 

53 

Brat pedalier 

5” 

1set 

18 

Arc 

45L* Ø0.8 

54 

Capace 


19 

Suport magneti 

118*20*3 

1set 

55 

Surub 

M8*P1.0*20 

20 

Magneti 

R95*20*13 

56 

Saiba 

Ø8.4* Ø20*1.5T 

21 

Arc 

Pt. ax Ø10   

57 

Surub 

M6*12 

10 

22 

Surub 

ST4*12 

58 

Saiba 

Ø6.4* Ø12*1.0 

10 

23 

Senzor 

100 

59 

Osie 

6003 

24 

Sa 


60 

Arc 

Pt. ax Ø17   

25 

Clapa-cablu 

Ø12 

61 

Foaie plastic 


26 

Cadru principal 


62 

Saiba 

Pt. ax Ø17   

27 

Clapa-cablu 

22*26 Ø12 

63 

Roata   

Ø160 

28 

Tampon 


64 

Piulita 

M6 

29 

Capac ax 

Interior 

Ø16.05 

65 

Magnet 


30 

Suport sa 


1set 

66 

Roata 

Ø155 J3 

31 

Surub 

M8*16 

67 

Ax 

Ø17*149.5 

1set 

32 

Saiba 

Ø8.4* 

68 

Cadru interior 


1set 

Summary of Contents for SM1223

Page 1: ...User manual SM1223 Magnetic exercise bike Xbike Sportmann www sport mag ro EN...

Page 2: ...3 Assembly Instruction 5 7 4 Operation Instruction 8 5 Computer Operation Instruction 8 6 Small Explosion Diagram 9 7 Big Explosion Diagram 10 8 Explosion Diagram Parts Name 11 9 Important Notes 12 1...

Page 3: ...oid wearing loose clothing which could get caught in the moving parts of the device 4 Stop exercising immediately when you feel unwell and lie down to rest 5 Ensure that only one person can use the fi...

Page 4: ...3 Finished Structure...

Page 5: ...4 Main Structure Hardware Bag...

Page 6: ...me 68 in a clockwise direction as shown by the arrow 2 then insert the positioning pin 34 to another hole as shown in Figure 2 Step2 Install the front and rear stabilizers to the main frame Attach the...

Page 7: ...Then as shown in figure 2 penetrate the other end of the foot buckle fasteners into the hole of the pedal in the direction of arrow 3 You can select the appropriate hole position based on individual...

Page 8: ...ube 30 into the main frame Then tighten the seat tube with the locknut and fasten the seat post 24 to the seat tube 30 with the wrench of tool box Step 6 Install the computer Fasten the computer base...

Page 9: ...ching Adjust the torque Rotate the knob to adjust the resistance of the magnetic wheel Computer Operation Instruction 1 display description Time 00 00 99 59 MIN SEC Speed 0 0 999 9KM H OR ML H Distanc...

Page 10: ...E cycles like this If it is the ODO PULSE function does not exist it will automatically skip Time Exercise to remember time Automatically Speed Display the current speed Distance Cumulate distance whe...

Page 11: ...10 Big Explosion Diagram...

Page 12: ...Earth tube 38 390 1 5T 2 52 Axletree steel 77 3T 2 17 Cross screw M6 8 1 53 R L pole 5 1set 18 Press spring 45L 0 8 1 54 Cover 2 19 Magnetic stand 118 20 3 1set 55 Screw M8 P1 0 20 2 20 Magnetic R95 2...

Page 13: ...week Begin with short periods per exercise and then increase these continually Start slowly with the exercise sessions and don t set yourself impossible targets In addition to these exercises do other...

Page 14: ...ing exercises Is your physical fitness enough age Heart rate bpm Limit bpm 20 100 150 200 25 98 146 195 30 95 142 190 35 93 138 185 40 90 135 180 45 88 131 175 50 85 127 170 55 83 123 165 60 80 120 16...

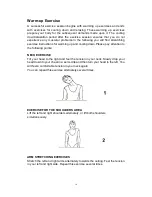
Page 15: ...d cooling down Please pay attention to the following points NECK EXERCISE Tilt your head to the right and feel the tension in your neck Slowly drop your head down to your chest in a semi cirle and the...

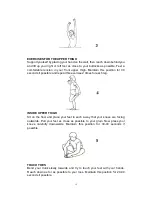
Page 16: ...ible and repeat this exercise 2 times for each leg INSIDE UPPER THIGH Sit on the floor and place your feet in such a way that your knees are facing outwards Pull your feet as close as possible to your...

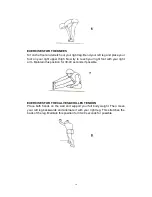
Page 17: ...h your right foot with your right arm Maintain this position for 30 40 seconds if possible EXERCISES FOR THE CALVES ACHILLES TENDON Place both hands on the wall and support your full body weight Then...

Page 18: ...17 Manual de utilizare SM1223 Bicicleta fitness magnetica Xbike Sportmann www sport mag ro RO...

Page 19: ...Schema 20 3 Instructiuni de asamblare 22 24 4 Instructiuni de utilizare 25 5 Calculator 25 6 Diagrama 26 7 Diagrama detaliata 27 8 Lista componente 28 9 Note importante 29 10 Program de antrenament p...

Page 20: ...s ar putea agata in componentele mobile ale bicicletei 4 Opriti va imediat daca va simtiti rau si intindeti va pentru a va odihni 5 Este interzis ca mai multe persoane sa foloseasca bicicleta in acel...

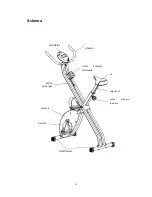
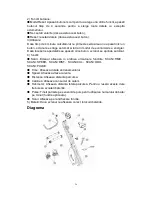
Page 21: ...20 Schema ghidon rotita ajustare rezistenta sa suport sa rotita ajustare inaltime stabilizatori calculator cadru principal carcasa pedala...

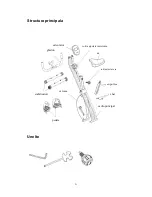
Page 22: ...21 Structura principala Unelte rotita ajustare rezistenta sa rotita ajustare sa suport sa chei cadru principal pedale carcasa stabilizatori calculator ghidon...

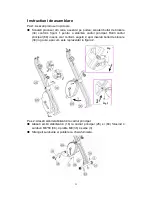
Page 23: ...principal Rotiti cadrul principal 68 in sens orar conform sagetii 2 apoi inserati boltul de blocare 34 in gaura asa cum este reprezentat in figura 2 Pas 2 Atasati ambii stablilizatori la cadrul princi...

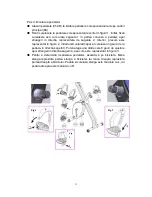
Page 24: ...or precum este reprezentat in figura 2 introduceti celalalt capat al curelusei in gaura de la pedala in directia sagetii 3 Puteti alege una dintre cele 6 gauri de ajustare apoi strangeti in directia s...

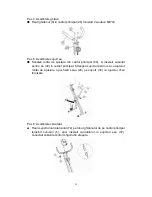
Page 25: ...suportul pentru sa 30 in cadrul principal Strangeti suportul pentru sa cu ajutorul rotitei de ajustare apoi fixati saua 24 pe suport 30 cu ajutorul cheii furnizate Pas 6 Asamblare calculator Fixati s...

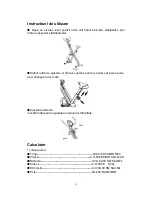
Page 26: ...ustare si ridicati suportul pentru sa atat cat este nevoie apoi strangeti la loc rotita Ajustati rezistenta Invartiti rotita pentru ajustarea nivelului de dificultate Calculator 1 afisaj ecran Timp 00...

Page 27: ...i sa pedalati sau apasati orice buton ecranul se aprinde automat 4 functii Scan Ecranul afiseaza in ordinea urmatoare functiile SCAN TIME SCAN SPEED SCAN DIST SCAN CAL SCAN ODO SCAN PULSE Time Afiseaz...

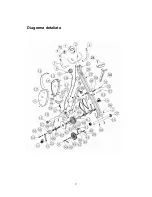
Page 28: ...27 Diagrama detaliata...

Page 29: ...49 Piulita M6 2 14 Carcasa frontala 1 50 Saiba plata 8 4 16 1 5T 6 15 Capace stabilizator pt tub 38 2 51 Piulita M8 2 16 Stabilizaror 38 390 1 5T 2 52 Osie 77 3T 2 17 Surub M6 8 1 53 Brat pedalier 5...

Page 30: ...ptome neobisnuite opriti va imediat Bicicleta nu este potrivita pentru uz in scopuri medicale Greutatea maxima a utilizatorului nu trebuie sa depaseasa 120 kg Antrenament Incepeti antrenamentul usor A...

Page 31: ...55 83 123 165 60 80 120 160 65 78 116 155 70 75 113 150 Exercitii de incalzire Un program de antrenament corect trebuie sa includa si exercitii de incalzire si relaxare pentru a pregati corpul pentru...

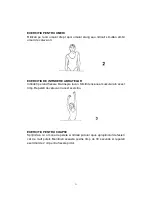
Page 32: ...OR Intindeti pe rand fiecare brat inspre tavan Simtiti tensiunea musculara in acest timp Repetati de cateva ori acest exercitiu EXERCITIU PENTRU COAPSE Sprijiniti va cu o mana de perete si ridicati pi...

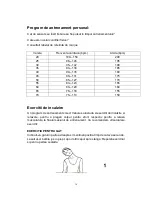
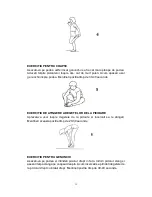
Page 33: ...nde EXERCITIU DE ATINGERE A DEGETELOR DE LA PICIOARE Aplecati va usor inspre degetele de la picioare si incercati sa le atingeti Mentineti aceasta pozitie timp de 20 30 secunde EXERCITIU PENTRU GENUNC...

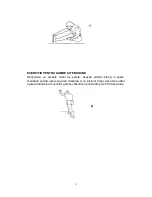
Page 34: ...OANE Sprijiniti va cu ambele maini de perete Asezati piciorul stang in spate mentineti pozitia apoi executati miscarea si cu piciorul drept Aceasta pozitie ajuta la intinderea muschilor gambei Mentine...

Reviews: