background image

MAINTAINING THE C50U BIKE

GUIDELINES FOR EXERCISE

The Sports Art C50U requires little maintenance but regular cleaning is
recommended to keep your bike at peak performance. Before your workout, use a
dry cloth to clean the surface of the display.

NOTE: NEVER POUR LIQUIDS ON THE DISPLAY.

To clean plastic parts, use a mild detergent, and make sure the unit is completely dry
before operating it.

It is recommended that you keep all liquids away from the unit during operation.
Spillage of liquids onto or into the machine will void the warranty.

The duration of your exercise session is dependent on your fitness level. In general,
it is recommended that you maintain your heart rate in the training zone for at least
ten minutes to realize an aerobic benefit. As your fitness level increases, you will be
able to maintain your heart rate in the training zone for longer periods: usually
between 20 and 30 minutes.

When starting your workout, use the first several minutes to warm up, then slowly
increase your workload to bring your heart rate into your specific training zone. At the
end of your workout, gradually decrease your workload and exercise lightly as a
"cool down".

To achieve the greatest benefits, aerobic exercises should be performed three to five
times per week. It is important to allow sufficient time, at least 24 hours, for your
body to recover after exercise.

How long should I exercise?

How often should I exercise?

20

Summary of Contents for C50U

Page 1: ...dure 4 UNDERSTANDING THE C50U DISPLAY CONSOLE Display Windows Display Specifications Basic Functions Basic Operation Internal Settings Key Functions Exercise Programs Pressing PAUSE From a Program Exe...

Page 2: ...your fitness regimen Before using your C50U bike we recommend that you familiarize yourself with this Owner s Manual Whether you are a first time user of an upright bike or a seasoned pro understandi...

Page 3: ...hildren on or near the bike Check the machine before every use Make sure all parts are assembled and all nuts and bolts are tightened Do not use the machine if the unit is disassembled in any way Keep...

Page 4: ...or repairs Work within your recommended exercise level do NOT work to exhaustion If you feel any pain or abnormal sensations STOP YOUR WORKOUT Consult your physician immediately The weight limit for t...

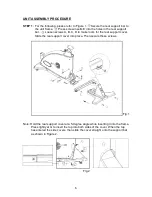
Page 5: ...afe place in case you need to ship the unit in the future Before assembling your bike make sure that you have all of the following items 1 Pedestal 2 Pedestal cover 3 Left pedal 4 Main frame 5 Rear su...

Page 6: ...5 Right pedal Seat bottom Handlebar mount lower cover Handlebars Handlebar mount upper cover Hardware kit Pedestal Pedestal cover Left pedal Main frame Rear support Rear support cover...

Page 7: ...A B C D to make room for the rear support cover Slide the rear support cover into place Then secure those screws Note Hold the rear support cover at a 5 degree angle while inserting it into the frame...

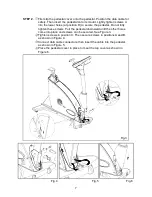
Page 8: ...ot fully tighten these screws Pull the pedestal downward until the other holes come into place and screws can be secured See Figure 3 Tighten screws in position C Then secure screws in positions A and...

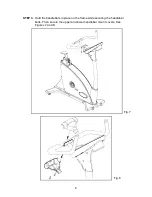
Page 9: ...STEP 3 Hold the handlebars in place on the frame while securing the handlebar bolts Then secure the upper and lower handlebar mount covers See Figures 7 and 8 Fig 7 Fig 8 8...

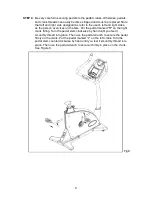
Page 10: ...exercises on the bike Put the pedal marked R on the right crank fitting Turn the pedal stem clockwise by hand until you feel it smoothly thread into place Then use the pedal wrench to secure the peda...

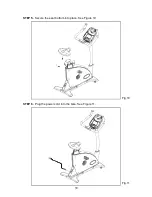
Page 11: ...STEP 5 STEP 6 Secure the seat bottom into place See Figure 10 Plug the power cord into the bike See Figure 11 10 Fig 10 Fig 11...

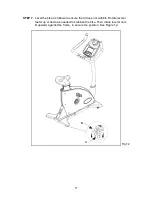
Page 12: ...bike as follows to ensure that it does not wobble Rotate leveler feet A up or down as needed to stabilize the bike Then rotate leveler nuts B upward against the frame to secure the position See Figure...

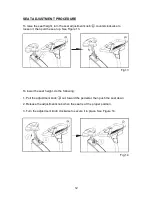
Page 13: ...n pull the seat up See Figure 13 To lower the seat height do the following 1 Pull the adjustment knob out toward the pedestal then push the seat down 2 Release the adjustment knob when the seat is at...

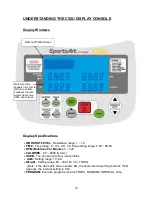
Page 14: ...9 00 5 120 0 0 9999 K CAL You can set up to four user profiles Setting range 10 99 Setting range 66 330 LB 30 150 KG Note If the dot matrix screen shows KG the unit s internal setting is metric If LB...

Page 15: ...o operate When USER mode appears press the key to select a user then press the QUICK START key to see the previous workout time and profile During a workout press the key to exit the QUICK START mode...

Page 16: ...screen press and hold keys simultaneously for three seconds to clear out user time distance and calories The unit clears accumulated values while beeping three times Then the USER selection screen app...

Page 17: ...press to adjust USER Age Weight Time When the exercise program indicator flashes press INTERVAL RANDOM TRACK HILL keys to immediately start working out In an exercise program press the STOP key to ex...

Page 18: ...RK TIME scrolls across the screen Time value flashes Press keys to set your work time Then press ENTER to confirm your choice 4 ENTER WORK LEVEL scrolls across the screen Resistance value flashes Pres...

Page 19: ...s The start up screen appears if you entered through QUICK START If you entered through an exercise program the PROGRAM selection screen appears and the PROGRAM indicator flashes SELECT PROGRAM OR PRE...

Page 20: ...accumulated distance The unit of distance is either in Miles or Kilometers depending on the speed setting selected previously Press ENTER to confirm your choice and to see the next setting You may al...

Page 21: ...el In general it is recommended that you maintain your heart rate in the training zone for at least ten minutes to realize an aerobic benefit As your fitness level increases you will be able to mainta...

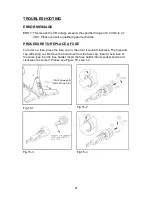
Page 22: ...ician To remove a fuse press the fuse cap in then turn it counterclockwise The fuse and cap will spring out Remove the burnt fuse from the fuse cap Insert a new fuse of the same type into the fuse hol...

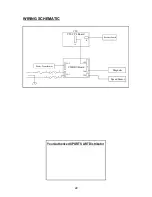
Page 23: ...WIRING SCHEMATIC 22 Your Authorized SPORTS ART Distributor C50 J2 J6 Receiver board Magnetic Speed Sensor C50DRV Board CN3 CN2 CN1 Power Transformer 1 2 3 4 CN4 CN5 C50 CTL Board...

Reviews: