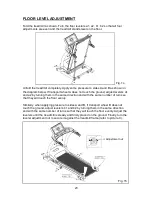
BELT ADJUSTMENT PROCEDURE
1. Turn on the power switch located at the front of the treadmill. Place the safety key
in its position.
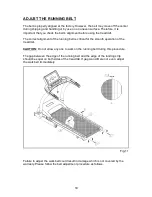
2. Press the SPEED
button to increase the speed to 2.0mph/3.2kph. Determine
belt placement in relation to landing strips on both sides of the treadmill. Make
sure the edge of the walk belt is aligned and parallel to the edge of the landing
strip. Also make sure the width of area A and B is approximately the same.
Observe walk belt operation for about 30 seconds.
3. Adjust the walk belt immediately if it is not parallel to the edge of the landing strip
and the width of area A and B are not the same. Please follow the steps below to
return the belt to the proper area.
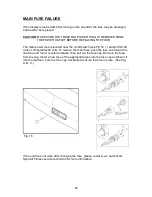
4. If the belt is too far left: Turn the left belt adjustment bolt located at the rear of the
treadmill clockwise 1/4 turn at a time, using the Allen wrench. Then turn the right
belt adjustment bolt counterclockwise 1/4 turn. Let the treadmill run 30 seconds,
then check the position of the belt. If the belt still has not returned to the proper
zone, repeat with another 1/4 turn on both sides until the belt has returned to the
proper zone. Do not turn the adjusting bolt more than 1/4 turn at a time.
5. Conversely, if the belt is too far right, turn the right belt adjustment bolt clockwise
1/4 turn, then turn the left adjustment bolt counterclockwise 1/4 turn. Then let the
treadmill run at least 30 seconds; check the position of the belt. If it still has not
returned to the proper zone, repeat with another 1/4 turn until the belt has
returned to the proper zone. Do not turn adjusting bolt more than 1/4 turn at a
time.
▲
20


