background image


MAINTENANCE 

With proper care, your Model 30 series GunJet will give you reliable service. To 

maintain this performance, parts should be inspected regularly and replaced 

when necessary with genuine Spraying Systems Co. parts. 

DISASSEMBLY PROCEDURE


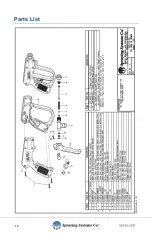
(See Figure 1 and parts list PL 30A & 30W) 

If it becomes necessary to disassemble this unit, follow these steps: 

1.


Make sure all air, electrical, and liquid lines to the pump are  

turned off. 

2.


Release all the pressure and liquid (from the hose to GunJet) by 

operating Trigger until fluid ceases to flow. 

3.


Set Trigger Lock (21) in locked position. 

4.


Remove gun from hose. 

5.


Remove 7 Screws (1). 

6.


Remove Right Hand Housing (2), Trigger Lock (21) and  

Lock Spring Ring (20). 

7.


Remove Body and Trigger as a subassembly (3) thru (19) from Left 

Hand Housing (2). 

8.


Remove Trigger (18) and Trigger Guide (19). 

9.


Remove #6 Burr (15), Spring (14), Stem Nut (13). 

10.


Using the hex on the Body (5) as a back-up wrenching surface, loosen 

Cap (3) and Packing Screw (12). 

11.


Remove Cap (3) and Valve Seat (4). 

12.


Holding Packing Screw (12) unscrew Body (5) from Stem Assembly (6) 

thru (12). 

13.


Remove Gasket (11) from Packing Screw (12). 

14.


Remove Packing Screw (12), Cup Packing (9), Washer (8), and Main 

Spring (7). 

15.


If required, Trigger Guide (19) may be removed from Trigger (18) by 

pressing or driving out Roll Pin (16). 

16.


If required, Roll Pin (17) may be removed from Trigger (18) by pressing 

or driving out. 


Summary of Contents for GunJet 30A

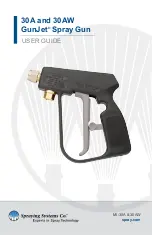
Page 1: ...30A and 30AW GunJet Spray Gun USER GUIDE spray com MI 30A 30AW...

Page 2: ...2 Contents CONTENTS 2 INTRODUCTION 3 WARNINGS PRECAUTIONS 4 INSTALLATION 6 MAINTENANCE 7...

Page 3: ...p feature to minimize the chance of freezing and except for the valve seat subassembly the 30A and 30AW GunJet spray guns are identical and require the same installation and operating procedures The M...

Page 4: ...T 1 22 M FROM THE TRIGGER MECHANISM DO NOT ASSEMBLE DISCHARGE NOZZLE DIRECTLY INTO THE SPRAY GUN 1 DO NOT aim gun at any person or any part of the body Fluids under high pressure can penetrate the hum...

Page 5: ...importance of obeying strict safety precautions for everyone s safety 4 DO develop a habit of shutting off the power to the pump relieving fluid pressure from gun and hose by actuating trigger until...

Page 6: ...uld be used 3 Follow your pump and component parts manufacturer s recommendations for operation but in any case do not exceed the pressure or temperature of the lowest rated component within the syste...

Page 7: ...on 4 Remove gun from hose 5 Remove 7 Screws 1 6 Remove Right Hand Housing 2 Trigger Lock 21 and Lock Spring Ring 20 7 Remove Body and Trigger as a subassembly 3 thru 19 from Left Hand Housing 2 8 Remo...

Page 8: ...ly a thin coat of light oil on Cup Packing 9 and with flat side of Cup Packing 9 facing Trigger 18 carefully screw Cup Packing over threads of Main Stem 6 Important Cup Packing 9 must be installed in...

Page 9: ...g Ring 20 in Left Hand Housing 2 14 Place Trigger Lock 21 in Left Hand Housing 2 15 Install Right Hand Housing 2 and 7 Screws 1 Caution Do not over tighten screws 16 Be sure Trigger Lock 21 is in lock...

Page 10: ...10 Parts List...

Page 11: ...11...

Page 12: ...North Avenue and Schmale Road P O Box 7900 Wheaton IL 60187 7901 Tel 1 800 95 SPRAY Intl Tel 1 630 665 5000 Fax 1 888 95 SPRAY Intl Fax 1 630 260 0842 www spray com MI 30A 30AW Spraying Systems Co 20...

Reviews: