APPLIC
A
TION SE
TUP
SY
STEM SE
TUP
APPENDIX
INTRODUC
TION
OPER
A
TION
3
845 Sprayer Control System
98-05349-ENUS R0
INST
ALLA
TION
CHAPTER 2 – INSTALLATION
MOUNTING THE TEEJET 845 CONSOLE
Console Step 1 - Location
Determine the best location for the control console in the cab or
operator’s compartment. Allow sufficient clearance, approximately
4 through 5″/10 through 12 cm to accommodate for the cable that
will be connected to the right side of the console.
Console Step 2 - Mounting
Mount the console to a firm support within the cab area, and
secure using the slots provided on the top, back, or bottom of the
Console. Although two simple brackets are supplied with the unit,
some additional bracketing may be necessary. The slots in the 845
will accept 1/4″ / 6 mm bolts.
Figure 2-1: Brackets Provide Angle Adjustment
Console Step 3 - Power Connection
Locate the power cable that has a black connector on one end and
two battery terminal rings on the other. Extend the battery terminal
ring end of this cable from the cab to the battery.
NOTE: Make sure there are a total of 12 Volts delivered to the
controller by connecting to the (+) terminal on one battery
and the (-) terminal on the other battery. Reliable operation
of the 845 Sprayer Control depends on a clean power
supply. Ensure this by connecting the power cables directly
to the battery and not to another power source.
Connect the battery terminal rings to the battery posts, making
sure that the positive (red) and negative (black) wires correspond
with the polarity of the battery terminals.
NOTE: The power cable is designed to provide the simple addition
of a remote Master Switch in a convenient location (i.e. on
the throttle, gear shift, or floor switch). To install a remote
boom switch, simply install a switch to the blue wire in the
power cable. The switch should be rated to handle the
total current used by all boom section valves combined. If
installed, the remote master switch will operate in series
with the boom switches on the console.
Connect the battery cable to the power cable lead that extends
from the main cable.
Test the installation by pressing the PROGRAM
button once to
turn the 845 console on. If the display shows information, you have
wired the power correctly.
NOTE: The TeeJet 845 Sprayer Control has an Automatic Power
Down feature. With the Master Switch in the “OFF”
position, the 845 will automatically shut down after 10
minutes of no inputs or at the time specified in the Auto
Power Down setting in the OEM Setup Mode. This
prevents possible battery drainage. To turn the console
“OFF” with the Master Switch located in the “OFF” position,
press and hold the MINUS
button while pressing the
PROGRAM
button once, and then releasing both
buttons. The console will shut down providing no other
buttons are pressed.
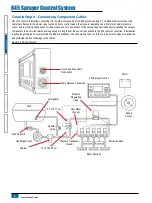
Figure 2-2: Power Connection
Red (Positive)
Console Battery Wires
Black (Negative)
One 12-Volt Battery


