4
6.
DO NOT
use damaged, perforated, or weakened fluid hose.
7.
DO NOT
use a GunJet® with a faulty or damaged Trigger Lock.
8.
DO NOT
operate a spray gun if there are any leaks from the packings,
fittings, hoses, etc. Fluids that are under high pressure can penetrate
skin, cloth, etc., and cause serious injury.
9.
DO NOT
touch any metal parts of the gun or accessories when spraying
hot liquids or severe injury can occur.
10.
DO NOT
handle a spray gun without
a tip or nozzle any differently than
one with
a tip or nozzle. Even with the tip or nozzle removed, the spray
gun can discharge a large volume of liquid at a high velocity.
SAFETY SHOULD ALWAYS BE OBSERVED:
1.
DO
use a two-handed control of PW4000A GunJet at all times. Grasp
spray gun firmly with both hands. If an extension is used, grasp the
extension. (Insulated extension if spraying hot liquids.)
2.
DO
adopt a secure body stance prior to and during spray operation to
safely control the high reactionary force of this unit.
3.
DO
impress on other people in the spraying area the importance of
obeying strict safety precautions for everyone’s safety.
4.
DO
develop a habit of shutting off the power to the pump, relieving
fluid pressure from gun and hose by actuating trigger until all fluid
ceases to flow, and setting the Trigger Lock in the locked position,
before attempting to remove the tip, nozzle, gun or any part of the
gun, or when gun is not in use.
5.
DO
check operation of Trigger Lock before each spray period. Trigger
Lock must hold the Trigger to its forward position. (Adjust if necessary;
s
ee section Trigger Adjustment Procedure.)
6.
DO
carefully check and tighten threaded connections regularly. Make
them secure and leak proof.
7.
DO
flush gun after each spray period using the same safety precautions
as used during spraying operations. Always use the lowest possible
pressure for flushing.
8.
DO
keep gun clean and dry to allow for positive grip.
Summary of Contents for GunJet PW4000A
Page 1: ...PW4000A GunJet Spray Gun USER GUIDE spray com MI PW4000A...
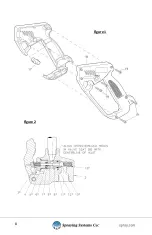
Page 8: ...8 Figure 1 Figure 2...
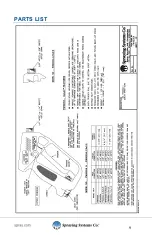
Page 9: ...9 PARTS LIST...
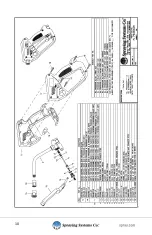
Page 10: ...10...
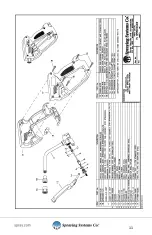
Page 11: ...11...

