22
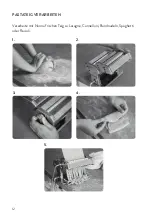
1.
Prepare the pasta dough. The basic recipe and other dough variants can be
found in the recipe booklet enclosed.
2.
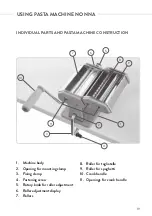
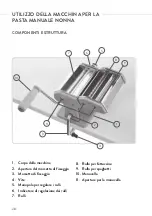
Fit the cutting attachment and fasten the pasta machine to a table or worktop
with the fixing clamp.
3.
Divide the dough into individual portions and cover the remaining dough with
cling film or a damp kitchen towel until ready to process. Set the pasta machine
to the largest roller gap by pulling on the appropriate knob and turning it until it
snaps into place.
4.
Dust the rollers and the work surface around your pasta machine with flour.
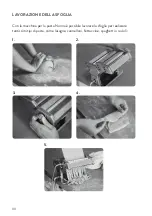
Fit the crank handle and turn at a steady pace to process the dough through
the flat rollers. Once rolled, fold the dough’s left edge and then its right edge
towards the middle, to form 3 layers. Pass the dough through the rollers again.
Repeat the process 3 times to make the dough elastic. Now reduce the roller
gap stepwise after each pass. The dough no longer needs to be folded. If the
dough gets too long, you can cut it in half.
5.
After passing the dough through the smallest setting, you can cut the dough
into lasagne sheets, tagliatelle or spaghetti with the appropriate roller. Fit the
appropriate roller attachment and roll the dough through the cutting roller. Let
the pasta dry a little. You can hang it up to dry. Repeat the process until all the
dough has been used.
CLEANING AND CARE
The pasta machine should be cleaned and dried after each use as follows. Lack of
care or inappropriate care of the pasta machine can impair its function.
1.
Before each use, process a small portion of the dough with the machine to
absorb any residual dust or impurities present in the machine. Do not continue
to use this piece of dough, discard it.
2.
Allow the dough present in the machine after use to dry before removing it.
3.
Use a damp cloth or brush to remove dough and flour residues.
4.
Dry your Nonna with a cloth and air dry her before storing.
5.
Do not use sharp or pointy objects to extract dough residue from the machine,
as this could damage the pasta machine. Do not rinse under running water
Summary of Contents for Nonna
Page 7: ......
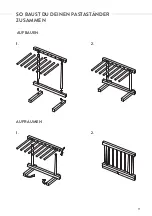
Page 11: ...11 SO BAUST DU DEINEN PASTAST NDER ZUSAMMEN 1 1 2 2 AUFBAUEN AUFR UMEN...
Page 20: ...20 HOW TO ASSEMBLE YOUR PASTA RACK 1 1 2 2 ASSEMBLING TIDY UP...
Page 29: ...29 COS MONTI LO STENDIPASTA 1 1 2 2 ASSEMBLAGGIO RIORDINARE...
Page 38: ...38 COMMENT ASSEMBLER LE S CHOIR P TES 1 1 2 2 MONTAGE RANGER...
Page 47: ...47 C MO MONTAR EL SECADOR DE PASTA 1 1 2 2 MONTAJE GUARDAR...
Page 53: ......
Page 54: ......
Page 55: ......
Page 56: ......

