background image

5

English

Mounting

Application

Deluxe handsfree bus telephone 
intercom with  colour monitor for 
Siedle In-Home bus

Functions:

Calling, hands-free/simplex  

• 

communication, video, door release 
and storey call

Speech/control button

• 

Colour monitor 8.8 cm (3.5”)

• 

Integrated video memory for  

• 

28 pictures, memory upgrade  
possible using an SD card

Door release and light button

• 

Buttons for switching and control 

• 

functions

Internal speech communication

• 

Display of switching statuses

• 

Muting button for call tone

• 

11 ring tones

• 

Call volume adjustable in 5 steps

• 

Speech volume adjustable 5 steps

• 

Monitor button for current picture

• 

5-way button for video memory 

• 

and zoom function

Video memory function (only with 

• 

additional installation)

Intercom functions:

Call forwarding

• 

Internal group call

• 

Internal call with callback function

• 

Collective announcement

• 

Automatic call pick-up with 

• 

internal call

Doormatic

• 

The intercom functions can only be 
programmed using the bus program-
ming software BPS 650-... 

Electrical voltage

Mounting, installation and ser-
vicing work on electrical devices 
may only be performed by a 
suitably qualified electrician.

Electrostatic charging

As a result of electrostatic 
charging, direct contact with 
the circuit board can result in 
destruction of the device. Direct 
contact with the circuit board 
must therefore be avoided.

Scope of delivery

BFCV 850-... (Base plate and 

• 

housing with circuit board)

Dummy card for SD card slot

• 

Operating instructions for the 

• 

end user

This product information

• 

Mounting

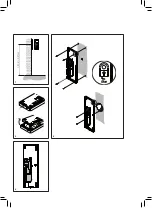
Strip back cable to appr. 80 mm.

Recommended mounting height 

appr. 1.50 m to centre device.

Open the device from the back; 

by releasing the base plate with the 
locking lever.

When mounting directly on the 

wall, fasten the base plate using 
4 screws, paying attention that 
the plate is the right way up (top 
marking). When mounting on a 
switch box, use the screw openings 
in the centre of the device, paying 
attention that the plate is the right 
way up (top marking).

Install in accordance with the 

wiring diagram. The cores of the 
installation cable must be stored 
inside the free installation space in 
the base plate.

Hook the housing into the base 

plate from above and close by exer-
ting a slight pressure. Depending on 
the installation environment, it may 
be necessary to change the micro-
phone sensitivity of the BFCV 850-... 
in order to permit clear speech 
transmission. If a speech connection 
exists, press the door release button 
and light button simultaneously. 
Using the speech /- the 
microphone sensitivity can be set. If 
no input is made within  
10 seconds, the microphone setting 
switches off again. Save the set 

microphone sensitivity by pressing 
the muting button for 3 seconds.

Dismantling

To remove the housing, 

press the lock upwards using a flat 
blade screwdriver. The circuit board 
remains in the housing super-
structure.

Lettering

The lettering panel can be  

inscribed to indicate the button 
functions. The see-through panel 
can be lifted at the side.

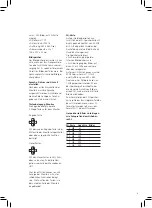
Terminal assignment

TaM/TbM  =  Input In-Home bus
TaM/TbM  =  Throughput In-Home    
 

  bus

ERT/ETb   =  Storey call button
+M/-M   =  Additional supply  


  20–30 V DC for video   


  memory function and   


  door parallel call

S1/S1  

=  Potential-free contact    


  for additional bell

Commissioning

Installation, commissioning and 
programming are described in the 
system manual (enclosed with line 
rectifiers BNG/BVNG 650-... ).

Accessories for BFCV 850-...

ZTCV 850-... table-top accessory for 
conversion from a wall-mounted to 
a table-top device.

Specifications:

• The device is supplied via the 

In-Home bus if the video memory is 
not used

• Additional supply

20–30 V DC for the video memory 
function / door parallel calls / inter-
com function current consumption 
max. 350 mA

• Ring tone volume: max. 83 dB (A)
• Colour monitor 8.8 cm (3.5“)
• Potential-free contact max. 


15 V AC, 30 V DC, 1 A e.g. for 
connection of an additional bell, 
switching time 0.4 secs.–19 mins.

Video memory:
• 28 images in device memory
• SD card from 32 MB to 2 GB

Summary of Contents for BFCV 850-0

Page 1: ...850 0 Téléphone mains libres bus confort Intercom avec moniteur couleur BFCV 850 0 Citofono vivavoce bus comfort Intercom con monitor a colori BFCV 850 0 Bus Hands Free Telefoon Comfort Intercom Kleu renmonitor BFCV 850 0 Håndfri bustelefon Com fort Intercom farvemo nitor BFCV 850 0 Buss svarsapparat Comfort Intercom med färgmonitor BFCV 850 0 ...

Page 2: ... Sehen Sprac Farbm Integ Bilder m Türöf Tasten tionen Intern Anze Stum 11 Kl Rufla derbar Sprac verände Moni 5 We Zoomfu Bildsp Zusatzin Interco Rufw intern Intern Samm autom bei Inte Türm Die Inte mit der BPS 650 Elektri Einbau beiten aussch Fachkr 2 ...

Page 3: ...6 7 5 ...

Page 4: ...n Top beachten Installation nach Anschlussplan 4 vornehmen Die Adern des Installa tionskabels müssen innerhalb des freien Installationsraumes in der Grundplatte verstaut werden Gehäuse oben auf der Grundplatte 5 einhängen und mit leichtem Druck schließen Je nach Einbauumgebung kann es erforderlich sein die Mikrofonempfindlichkeit des BFCV 850 zu verändern um eine klare Sprachübertragung zu ermög l...

Page 5: ...nen je nach Anzeige des Monitors mit unter schiedlichen Funktionen belegt sein Die Funktion der Tasten ist in der untersten Zeile des Monitors eingeblendet SD Karte Auf der Geräteoberseite kann zusätzlich eine SD Speicherkarte mit einer Speicherkapazität von 32 MB bis 2 GB eingesteckt werden bei Auslieferung ist eine Blind Karte als Staubschutz eingesteckt Die Speicherkarte dient zur Erweiterung d...

Page 6: ...tigt der Bildaufbau mehr Zeit Der Wert muss entsprechend höher eingestellt werden Ausschaltverzögerung Monitor schaltet zeitverzögert aus Erfolgen keine Eingaben schaltet sich das Gerät nach 20 Sekunden aus Service V1 00 1 00 00 Anzeige des Softwarestandes Zeitsignal empfangen Information ob das Zeitsignal DCF77 anliegt Nur bei Siedle Multi möglich Testbild weiß Anzeige weißer Hintergrund Testbild...

Page 7: ...w openings in the centre of the device paying attention that the plate is the right way up top marking Install in accordance with the 4 wiring diagram The cores of the installation cable must be stored inside the free installation space in the base plate Hook the housing into the base 5 plate from above and close by exer ting a slight pressure Depending on the installation environment it may be ne...

Page 8: ...menu levels Depending on the monitor display the control buttons can be assigned with different functions The button functions are shown in the bottom line of the monitor SD card An extra SD memory card with a memory capacity of 32 MB to 2 GB can be inserted on the upper side of the device on delivery a blind card is inserted as dust protection The memory card serves to increase the internal video...

Page 9: ...n takes longer requiring a suitably higher value to be set OFF delay The monitor switches off with a time delay If nothing is entered the device switches off after 20 seconds Servicing V1 00 1 00 00 Display of the software status Time signal received Indication of whether the time signal DCF77 has been received only possible with Siedle Multi Test picture white Display white background Test pictur...

Page 10: ...le à l aide de 4 vis Respecter la position de montage Haut Top Dans le cas d un montage sur prise utiliser les orifices pour vis prévus au centre de l appareil Respecter la position de montage Haut Top Effectuer l installation conformé 4 ment au schéma de raccordement Les fils du câble d installation doivent être regroupés dans la zone d installation libre du socle Accrocher le boîtier en haut du ...

Page 11: ...hes de commande Les touches de commande à droite à gauche en haut et en bas permet tent de naviguer dans les différents niveaux de menu Différentes fonctions peuvent être affectées aux touches de com mande en fonction de l affichage du moniteur La fonction des touches s affiche sur la ligne se trouvant tout en bas du moniteur Carte SD En haut de l appareil il est possible d ajouter une carte mémoi...

Page 12: ...u de façon incomplète la constitution de l image nécessite plus de temps Il faut régler une valeur augmentée en conséquence Temporisation d arrêt Le moniteur s arrête d une façon tempo risée Si l on n effectue pas d entrées l appareil s arrête au bout de 20 secon des Dépannage V1 00 1 00 00 Affichage du niveau du logiciel Recevoir signal temps Information indiquant si le signal temps DCF77 est pré...

Page 13: ... fissare la piastra base con 4 viti Fare attenzione alla posizione di montaggio superiore In caso di montaggio su scatola di distribu zione utilizzare i fori per le viti al centro dell apparecchio Fare atten zione alla posizione di montaggio superiore Eseguire l installazione secondo 4 lo schema di collegamento I fili del cavo d installazione devono essere alloggiati all interno del vano di montag...

Page 14: ...centro permette di accendere il monitor oppure di confermare la funzione selezionata Tasti di comando I tasti di comando freccia destra sinistra su giù permettono di navi gare nei vari livelli di menu Ai tasti di comando è possibile assegnare diverse funzioni a seconda della visualizzazione del monitor La funzione dei tasti è visualizzata nell ultima riga in fondo del monitor Scheda SD Sul lato su...

Page 15: ... richiede più tempo Di conse guenza occorre impostare un valore più alto Spegnimento temporizzato Il monitor si spegne in modo temporizzato e non viene eseguito alcun inserimento l apparecchio si spegne dopo 20 secondi Assistenza V1 00 1 00 00 Visualizzazione della versione del software Ricezione del segnale temporale Informazione sulla presenza del segnale temporale DCF77 possibile solo per Siedl...

Page 16: ... gebruiken Let op de inbouwpositie boven top Installatie volgens aansluitschema 4 uitvoeren De aders van de instal latiekabel moeten binnen de vrije installatieruimte in de basisplaat worden weggestopt Behuizing boven op de basisplaat 5 inhangen en met lichte druk sluiten Afhankelijk van de inbouwomgeving kan het nodig zijn de microfoon gevoeligheid van de BFCV 850 te veranderen om een duidelijke ...

Page 17: ...monitor met verschillende functies zijn ingedeeld De functie van de toetsen wordt op de onderste regel van de monitor getoond SD kaart Op de bovenzijde van het apparaat kan additioneel een SD geheugen kaart met een geheugencapaci teit van 32 MB tot 2 GB worden geplaatst bij aflevering is een dummy kaart als stofbescherming geplaatst De geheugenkaart dient voor de uitbreiding van het interne beeldg...

Page 18: ...bouw meer tijd De waarde dient overeenkomstig hoger te worden ingesteld Uitschakelvertraging Monitor schakwelt uit met tijdvertraging Indien geen invoer volgt schakelt het apparaat zich na 20 seconden uit Service V1 00 1 00 00 Weergave van de softwareversie Tijdsignaal ontvangen Informatie of het tijdsignaal DCF77 aanwezig is alleen bij Siedle Multi mogelijk Testbeeld wit Weergave witte achtergron...

Page 19: ...g af enheden Oben Top Installationen foretages ifølge til 4 slutningsdiagram Installationskab lets ledere skal opbevares indvendigt i bundpladen på den frie installa tionsplads Kabinettet hægtes på bundpladen 5 for oven og lukkes med et let tryk Afhængigt af indbygningsomgi velserne kan det være nødvendigt at ændre mikrofonfølsomheden for BFCV 850 for at opnå en klar og tydelig transmission af sam...

Page 20: ...ktioner Tasternes funktion er indblændet i den nederste linje på monitoren SD kort På apparatets overside kan der desuden isættes et SD hukommel seskort med en lagerkapacitet på fra 32 MB til 2 GB ved levering fra fabrikken er der til beskyttelse mod støv på dette sted isat et blindkort Hukommelseskortet anvendes til at udvide den interne billedhu kommelse og at overføre billederne til en PC ved h...

Page 21: ...gt tager billedopbygningen længere tid I så fald skal indstillingsvær dien være tilsvarende større Forsinket frakobling Monitoren frakobles med tidsforsinkelse Hvis der ikke sker nogen indtastninger frakobles enheden efter 20 sekunder Service V1 00 1 00 00 Visning af softwareversion Modtagelse af tidssignal Information om tidssignalet DCF77 sendes kun muligt ved Siedle Multi Testbillede hvidt Visn...

Page 22: ...pparaten Beakta monterings läget Oben Top Upp Utför installationen enligt anslut 4 ningsschemat Installationskabelns ledare måste stoppas in i det fria in stallationsutrymmet i bottenplattan Häng fast höljet upptill på 5 bottenplattan och stäng genom att lätt trycka till den Beroende på monteringssituationen kan det vara nödvändigt att ändra känsligheten för mikrofonen till BFCV 850 för att möjlig...

Page 23: ...eroende på monitorns indikation Knapparnas funktion visas i den understa raden på monitorn SD kort På apparatens ovansida är det möjligt att dessutom sticka in ett SD minneskort med en minneskapacitet på 32 MB till 2 GB vid leveransen har ett blindkort stuckits in som skydd mot damm Minneskortet används för att utvidga apparatens interna bildminne och för att överföra bilderna till en PC med hjälp...

Page 24: ...å behöver bilduppbyg gnaden längre tid Värdet måste ställas in högre med tanke på detta Fördröjd frånkoppling Monitorn kopplas från med tidsfördröjning Om ingen inmatning utförs så kopplar appa raten från efter 20 sekunder Service V1 00 1 00 00 Indikering av programvarans version Mottagning av tidssignal Information om tidssignalen DCF77 ankommer Möjligt endast vid Siedle Multi Testbild vit Indike...

Page 25: ...23 ...

Page 26: ...S Siedle Söhne Postfach 1155 78113 Furtwangen Bregstraße 1 78120 Furtwangen Telefon 49 7723 63 0 Telefax 49 7723 63 300 www siedle de info siedle de 2008 05 08 Printed in Germany Best Nr 0 1101 037021 ...

Reviews: