27
router. T
his means that the router
and Smart Gateway can always
be reached over the same domain
name from the Internet, although
the dynamic public IP address of the
rou
ter changes daily.
Remarks:
•
Port forwarding (as a possible
point of attack) rep
resents a poten-
tial danger for the open
network
security of
the customer network.
Port forwarding configured must
therefore be performed as described
without fail. No forwarded por
ts
should be communicated to third
parti
es or unknown persons. This
applies equally to the domain of the
DynDNS access.
•
Due to the wide diversity of
routers available on the market,
within the sco
pe of these operating
instructions it is not possible to enter
into the detailed procedure neces-
sary for each individual
router. These
instructions describe the generic
procedure.
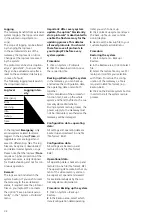
Configuration port forwardin
g
Port forwarding
Control port (TCP) Audio ports (UDP)
Video ports
(TCP/UDP)
External SIP port
(TCP)
Source IP address
all
all
all
all
Source protocol
(external)
TCP
UDP
TCP
TCP
Source start port
(external
)
10000
10000
20500
5070
Source end port
(external
)
10000
10100
20550
5070
Target IP address
Static IP address of
the Gateway
Static IP address of the
Gateway
Static IP address of the
Gateway
Static IP address of
the Gateway
Target protocol (inter
nal)
TCP
UDP
TCP/UDP
TCP
Target start port
(internal
)
10000
10000
20500
5070
Target end port
(internal
)
10000
10100
20550
5070
Activate port forwardin
g
(enable)
Yes
Yes
Yes
Yes
•
The IPv4 forced separation which
takes place for technical reasons in
int
ernet connections wi
th dynami-
cally changing public IP address must
be set to a t
ime at which the Sie
dle
app for Smart Gateway is not being
u
sed (e.g. at night), as otherwise
there
will be brief (daily) interruption
of se
rvices. The Siedle a
pp for Smart
Gateway will then be tempor
arily
unavailable.
Procedure:
Step 1 – set up port forwarding
1
Log into the router.
2
If necessary, change to the “Expert
view” / “Extended view”.
3
Change to the relevant menu/
submenu in or
der to configure por
t
forwarding (e.g. port forwarding,
port enabling, port regulation or
similar).
4
Configure the port forwar
ding for
all 4 ports / port ranges in accord-
ance with the table “Configuration
o
f port forwarding”.
5
Check all the settings you have
carried o
ut for correctness.
6
Save your inputs.
Step 2 – set up DynDNS access
1
Change to the area of the router
in
which you can config
ure DynDNS
access. S
elect one of the offered
DynDNS providers if applicable or
enter the name of the required
provider.
2
In the field “Domain name” (or
similar
), enter the DynDNS
domain
issued by your DynDNS provider (e
.g.
my_dynamic_domain_name.dyndns.
com).
3
Provider-dependent: In the field
“email address”, enter the email
address stored by the customer on
registration.
4
In the field “User name” (o
r
similar), enter th
e user name of the
D
ynDNS access specifi
ed by the
customer.
5
In the field “Password” (or similar),
enter t
he password of the D
ynDNS
access specified by the customer.
6
Activate the DynDNS.
7
Save your inputs in the router.
Note:
If further entries are required, you
can find
these out from the
website
of the selec
ted DynDNS provider.
Summary of Contents for Smart Gateway Professional
Page 1: ...SG 650 0 Commissioning instruction Smart Gateway Professional ...
Page 34: ...34 ...
Page 35: ...35 ...


