background image

7

Installation

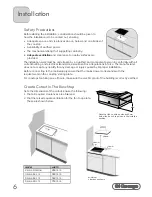
Lay The Sealant

Apply the sealant around the top edges of the cutout, 

so that when the cooktop is lowered onto the benchtop, 

an even seal is formed.

Install The Cooktop and 
Secure With Brackets

Lower the cooktop into the cutout. Use the 4 brackets 

supplied to secure the cooktop into the cabinetry, using 

packing wood where necessary.

Make Electrical Connection

This appliance must be adequately earthed. If the cooktop does not have a plug, it must be 

connected by means of a special power cord, which must be suitably earthed. In particular: 

The cooktop must be connected to the mains via a bipolar switch which has at least 3mm 

clearance between contacts.   All electrical work must be done by a licensed electrician.

Cooktop

100 cm

2

 min

Ventilation Area

80 mm min
Clearance

50 mm min
Clearance

Oven Zone or
Cupboard Space

Benchtop

Kick Board

FRONT

BACK

100 cm

2

 min

Ventilation Area

100 cm

2

 min

Ventilation area

Ventilation Requirements

The fan requires an airfl ow as shown 

in the opposite diagram. 100 cm

2


ventilation must be provided in both the 

top and the bottom of the under bench 

area, as shown.
A minimum of 50 mm clearance must be 

provided under the cooktop to allow the 

air to fl ow freely.

minimum 

requirements shown

Summary of Contents for 5537400

Page 1: ...re Do not allow cookware handles to hang over the edge of the cooktop as these can easily be knocked Your induction hob generates magnetic fields which may interfere with medical devices such as pacem...

Page 2: ...at thus keeping temperatures in the kitchen lower Control You are not waiting for an element to heat up or cool down so you see the results of a setting change instantly Speed Brings water to the boil...

Page 3: ...ugh the elements themselves do not generate heat the surface may become hot since it is in contact with a hot saucepan When the element is turned off the element control reads H to indicate hot surfac...

Page 4: ...as been in place for at least 10 seconds then press The auto preheat will cancel and the element will continue to heat up as if you had set the element directly 1 2 3 Using The Touch Controls Timer Th...

Page 5: ...ts themselves do not heat up it is possible that unattended oils may catch fire Do not attempt to handle or move a burning pot Smother the flames with a lid or other nonflammable cover Do not splash w...

Page 6: ...s not accept any liability for any damage or injury caused by improper installation Before connecting to the mains supply ensure that the mains power corresponds with the requirements on the cooktop s...

Page 7: ...t be suitably earthed In particular The cooktop must be connected to the mains via a bipolar switch which has at least 3mm clearance between contacts All electrical work must be done by a licensed ele...

Page 8: ...ve sponges or cleaners Many caustic oven cleaners will permanently burn the stain onto the glass surface When wiping over remember to turn diamond rings away from the glass to prevent accidental scrat...

Reviews: