


5
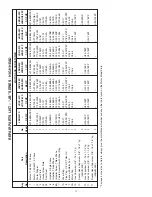
PUMP SERVICE
This centrifugal pump requires little or no service other than
reasonable care and periodic cleaning. Occasionally, howev-
er, a shaft seal may become damaged and must be replaced.
The procedure as outlined below will enable you to replace
the seal.
NOTICE: Pumps use mechanical seals with a rubber seat
ring or a sealing O-Ring. THESE SEALS ARE COM-
PLETELY INTERCHANGEABLE.
NOTICE:
The highly polished and lapped faces of this seal
are easily damaged. Read instructions and handle the seal
with care.
Some models are equipped with an impeller screw, which has
a left hand thread. Before unscrewing the impeller, remove
the impeller screw.
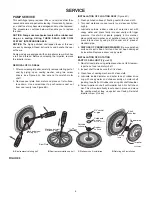
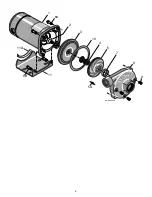
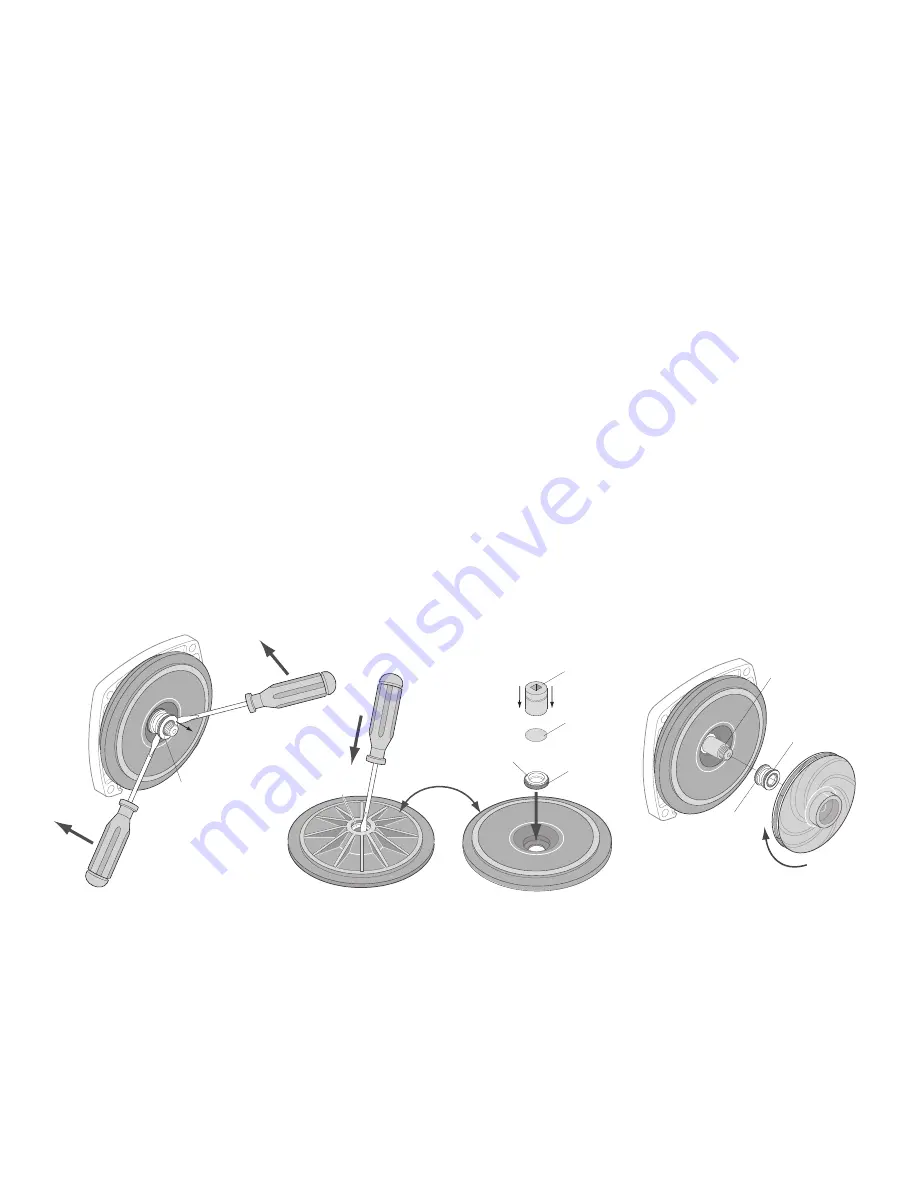
REMOVAL OF OLD SEAL
1. After unscrewing impeller, carefully remove rotating part of
seal by prying up on sealing washer, using two screw-
drivers (see Figure 5A). Use care not to scratch motor
shaft.
2. Remove seal plate from motor and place on flat surface,
face down. Use a screwdriver to push ceramic seat out
from seal cavity (see Figure 5B).
INSTALLATION OF FLOATING SEAT
(Figure 5C)
1. Clean polished surface of floating seat with clean cloth.
2. Turn seal plate over so seal cavity is up, clean cavity thor-
oughly.
3. Lubricate outside rubber surface of ceramic seat with
soapy water and press firmly into seal cavity with finger
pressure. If seat will not locate properly in this manner,
place cardboard washer over polished face of seat and
press into seal cavity using a 3/4” socket or 3/4” piece of
standard pipe.
4.
DISPOSE OF CARDBOARD WASHER
. Be sure polished
surface of seat is free of dirt and has not been damaged
by insertion. Remove excess soapy water.
INSTALLATION OF ROTATING
PART OF SEAL UNIT
(Figure 5D)
1. Reinstall seal plate using extreme caution not to hit ceram-
ic portion of seal on motor shaft.
2. Inspect shaft to make sure that it is clean.
3. Clean face of sealing washer with clean cloth.
4. Lubricate inside diameter and outer face of rubber drive
ring with soapy water and slide assembly on motor shaft
(sealing face first) until rubber drive ring hits shaft shoulder.
5. Screw impeller on shaft until impeller hub hits shaft shoul-
der. This will automatically locate seal in place and move
the sealing washer face up against seat facing. Reinstall
impeller screw (if used).
Seal Plate
Mechanical seal
rotating half
Mechanical seal
stationary half
A
-Seal removal-rotating half
B
-Seal removal-stationary half
C
-
Stationary half installation
D
-
Rotating half installation
T
u
r
n
o
v
e
r
Polished
surface
Rubber
surface
Cardboard
washer
(supplied w/seal)
3/4" socket
or pipe
Sealing
face
Rubber drive
ring
Impeller
Shaft
shoulder
5939 0109
FIGURE 5
SERVICE


