background image

STACK-ON PRODUCTS CO.
P.O. BOX 489, WAUCONDA, IL  60084

40531-1506

4

18

If the door of the safe starts to rub on the door 
frame, open the door per the instructions above.

By the door hinges you will find a threaded stem.  
Use an Allen Wrench to tighten the threaded stem.  
This will realign the door.

MAINTENANCE

IMPORTANT
Keep keys and your combination number in a secure 
place, away from children.  Keep this record of your serial 
number and combination in a secure place separate from 
your safe.  To order a replacement key set, follow the 
instructions on the attached form.

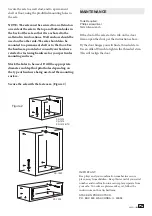
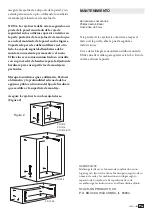
Tools Required:  
Phillips screwdriver
5mm Allen wrench

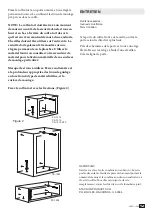
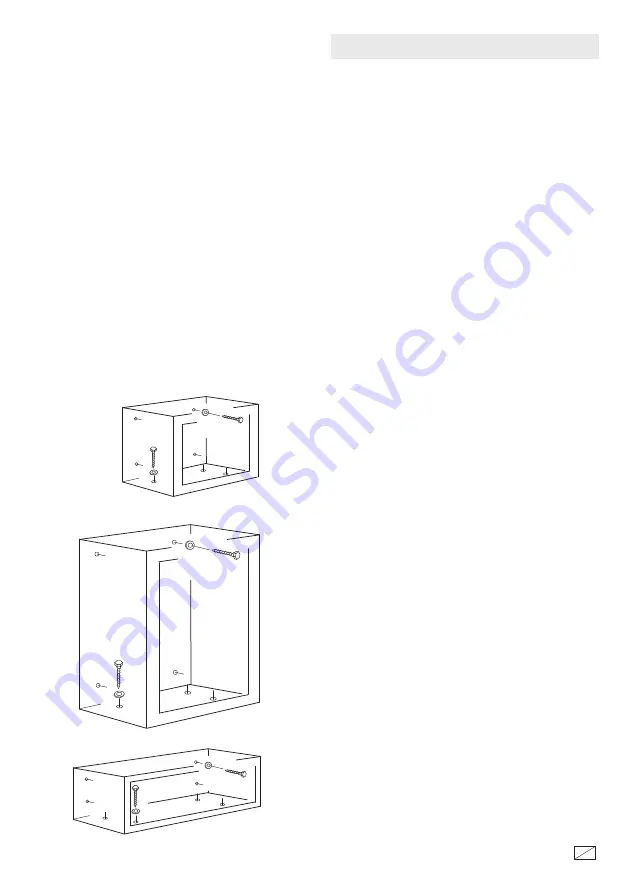
Figure 2

Secure the safe to a wall stud, and to a permanent 
shelf or floor, using the predrilled mounting holes in 
the safe.


NOTE:  The safe must be secured to a wall stud on 
one side of the safe in the top and bottom holes in 
the back of the safe so that it is anchored to the 
wall stud in two locations.  Wall anchors should be 
used on the other side. The safe should also be 
mounted to a permanent shelf or to the floor. Use 
the hardware provided or consult your hardware 
retailer for fastening hardware for your particular 
mounting surfaces.

Mark the holes to be used.  Drill the appropriate 
diameter and depth of pilot holes depending on 
the type of hardware being used and the mounting 
surface.

Secure the safe with the fasteners. (Figure 2)

PS-1520

PS-1508

PS-1514
PS-1515
PS-1415-RTX

Summary of Contents for PS-1415-RTX

Page 1: ...ss to this information Tools Required Drill Thin Bladed Flat Head Screwdriver 10 mm Wrench 3 8 9 5 mm masonry drill bit for drilling into masonry 3 16 5 mm drill bit for drilling into wood and wall st...

Page 2: ...d is turned on and the green light will flash once when the lockout period is over Write your new combination on this form or store your combination on our secure website at www stack on com under Ser...

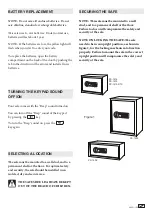
Page 3: ...nstall all new batteries BATTERY REPLACEMENT SECURING THE SAFE SELECTING A LOCATION TURNING THE KEYPAD SOUND OFF ON Figure 1 THE SAFE SHOULD ALWAYS BE KEPT OUT OF THE REACH OF CHILDREN NOTE ON LOCKING...

Page 4: ...5mm Allen wrench Figure 2 Secure the safe to a wall stud and to a permanent shelf or floor using the predrilled mounting holes in the safe NOTE The safe must be secured to a wall stud on one side of...

Page 5: ...te Purchased___ ___ ____ Owner s Address ___________________________ Unit or Apt Number _________________ City ___________________________ State _______________ Zip Code________________ Telephone Numb...

Page 6: ...OES NOT COVER ANY PRODUCT OR ANY PART OF ANY PRODUCT WHICH HAS BEEN SUBJECT TO EXCESSIVE USE ACCIDENT NEGLIGENCE ABUSE OR MISUSE INCORRECT MAINTENANCE ALTERATION OR REPAIR BY ANYONE OTHER THAN STACK O...

Page 7: ...l mm 3 8 9 5 mm foret ma onnerie pour percer dans la ma onnerie Foret 3 16 5 mm pour percer dans le bois et les montants du mur Mat riel inclus 4 M6 x 50 mm 2 de long tirefonds 4 Rondelles 4 M6 x 40 m...

Page 8: ...la lumi re verte clignote une fois lorsque la p riode de lock out est termin crivez votre nouvelle combinaison sur ce formulaire ou de ranger votre combinaison sur notre site s curis www stack on com...

Page 9: ...sant la patte dans le sens de la fl che Remplacez toutes les piles REMPLACEMENT DES PILES ACTIVATION D SACTIVATION DU SIGNAL SONORE DU CLAVIER LA S CURIT DOIT TOUJOURS TRE HORS DE LA PORT E DES ENFANT...

Page 10: ...le coffre fort un poteau mural et une tag re permanent ou au sol en utilisant les trous de montage pr perc s dans le coffre NOTE Le coffre fort doit tre fix un montant de mur sur un c t de la s curit...

Page 11: ...______ No d appartement _____________ Ville ___________________________ Province _______________ Code postal___________ T l phone ____ _____________________ T l copieur ____ ________________________ C...

Page 12: ...ABUSIF D UNE MAUVAISE UTILISATION D UN ENTRETIEN INCORRECT D ALT RATIONS OU DE R PARATIONS PAR QUICONQUE AUTRE QU UN REPR SENTANT DE STACK ON EN OUTRE CETTE GARANTIE NE S APPLIQUE AUCUN ACCESSOIRE OU...

Page 13: ...ica tendr que abrirla con la llave para poder instalar las pilas Las bater as est n incluidas y se encuentran dentro de la caja fuerte Para abrir la puerta con la llave primero quitar la tapa de la ce...

Page 14: ...ar una vez si el sonido est encendido y la luz verde parpadea una vez cuando el per odo de bloqueo ha terminado Escriba su nueva combinaci n en este formulario ni guarde la combinaci n de nuestro siti...

Page 15: ...ente o el suelo Para la seguridad y protecci n ptima la caja fuerte se debe instalar en una zona aislada seco y seguro Figura 1 EL SEGURO SIEMPRE SE DEBE MANTENERSE FUERA DEL ALCANCE DE LOS NI OS NOTA...

Page 16: ...oste de la pared y un estante permanente o piso utilizando los orificios de montaje perforados en la caja fuerte NOTA La caja fuerte debe estar asegurado a un poste de la pared en un lado de la caja d...

Page 17: ...ario _____________________________ No Interior _________________ Ciudad ________________________ Estado _______________ C P ________________ No Tel fono ____ ___________________ No Fax ____ __________...

Page 18: ...NTE NEGLIGENCIA ABUSO O MAL USO MANTENIMIENTO INCORRECTO ALTERACI N O REPARACI N POR CUALQUIER TERCERO QUE NO SEA STACK ON ADICIONALMENTE ESTA GARANT A NO CUBRE ACCESORIOS O PIEZAS USADAS CON O DENTRO...

Reviews: