background image

2


40544-2012  

To open the safe, insert key into 

lock and turn clockwise un�l the 

door automa�cally opens.  

NOTE:  

You must turn the key back to the 

locked position before you are 

able to close and lock the door.


INSTALLING THE 

BATTERIES 

NOTE:  Do not mix old and new 

batteries.  Do not mix alkaline, 

standard or rechargeable 

batteries.


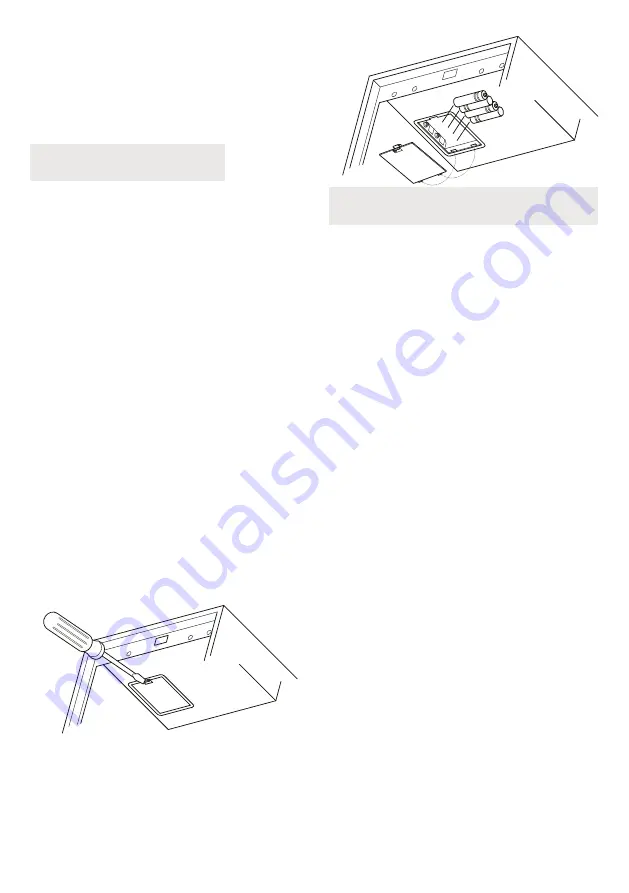
If your safe includes a shelf, 

remove it for be�er access to the 

ba�ery compartment. Push the 

ba�ery cover locking tab with a 

screwdriver to release the cover.  

Install the (4) AA alkaline ba�eries 

as shown.  Replace the cover by 

inser�ng the rear tabs in the slots 

and snapping the cover in place. 


NOTE:  If the ba�eries are low, 

the combina�on bu�ons will 

flash red when pushed.  Replace 

with 4 new AA alkaline ba�eries 

as shown.


PROGRAMMING YOUR OWN 

ELECTRONIC COMBINATION 


For security you must program your 

own combina�on a�er opening the safe.  


Record your new combina�on on 

this form or store your combina�on on our 

secure website at www.stack-on.com under 

Service.  If you write down your combina�on 

you must keep this informa�on in a secure 

place, away from children, not inside the safe.  


1. 

Press the Reset Bu�on (3) located inside the 

safe. Two “beeps” will sound (if the sound is 

turned on) and all 3 bu�ons will flash blue 

twice.  You will have 5 seconds to begin 

entering your combina�on or you will have 

to start over.


2. 

Enter your own 3-8 bu�on combina�on by 

pressing any combina�on of the 3 bu�ons.


Example:  (RIGHT) - (LEFT) - (CENTER) - 

(LEFT) - (RIGHT)


For each combina�on entry a “beep” will 

sound (if the sound is turned on) and all the 

bu�ons will light up green.  If you delay 

more than 5 seconds between entries you 

will have to start over from step 1.  A�er 

you have finished entering your 

combina�on, you will have 5 seconds to 

press the Reset Bu�on to record your new 

combina�on or you will have to start over 

from step 1.


3. 

When you press the Reset Bu�on to record 

your new combina�on, there will be two 

Summary of Contents for QPS-2012-E

Page 1: ...crews 4 Washers Tools Required Drill Flat Head Screwdriver 10 mm Wrench 3 16 5 mm drill bit for drilling into wood A backup key has been provided in case you lose or forget your security code or the b...

Page 2: ...ng the safe Record your new combina on on this form or store your combina on on our secure website at www stack on com under Service If you write down your combina on you must keep this informa on in...

Page 3: ...the safe being automa cally locked out for 60 seconds before you can try your code again The safe will beep one mes if the sound is turned on and the green light will ash once when the lockout period...

Page 4: ...rect upright position will compromise the safety and security of the safe Figure 1 Secure the safe to a shelf using the predrilled moun ng holes in the safe and hardware provided Place the safe in the...

Page 5: ...e replacement key for your security product In order to receive a replacement key to your security product 1 Please visit h ps www stack on com customer service 2 Locate and click on the Replace your...

Page 6: ...RRANTY DOES NOT COVER ANY ACCESSORIES OR PARTS USED WITH OR IN THE PRODUCT WHICH ARE NOT INCLUDED WITH THE ORIGINAL PURCHASE THIS WARRANTY IS EXCLUSIVE AND EXPRESSLY IN LIEU OF ALL OTHER WARRANTIES EX...

Page 7: ...d primero reciba su caja fuerte usted tendra que abrir la puerta con las llaves para instalar las bater as pilas Baterias no incluidas Necesitaras 4 bater as AA NOTA Esta tecla tambi n se ha proporcio...

Page 8: ...AMADO SUS PROPIA COMBINACI N ELECTR NICA Para su propia seguridad usted debe de programar su propia combinaci n despu s de abrir la caja fuerte Anote esta nueva combinaci n en este formulario ni guard...

Page 9: ...dad est bloqueada autom camente durante 60 segundos antes de poder probar su c digo de nuevo La caja fuerte sonar una veces si el sonido est encendido y la luz verde parpadea una vez cuando el per odo...

Page 10: ...l corrrect pondr en peligro la seguridad de la caja fuerte Asegure la caja fuerte a un estante con los ori cios de montaje perforados en la caja fuerte y el hardware proporcionado Coloque la caja de s...

Page 11: ...Para poder recibir su llave de reemplazo de su gabinete de seguridad 1 Favor visite el siguiente enlace www stack on com customer service 2 Encuentre y haga clic sobre el icono para reponer sus llaves...

Page 12: ...ANTENIMIENTO INCORRECTO ALTERACI N O REPARACI N POR CUALQUIER TERCERO QUE NO SEA STACK ON ADICIONALMENTE ESTA GARANT A NO CUBRE ACCESORIOS O PIEZAS USADAS CON O DENTRO DEL PRODUCTO QUE NO EST N INCLUI...

Reviews: