Mounting and Installation
10
225034 / 7570609300
2014-01-21·BA00·III·en·00
SolConeX Plug, 16 A
Series 7570/12
EN
EN
EN
EN
EN
EN
EN
EN
EN
EN
EN
EN
EN
EN
EN
EN
EN
EN
EN
EN
EN
EN
EN
EN
EN
11222E00
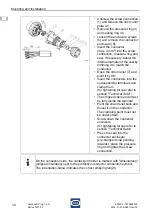
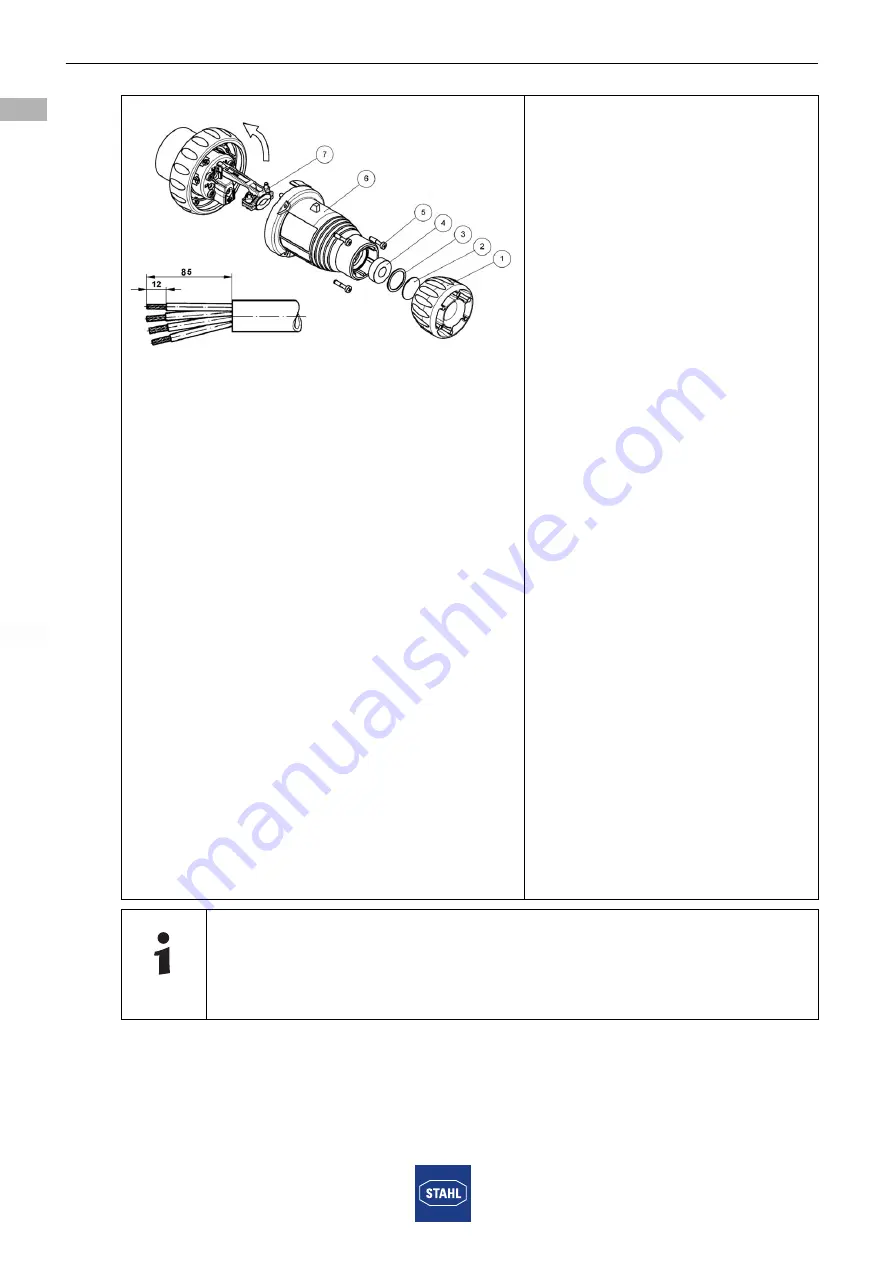
• Unscrew the screw connection
(1) and remove the dust cover
plate (2).
• Remove the pressure ring (3)
and sealing ring (4).
• Loosen the enclosure screws
(5) and remove the connector
enclosure (6).
• Insert the conductor
(max. 4 mm
2
) into the screw
connection, pressure ring and
seal. If necessary, adjust the
internal diameter of the seal by
trimming it to match the
conductor.
• Open the strain relief (7) and
pivot it by 90°.
• Insert the conductors into the
corresponding terminals and
clamp them
(for tightening torque refer to
section "Technical Data").
• The stripped cable ends must
be fully inside the terminal.
• Pivot the strain relief back and
mount it on the conductor.
The clamping point must not
be under strain.
• Screw down the connector
enclosure
(for tightening torque refer to
section "Technical Data").
• Press the seal into the
connector enclosure
(pre-stamped side pointing
inwards), place the pressure
ring and tighten the screw
connection.
On the connection side, the contact pin holder is marked with "Abisolierung"
(stripped insulation) next to the protective conductor connection symbol.
The indentation below indicates the correct stripping length.
Summary of Contents for SolConeX 7570/12 Series
Page 2: ......
Page 16: ...14 225034 7570609300 2014 01 21 BA00 III de 00 SolConeX Stecker 16 A Reihe 7570 12 ...
Page 30: ...14 225034 7570609300 2014 01 21 BA00 III en 00 SolConeX Plug 16 A Series 7570 12 ...
Page 31: ......
Page 32: ...225034 7570609300 2014 01 21 BA00 III de en 00 ...
Page 33: ......


