background image

10

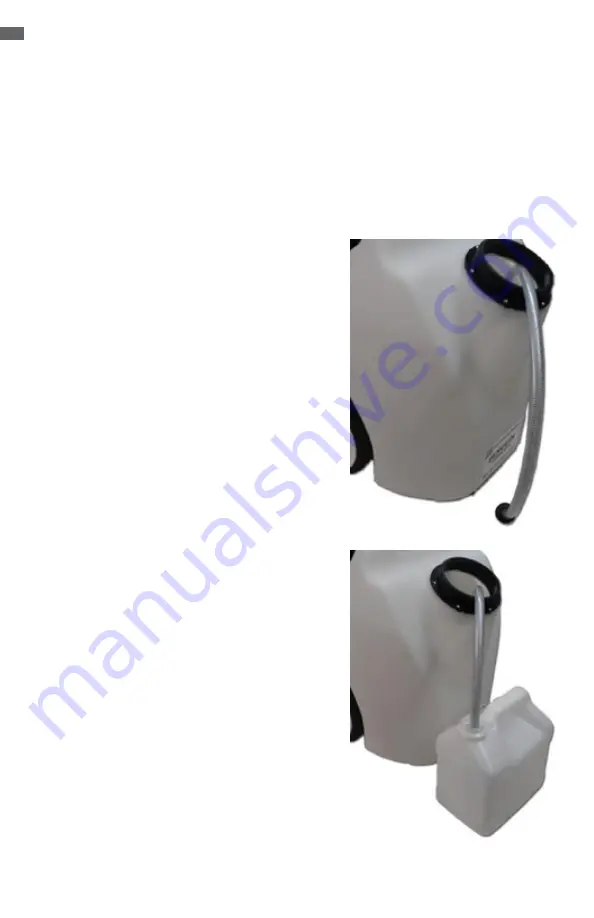
Changing Chemical

1. 

Empty the previous chemical from the tank.

2. 

Pull out the dip hose from inside the tank.

3. 

Insert the dip hose into an external container 

with clean warm water.

4. 

Turn the unit ON and pull the spray gun 

trigger to run the water through the system. 

Continue until any solution in the line is 

rinsed out.

5. 

Turn the unit OFF and place the dip hose 

back into the tank.

6. 

Refill  the  tank  with  the  new  solution.  The 


Penguin Sprayer is now ready for use again.

If you need to change from one chemical to another, you will need to ensure the previous 

chemical is completely flushed from the system before filling with the new chemical.

Summary of Contents for PENGUIN 71-200

Page 1: ...PENGUIN 71 200 Cordless Sprayer user manual www stainoutsystem com REV 7 5 21...

Page 2: ...lting from misuse abuse lack of maintenance unauthorized modification chemical incompatibility or ex posure to freezing temperature conditions are not covered under this warranty This warranty does no...

Page 3: ...3 Table of Contents Safety Information 4 Overview 5 Before Operation 6 Charging the Battery 7 Operation 8 Storage 9 Changing Chemical 10...

Page 4: ...d handling the electrical plug with wet hands as stray electrocution may occur Keep the electrical cord away from heated surfaces Report machine damage or faulty operation immediate ly to your distrib...

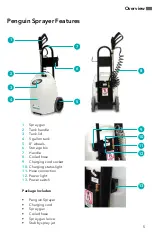
Page 5: ...allon tank 5 8 wheels 6 Storage bin 7 Handle 8 Coiled hose 9 Charging cord socket 10 Charging status light 11 Hose connection 12 Power light 13 Power switch Penguin Sprayer Features Package Includes P...

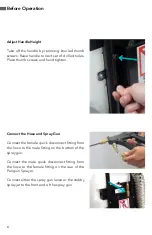
Page 6: ...hand tighten Connect the Hose and Spray Gun Connect the female quick disconnect fitting from the hose to the male fitting on the bottom of the spray gun Connect the male quick disconnect fitting from...

Page 7: ...g make sure the power switch is in the OFF position Charging may take up to 8 hours It is OK to operate the unit while charging Battery will charge while unit is in use Please recharge the unit at the...

Page 8: ...chemical or solution Turn the power switch to the ON position You will hear the pump begin to run as the pump pressure builds up and fills the hose it will stop The pump will run when the trigger on...

Page 9: ...some diluted solutions tend to thicken when sitting for a period of time and may cause an obstruction If storing in freezing conditions please make sure that the unit contains no water in cluding in t...

Page 10: ...n trigger to run the water through the system Continue until any solution in the line is rinsed out 5 Turn the unit OFF and place the dip hose back into the tank 6 Refill the tank with the new solutio...

Page 11: ...11 NOTES...

Page 12: ...StainOut System 1611 A S Melrose Dr 207 Vista CA 92081 760 224 9352...

Reviews: