- 9 -
EN
•
Ensure adequate ventilation of the device. The ambient temperature should not exceed 50 °C.
•
In case of walls made of flammable materials (e.g. wood), the distance between the wall and the device should not be less
than 50 cm.
•
Before connecting the unit to the power source, set the power switch to the OFF position „0”.
•
The device should be connected to a 230V / 50Hz socket with a 30 mA differential current protection switch.
•
We recommend connecting the device to a wall-mounted socket. A failure of the electrical system may occur if you connect
the grill to a socket already used by another device.
•
The power supply socket should have current measurements related to safety and protection against electric shock.
•
All connections and interference with the device must be carried out by qualified individuals only who are properly trained to
operate in accordance with health & safety rules.
6. HEALTH & SAFETY RULES
In order to prevent burns and electric shock, the following safety rules must be strictly followed:
•
the personnel must be trained in the use of the device in accordance with the information contained in this manual;
•
the personnel must be trained in the basic rules of using electrical devices, safety in the workplace and providing first aid
when required,
•
make sure that the device is ready for operation before switching it on;
•
prior to any maintenance work, disconnect the device from the power source;
•
do not switch on the device if any heating and/or control element has been damaged;
•
use proper tools (e.g. pliers) to take out the food;
•
do not wash the device under running water;
•
do not touch the heating plates or walls of the device body with bare hands;
•
when working with the device, the user has to make sure his/her hands are dry;
•
any repairs to the device may only be carried out by qualified technical personnel (technical service team).
7. OPERATION OF THE DEVICE
•
Prior to first use, remove the protective film from the device. Wash the outer surfaces of the body with warm water and a
degreasing agent used to clean the dishes. Do not use abrasive or other substances that could scratch the surface. Use only a
damp cloth for cleaning. After washing the device, leave it to dry completely.
•
Before connecting the unit to the power source, set the power switch to the OFF position „0”.
•
ATTENTION!!!
The process of „burning out” of the device during the first use should be carried out. Proceed as follows:
•
turn on the device by switching the power switch to position 1
•
set the temperature at 300 °C by turning the knob (once the device reaches this temperature, the control lamp will
go out)
•
wait approx. 15 minutes after the lamp goes out, and then you can proceed with frying
.
•
Turn the device on with the green button.
•
Turn on the device’s power with the green button.
•
Select the heating temperature by setting the temperature control knob to 50 - 300 °C (the lamp will up).
•
When the temperature of the plate reaches the set value, the thermostat will disconnect the power supply, the heating indi-
cator will go off. When the temperature drops below the set value, the controller will turn on the power again and the signal
lamp will light up.
•
When the food is ready to eat, put it into the pan with the help of wooden or plastic accessories. To avoid damage to the plates,
do not use metal accessories.
•
Do not touch the plate or the walls of the device with bare hands, these elements are hot when the device is in use
•
When working with the device, the user must ensure that his/her hands are dry.
•
In the case of a double contact grill, there are two temperature controllers: the left controller is responsible for heating the left
plates, and the right one controls the temperature of the right plates; the left light signals the operation of the left-hand plates,
and the right lamp - the operation of the right-hand plates.
•
After finishing work, clean the body of the device and remove any food scrapings from the drawer for collecting grease. Wipe
the heating plates with a paper towel.
7.1.
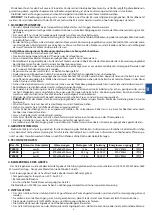
Control panel:
1
2
3
1.
Heating control lamp
2.
Power ON / OFF switch
3.
Temperature controller knob
7.2.
Adjustment of the plate lowering and lifting brake:
Depending on the need and intensity of use of the device, the customer should adjust the brake calipers. Unscrew the rear
hinge cover. The adjustment is done by tightening the screws clockwise. This should be done after the device has cooled to room
temperature.
Summary of Contents for 742018
Page 11: ......


