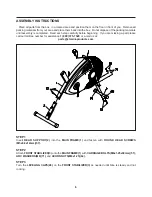
ASSEMBLY INSTRUCTIONS
STEP 4
Attach the
SEAT(43)
to the
SEAT POST(4)
with
NYLOCK NUTS(M8x1.25)(62)
and
WASHERS(M8)(67).
Slide
BELLOWS(45)
over the
SEAT POST(4).
Insert the
SEAT POST(4)
into the
MAIN FRAME(1)
and lock
in position with
LOCKING KNOB(46).
7
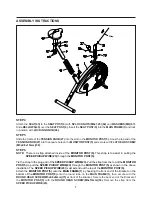
Strap
There is a strap attached inside of the
MONITOR POST(5).
This strap is to assist in pulling the
SPEED PICKUP WIRE(23)
through the
MONITOR POST(5).
Tie the strap to the plug end of the
SPEED PICKUP WIRE(23).
Pull the strap from the top of the
MONITOR
POST(5)
to pull the
SPEED PICKUP WIRE(23)
through the
MONITOR POST(5)
as shown in the above
illustration. The
SPEED PICKUP WIRE(23)
must extend out the top of the
MONITOR POST(5).
Attach the
MONITOR POST(5)
onto the
MAIN FRAME(1)
by hooking the front end of the Bracket on the
bottom of the
MONITOR POST(5)
onto the round tube on the
MAIN FRAME(1),
then secure with the
ROUND HEAD SCREW(M5x0.8x6mm)(73)
at front of the Bracket. Secure the back end of the Bracket of
the
MONITOR POST(5)
with the
ROUND HEAD SCREW(M5x15mm)(53).
Remove the strap from the
SPEED PICKUP WIRE(23).
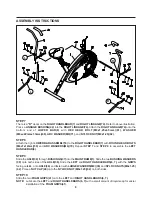
STEP 5
Slide the Cable of the
TENSION KNOB(27)
into the slot on the
MONITOR POST(5).
Hook the top end of the
TENSION KNOB(27)
into the square hole on the
MONITOR POST(5)
and secure with
FLAT HEAD SCREW
(M5x0.8x15mm)(58).
STEP 6
NOTE:

