background image

3

TABLE OF CONTENTS

SAFETY INSTRUCTIONS

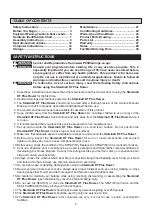
1. Save these instructions and ensure that other exercisers read this manual prior to using the 

Stamina® 

DT Plus Rower 

for the first time.

2. Read all warnings and cautions posted on the 

Stamina® DT Plus Rower.

3. The 

Stamina® DT Plus Rower

 should only be used after a thorough review of the Owner’s Manual. 

Make sure that it is properly assembled and tightened before use.

4. We recommend that two people be available for assembly of this product.

5. Keep children away from the 

Stamina® DT Plus Rower.

 Do not allow children to use or play on the 

Stamina® DT Plus Rower.

 Keep children and pets away from the 

Stamina® DT Plus Rower 

when it 

is in use.

6. It is recommended that you place this exercise equipment on an equipment mat.

7. Set up and operate the 

Stamina® DT Plus Rower

 on a solid level surface. Do not position the 

Stamina® DT Plus Rower

 on loose rugs or uneven surfaces.

8. Make sure that adequate space is available for access to and around the 

Stamina® DT Plus Rower.

9. Before using, inspect the 

Stamina® DT Plus Rower

 for worn or loose components, and securely 

tighten or replace any worn or loose components prior to use.

10. Before using, check the condition of the STRAP(50). Replace the STRAP(50) if it is cracked or broken.

11. Consult a physician prior to commencing an exercise program and follow his/her recommendations in 

developing your fitness program. If at any time during exercise you feel faint, dizzy, or experience pain, 

stop and consult your physician.

12. 

Always choose the workout which best fits your physical strength and flexibility level. Know your limits 

and train within them. Always use common sense when exercising.

13. Do not wear loose or dangling clothing while using the 

Stamina® DT Plus Rower.

14. Never exercise in bare feet or socks; always wear proper footwear such as running, walking, or cross 

training shoes that fit well, provide foot support, and feature non-skid rubber soles.

15. Be careful to maintain your balance while using, mounting, dismounting, or assembling the 

Stamina® 

DT Plus Rower,

 loss of balance may result in a fall and bodily injury.

16. Do not use the SEAT(45) to move the 

Stamina® DT Plus Rower.

 The SEAT(45) will move and the 

SEAT CARRIAGE(10) may pinch your hand or fingers.

17. The 

Stamina® DT Plus Rower

 should not be used by persons weighing over 250 pounds.

18. The 

Stamina® DT Plus Rower

 should be used by only one person at a time.

19. The 

Stamina® DT Plus Rower

 is for consumer use only. It is not for use in public or semipublic 

facilities.

!


WARNING

Cancer and Reproductive Harm www.P65Warnings.ca.gov

 Consult your physician before starting this or any exercise program. This is 

especially important if you are over the age of 35, have never exercised before, 

are pregnant, or suffer from any health problem. This product is for home use 

only. Do not use in institutional or commercial applications. Failure to follow all 

warnings and instructions could result in serious injury or death.

 To reduce the risk of serious injury, read the following Safety Instructions 

before using the Stamina® DT Plus Rower.

!


WARNING

!


WARNING

Safety Instructions ......................................  3

Before You Begin ........................................  5

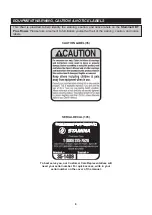
Equipment Warning, Caution & Notice Labels 

...  6

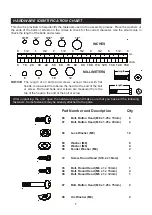
Hardware Identification Chart ....................  7

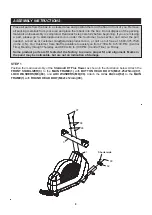
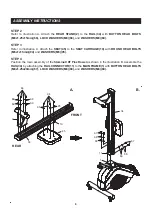
Assembly Instructions ................................ 8

Operational Instructions ........................... 12

Computer Instructions .............................. 14

Storage .......................................................  21

Maintenance ............................................... 21

Conditioning Guidelines ........................... 22

Warm-Up and Cool-Down .........................  23

Product Parts Drawing .............................. 24

Parts List ....................................................  25

Warranty .....................................................  27

Notes ........................................................... 28

Fax/Mail Ordering Form ............................  30

Summary of Contents for 35-1409

Page 1: ...correctly Serious bodily injury can also occur if all instructions are not followed Keep others and pets away from equipment when in use Always make sure all bolts and nuts are securely tightened pri...

Page 2: ......

Page 3: ...them Always use common sense when exercising 13 Do not wear loose or dangling clothing while using the Stamina DT Plus Rower 14 Never exercise in bare feet or socks always wear proper footwear such a...

Page 4: ...and to help us better serve you please go onlineand register your new product register staminaproducts com ONLINE customer care staminaproducts com www staminaproducts com TELEPHONE 1 800 375 7520 FA...

Page 5: ...eled Locate the serial decal on the product and write the serial number on the cover of the manual in the space provided See page 5 for an image of the serial decal Model number and serial number are...

Page 6: ...take a moment to familiarize yourself with all of the warning caution and notice labels EQUIPMENT WARNING CAUTION NOTICE LABELS CAUTION LABEL 35 To best serve you our Customer Care Representatives wi...

Page 7: ...heads is measured from below the head to the end of the bolt or screw Flat head bolts and screws are measured from the top of the head to the end of the bolt or screw After unpacking the unit open the...

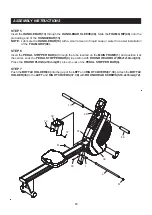
Page 8: ...into the box Do not dispose of the packing materials until assembly is completed Read each step carefully before beginning If you are missing a part please go to staminaproducts com under the Custome...

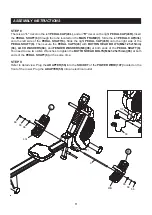
Page 9: ...he SEAT 45 to the SEAT CARRIAGE 10 with ROUND HEAD BOLTS M6x1x15mm 94 and WASHERS M6 95 STEP 4 Position the main assembly of the Stamina DT Plus Rower as shown in the illustration B Assemble the RAIL...

Page 10: ...TEP 6 Insert the PEDAL STOPPER BAR 4 through the tube located on the MAIN FRAME 1 and position it at the center Lock the PEDAL STOPPER BAR 4 in position with ROUND HEAD BOLT M6x1x10mm 93 Press the ROU...

Page 11: ...the PEDAL SHAFT 6 Then secure the PEDAL CAPS 43 with BUTTON HEAD BOLTS M8x1 25x15mm 66 LOCK WASHERS 68 and FENDER WASHERS M8 96 at both ends of the PEDAL SHAFT 6 You need to use two Allen Wrenches to...

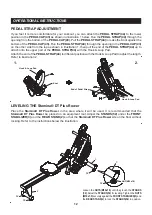
Page 12: ...P 44 with the Hook Loop Pad Attach the end of the PEDAL STRAP 44 to different position with the Hook Loop Pad to adjust the length Refer to illustration 2 Hook Loop Pad Hook Loop Pad Knot 1 2 End of P...

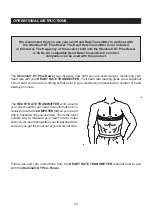
Page 13: ...ot included in this rower The frequency of the receiver built into the Stamina DT Plus Rower is 5k Hz All compatible Heart Rate Transmitters from other companies can be used with this product The HEAR...

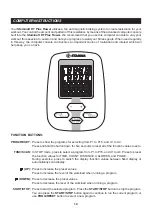
Page 14: ...ad when running a program Press to start the selected program Press the START STOP button to stop the program You can press the START STOP button again to continue to run the current program or use PR...

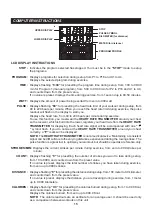
Page 15: ...he preset value Displays the calories burned from zero up to 999 9 Kcal NOTE The calorie readouts are an estimate for an average user It should be used only as a comparison between workouts on this un...

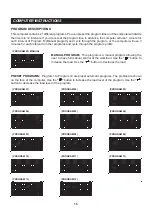
Page 16: ...file PROGRAM M MANUAL MANUAL PROGRAM This program is a manual program allowing the user to have full manual control of the workload Use the button to increase the load Use the button to decrease the l...

Page 17: ...bars will move to the next interval and it means you have met the preset challenge If you do not set the program time and distance in advance the computer will use 10 minutes and 4 kilometer to run th...

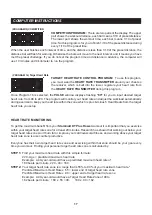
Page 18: ...omatic programs that allow the user to manually preset each of the 12 intervals Under STOP mode use and FUNC SCAN buttons to edit the program profile The program profile will be stored in the memory a...

Page 19: ...put items as follows and allow you to set the function values Use and FUNC SCAN buttons to input the values STEP 4 START THE WORKOUT Press the START STOP button to start the workout Time 5 00 to 99 00...

Page 20: ...tion values to zero Use PROG RESET button to select a new program 4 The computer will shut off automatically after 4 minutes of inactivity and all function values will be reset to zero D USER SETTING...

Page 21: ...Pull on the HANDLEBAR 13 and verify that the Fan and Magnetic System provides tension and the seat travel is smooth and stable 2 Clean the roller tracks in the RAIL 34 with an absorbent cloth 3 Verif...

Page 22: ...ty of your maximum heart rate zone Start at the lower intensity and build up to higher intensity as you become more aerobically fit If you feel dizzy or lightheaded you should slow down or stop exerci...

Page 23: ...our cool down should include the stretches listed above and should be completed after each strength training session Lower Body Stretch Place feet shoulder width apart and lean forward Keep this posit...

Page 24: ...31 79 80 81 22 55 74 22 74 19 20 21 36 55 72 72 75 75 71 69 69 68 68 71 70 70 59 59 59 59 10 67 54 67 54 9 67 69 71 54 67 69 54 71 69 68 66 34 69 68 67 67 68 69 95 95 94 94 45 39 72 72 51 77 69 69 68...

Page 25: ...1 24 Strap Pulley 1 25 Strap Pulley Cover 1 26 Magnet 1 27 Spiral Spring Core 1 28 Flat Spiral Spring 1 29 Pulley 1 30 One way Bearing 1 31 Bearing 6000 3 32 Strap Pulley Shaft 1 33 Lower Idler Wheel...

Page 26: ...r M10 2 81 Nylock Nut M10 x 1 5 1 82 Bolt Socket Head M6 x 1 x 16mm 4 83 Lock Washer M6 4 84 Nylock Nut M6 x 1 4 85 Eye Bolt M6 x 1 2 86 Tension Bracket 2 87 Nut M6 x 1 2 88 C Ring S10 1 89 C Ring S17...

Page 27: ...RRANTY INCLUDING MERCHANTABILITY AND FITNESS FOR A PARTICULAR PURPOSE MAY BE COMMENCED MORE THAN ONE 1 YEAR AFTER DELIVERY OF THE PRODUCT TO THE PURCHASER These warranties are not transferable IF ANY...

Page 28: ...NOTES 28...

Page 29: ...NOTES 29...

Page 30: ...nvenience Stamina s customer care representatives can be reached by email at customer care staminaproducts com or by phone at 1 800 375 7520 in the U S Our customer care representatives are available...

Reviews: