background image

5

Part No. and Description

 Qty

42

Nylock Nut (M6 x 1)

    2

38

Bolt, Round Head (M6 x 1 x 10mm)

    2

40

Bolt, Hex Head (M6 x 1 x 47mm)

    2

44

Larger Washer (M6)

    2

45

Washer (M6)

  4

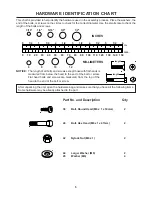
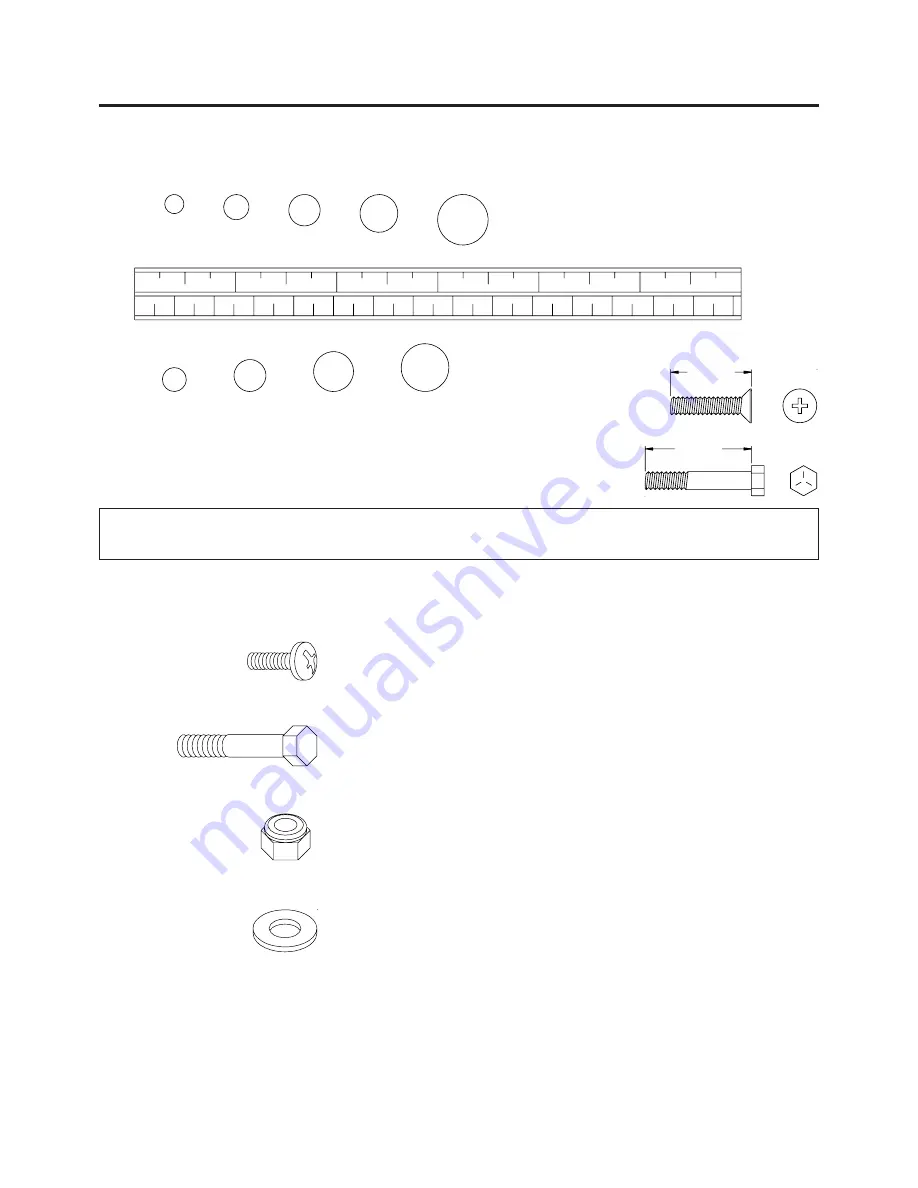
HARDWARE IDENTIFICATION CHART

This chart is provided to help identify the hardware used in the assembly process. Place the washers, the
end of the bolts, or screws on the circles to check for the correct diameter. Use the small scale to check the
length of the bolts and screws.

NOTICE:

The length of all bolts and screws except those with flat heads is
measured from below the head to the end of the bolt or screw.
Flat head bolts and screws are measured from the top of the
head to the end of the bolt or screw.

mm.

in.

INCHES

MILLIMETERS

1

1/2

0

2

1/2

3

1/2

4

1/2

5

1/2

6

1/2

0

10

20

30

40

50

60

70

80

90

100

110 120

130 140 150

6

8

10

12

3/16"

5/16"

1/2"

3/8"

1/4"

length

length

After unpacking the unit, open the hardware bag and make sure that you have all the following items.
Some hardware may be already attached to the part.

Summary of Contents for 55-1532

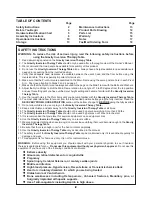
Page 1: ...this equipment Serious bodily injury can occur if this equipment is not assembled and used correctly Serious bodily injury can also occur if all instructions are not followed Keep others and pets away from equipment when in use Always make sure all bolts and nuts are tightened prior to each use Follow all safety instructions in this manual When calling for parts or service please specify the follo...

Page 2: ... more than 250 lbs The Gravity Inversion Therapy Table should not be used by persons over 6 feet 6 inches tall It is recommended that you place this exercise equipment on an equipment mat Use the Gravity Inversion Therapy Table only on a level surface Wear appropriate clothing when exercising do not wear loose clothing that could become caught in the Gravity Inversion Therapy Table Be sure that th...

Page 3: ...body into shape and on your way to achieving a happier and healthier lifestyle CALL US FIRST 3 Should you have any questions please call our Customer Service Department toll free number 1 800 375 7520 Monday Thursday 7 30 A M 5 00 P M Central Time Friday 8 00 A M 3 00 P M Central Time TELEPHONE CUSTOMER SERVICE Tel 1 800 375 7520 FAX CUSTOMER SERVICE Fax 417 889 8064 MAIL STAMINA PRODUCTS INC ATTN...

Page 4: ...ench Although Stamina manufactures its products with the finest materials and uses the highest standards of manufacturing occasionally a part that does not fit is the incorrect size or is otherwise inappropriate is found Even with the highest inspection and quality controls in place these things will happen occasionally Please do not return the product Contact us FIRST If a part is missing or defe...

Page 5: ...e to check the length of the bolts and screws NOTICE The length of all bolts and screws except those with flat heads is measured from below the head to the end of the bolt or screw Flat head bolts and screws are measured from the top of the head to the end of the bolt or screw mm in INCHES MILLIMETERS 1 1 2 0 2 1 2 3 1 2 4 1 2 5 1 2 6 1 2 0 10 20 30 40 50 60 70 80 90 100 110 120 130 140 150 6 8 10...

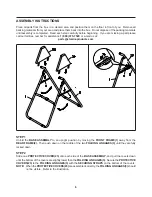
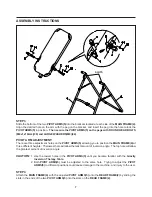
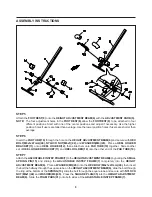
Page 6: ...cts com 6 STEP 1 Unfold the BASE ASSEMBLY to an upright position by moving the FRONT FRAME 1 away from the REAR FRAME 2 Then push down on the middle of the two FOLDING LINKAGES 3 until they are fully locked down STEP 2 Slide one PROTECTIVE COVER 23 onto each side of the BASE ASSEMBLY and pull the covers down until the bottom of the covers are slightly lower than the FOLDING LINKAGES 3 Secure the P...

Page 7: ... to position the MAIN FRAME 4 at three different heights The lowest hole will allow the least amount of inversion angle The top hole will allow the greatest amount of inversion angle CAUTION STEP 4 Attach the MAIN FRAME 4 with the adjusted PIVOT ARMS 5 onto the REAR FRAME 2 by sliding the slots in the ends of the two PIVOT ARMS 5 into the slots on the REAR FRAME 2 Use the lowest holes in the PIVOT...

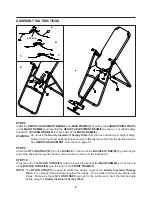
Page 8: ...e ADJUSTABLE INSTEP FRAME 7 completely into the HEIGHT ADJUSTMENT BEAM 6 Place a WASHER M6 45 onto the HEX BOLT M6x1x47mm 40 then insert the bolt the halfway through the square tube on the HEIGHT ADJUSTMENT BEAM 6 slide the bolt through the ring at the bottom of the SPRING 13 slide the bolt through the square tube and secure with NYLOCK NUT M6x1 42 and WASHER M6 45 Press the SQUARE PLUG 35 into th...

Page 9: ... STRAP 27 onto the loop on the back of the MAIN FRAME 4 Hook the end of the BUCKLE STRAP 28 onto the loop on the FRONT FRAME 1 NOTE A C B BUCKLE Do not use the Gravity Inversion Therapy Table until you have verified your height setting Failure to use the proper height setting can result in difficulty recovering from the decline position See HEIGHT ADJUSTMENT instructions on page 10 The NYLON STRAP...

Page 10: ...y Table is a very sensitive balance device It responds to very slight changes in weight distribution It is very important to make sure that the height adjustment is set properly Use the following procedure to set the height adjustment and balance the Gravity Inversion Therapy Table Adjust the NYLON STRAPS to restrict movement to approximately 15 degrees beyond the horizontal position The nylon str...

Page 11: ...ion table will be as far back as it can go As you get more comfortable with the use rock the bed slowly by moving your arms up and down slowly A gentle swinging motion will alternately put your spine in traction and compression This rhythmic type of traction is used by many hospitals and doctors to treat certain back problems It is recommended that the inversion table be used for five or ten minut...

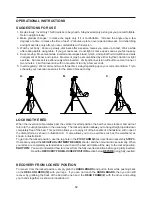
Page 12: ...UGGESTIONS FOR USE 1 2 3 4 5 A B C LOCKING THE BED When the inversion table rotates past the vertical inverted position the bed becomes locked and will not return to the upright position in the usual way The locked position allows you to hang straight upside down completely free of the bed This position allows you to enjoy all of the benefits of a handstand with none of the discomforts as shown in...

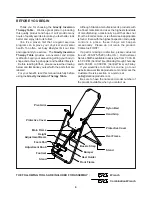
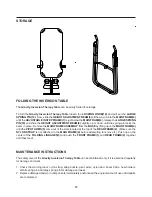
Page 13: ...lifting up on the MAIN FRAME 4 until the PIVOT ARMS 5 come out of the slots located at the top of the REAR FRAME 2 Make sure the NYLON STRAP is not attached to the MAIN FRAME 4 before attempting to remove it Push up on the center of the FOLDING LINKAGES 3 and push the FRONT FRAME 1 and REAR FRAME 2 together until they meet MAINTENANCE INSTRUCTIONS The safety level of the Gravity Inversion Therapy ...

Page 14: ...PRODUCT PARTS DRAWING BACK FRONT 14 ...

Page 15: ... 2 25 Bumper 1 26 Hook 2 27 Nylon Strap 1 28 Buckle Strap 1 29 Hollow Cap 1 30 Stand 4 31 Foam Pad 2 32 Dome Plug 22 2mm 4 33 Round Plug 31 8mm 2 34 Square Plug 33 4mm x 33 4mm 1 35 Square Plug 38mm x 38mm 2 36 Oval Plug 20mm x 60mm 2 37 Support Washer 1 38 Bolt Round Head M6 x 1 x 10mm 2 39 Bolt Round Head M6 x 1 x 40mm 4 40 Bolt Hex Head M6 x 1 x 47mm 2 41 Bolt Hex Head M8 x 1 25 x 25mm 2 42 Nyl...

Page 16: ...HASER This limited warranty is not transferable IF ANY PART OF THE PRODUCT IS NOT IN COMPLIANCE WITH THIS LIMITED WARRANTY OR ANY IMPLIED WARRANTY THE REMEDY OF REPAIR OR REPLACEMENT IS THE EXCLUSIVE REMEDY AVAILABLE TO YOU In the event that the purchaser makes any claim under this limited warranty or any implied warranty the Warrantor reserves the right to require the product to be returned for i...

Page 17: ...NOTES 17 ...

Page 18: ... 800 375 7520 in the U S from 7 30 A M 5 00 P M Central Time Monday Thursday and 8 00 A M 3 00 P M on Friday or fill out the fax sheet ordering form below and fax it to 417 889 8064 Our Customer Service Department will be able to assist you with your problem and the part will be mailed directly to your house Mr Ms Address Apt City State Zip Code Phone Work Phone Date Purchased Model Purchased From...

Reviews: