ASSEMBLY INSTRUCTIONS
8
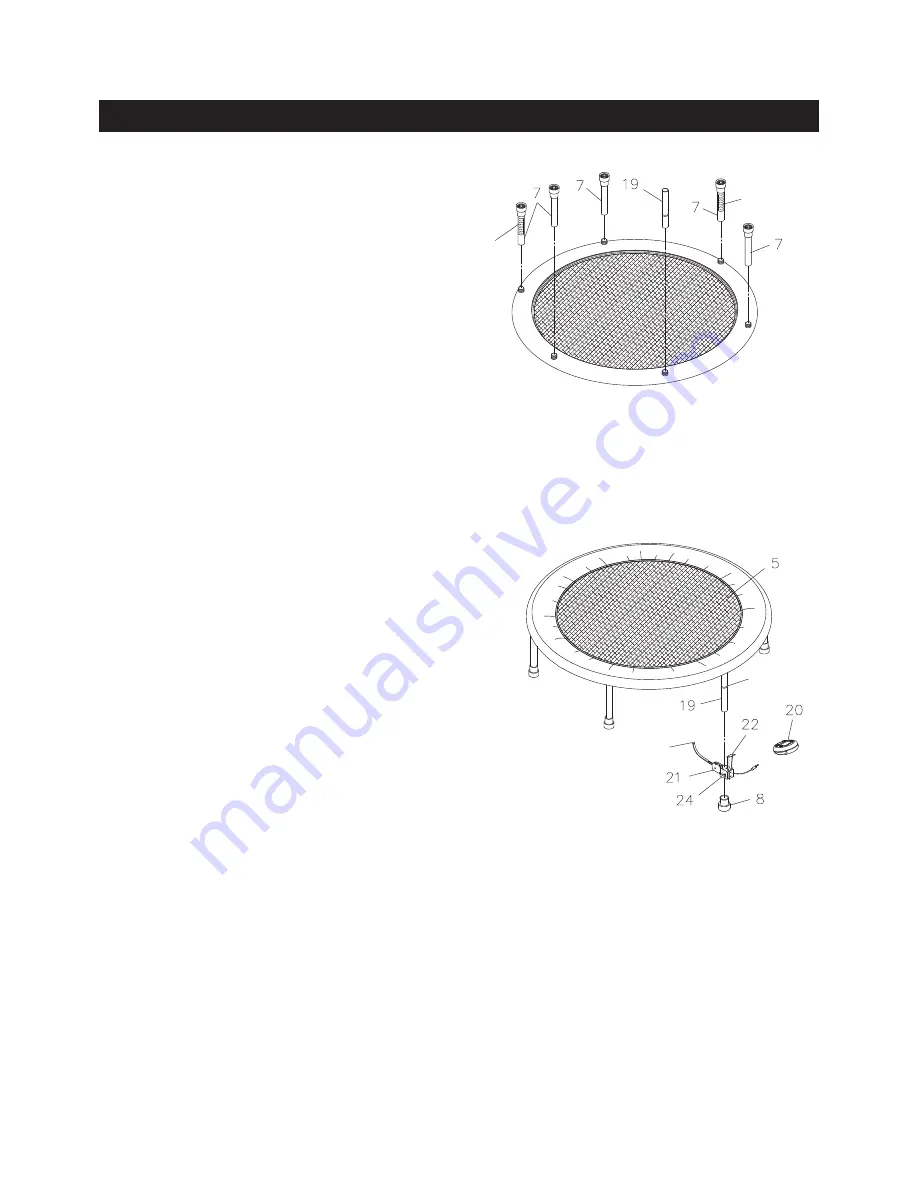
STEP 5
Place the trampoline in the normal use position. Loosen
the
LOCKING KNOB(24)
on the
SENSOR DETECTOR
(21)
to allow the
FLUTED LEG(19)
to slide through the
hole in the
SENSOR DETECTOR(21).
Slide the
SENSOR
DETECTOR(21)
onto the
FLUTED LEG(19)
and slide up
until the
SENSOR DETECTOR(21)
snaps into the flute.
Adjust the position of the
SENSOR DETECTOR(21)
so that
the tip is slightly touching the bottom of the
MAT(5).
Be
sure the
SENSOR DETECTOR(21)
is not pressed firmly
against the bottom of the mat or bent downward. If it is
not adjusted correctly, there is a chance that the
SENSOR
DETECTOR(21)
won’t work properly or that the arm will
break during use. Lock the
SENSOR DETECTOR(21)
in
position with the
LOCKING KNOB(24).
Press the
LEG
CAP(8)
on the
FLUTED LEG(19).
STEP 6
Install an AA battery into the
METER(20),
battery is not
included. See page 12 for detailed battery installation
instructions. Slide the
METER(20)
onto the
MOUNTING
BRACKET(22).
Plug the sensor wire on the
SENSOR
DETECTOR(21)
into the back of the
METER(20).
5.
Flute
Tip
4.
Warning
Label
Warning
Label
STEP 4
Refer to the position of the legs as shown in
illustration 4. First, screw the
FLUTED LEG(19)
into one of the threaded connectors on the
rail frame. Next, attach the two
LEGS(7)
with
Warning Labels on sides opposite from each
other. Finish by attaching the remaining three
LEGS(7)
.
Summary of Contents for inTONE Plus 35-1632
Page 18: ...PRODUCT PARTS DRAWING 18 ...
Page 21: ...NOTES 21 ...


