background image

DE

15

EN

BEFORE FIRST USE

Upon receipt of the goods, check the packaging for integrity and open it. If the packaging 
is damaged, please contact your transport company and distributor within 3 days, and 
document the damages as detailed as possible. Do not turn the package upside down! 
When transporting the package, please ensure that it is kept horizontal and stable. Ple-
ase keep all packaging materials (cardboard, plastic tapes and styrofoam), so that in case 
of a problem, the device can be sent back to the service centre in accurate condition.

Disposing of packaging
The various items used for packaging (cardboard, plastic straps, polyurethane foam) 
should be conserved, so that the device can be sent back to the service center in best 
conditions in case of problem!

INSTALLING THE APPLIANCE

Appliance location
The work surface where the device will be located must be suitable for the size of the 
appliance, please refer to the measurements. The work surface must be levelled, dry, 

heat-resistant and at a fitting height from the ground to enable a proper use of the 

device.

The power cord connected to the appliance must be properly grounded and corres-
pond to the technical details.

After the device has been positioned at the desired location, remove the screws on the 
bottom side of the unit (transport protection). The screws are marked in red and must 
be removed before use. If the device needs to be transported, put the screws back at 
their places.

EN

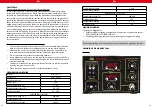
SMD REWORK STATION OPERATION:

1.  Device must be placed on stable work table, SMD rework gun must be placed 

into the holder.

2. 

Fix the appropriate nozzle and connect the device to the power source.

3.  Turn on the device with the main switch placed at the back of the device, turn on 

the SMD rework gun with switch (12), gun will start to heat. 

4.  Set the desired temperature using knob (5). Display (10) will show this tempera-

ture for a moment and then it will show the actual temperature of the gun. Heat 

indicator (8) flashes during heating and maintaining the set value of the tempera

-

ture. After temperature stabilization, desired air flow volume can be adjusted by 

knob (4).

5.  After work, the SMD rework gun should be placed into the holder. Turn off the 

SMD rework by switch (12). If the temperature at this moment is higher than 
100 

C, the device will cool down the gun and turns off.

6.  If the device is not using for a long time, it should be completely disconnected 

from the power source.

SOLDERING STATION OPERATION

1.  Device must be placed on stable work table, soldering iron must be placed into 

the holder.

2. 

Fix the appropriate soldering tip and connect the device to the power source.

3.  Turn on the device with the main switch placed at the back of the device, turn on 

the soldering iron with switch (11), it will start to heat. Heat indicator (6) flashes 

during heating and maintaining the set value of the temperature.

4.  Using knob (2) set the desired temperature. Display (9) will show this temperature 

for a moment and then it will show the actual temperature of the soldering iron. 

5.  After work, the soldering iron should be placed into the holder. Turn off the solde-

ring station by switch (11).

6.  If the device is not used for a long time, it should be completely disconnected from 

the power source.

CHANGING THE TEMPERATURE DISPLAY UNITS

Switch (7) is designed for changing the temperature units between Celsius and Fahren-
heit (

C – Celsius, 

F – Fahrenheit)

GENERAL REMARKS

1.  If the display is showing “S-E” it means that soldering iron is disconnected, and 

HOT AIR gun is having problem with the heat sensor.

2.  When the device is being turned on, both soldering iron and HOT AIR gun should 

be placed in their holders.

3.  The outlet of the SMD rework gun should be clean and free from any obstacles.

4.  When using small nozzles, it should be remembered that the air flow should be

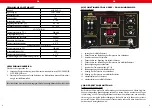
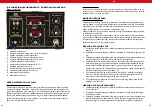
1.  SMD rework gun cable
2.  soldering iron temperature setting knob 
3.  soldering iron connection socket
4. 

air flow volume adjustment knob 

5.  SMD rework gun temperature setting knob 
6.  soldering iron heating indicator 
7.  temperature unit switch (C / F)
8.  SMD rework gun heating indicator 
9.  soldering iron temperature display 
10.  SMD rework gun temperature display 
11.  soldering iron on / off switch 
12.  SMD rework gun on / off switch

14

Summary of Contents for S-LS-11

Page 1: ... S W E L D I N G c o m User manual Manuel d utilisation Istruzioni per l uso Manual de instrucciones BEDIENUNSANLEITUNG LÖTSTATION HEISSLUFT ENTLÖTSTATION SOLDERING STATION SMD REWORK STATION STACJA LUTOWNICZA STACJA HOT AIR ...

Page 2: ...ng des Gerätes verbessern und gleichzeitig Wärmestaus vermeiden Ziehen Sie vor der Reinigung dieses Gerätes den Netzstecker und benutzen Sie zur Reinigung nur ein feuchtes Tuch Vermeiden Sie den Einsatz von Putzmitteln und ach ten Sie darauf dass keine Flüssigkeit in das Gerät eindringt bzw darin verbleibt Das Innere dieses Gerätes enthält keine durch den Benutzer zu wartende Teile Über lassen Sie...

Page 3: ...icht 1 2 3 4 5 6 9 8 10 11 12 1 Leitung des Heißluft Entlöters 2 Drehschalter zur Einstellung der Temperatur des Lötkolbens 3 Anschlussstelle des Lötkolbens 4 Drehschalter zur Regelung des Luftdurchflusses 5 Drehschalter zur Einstellung der Temperatur des Heißluft Entlöters 6 Erhitzungsanzeige des Lötkolbens 7 Schalter der Temperatureinheit C F 8 Erhitzungsanzeige des Heißluft Entlöters 9 Anzeige ...

Page 4: ...tromversorgung zu trennen BEDIENUNG DER LÖTSTATION 1 Die Einrichtung ist auf stabilen Boden zu legen der Lötkolben ist in der Halte rung zu befestigen 2 Befestigen Sie die entsprechende spitze am Lötkolben und schließen Sie anschlie ßend das Gerät ans Netz an 3 Die Einrichtung ist unter Anwendung eines Hauptschalters im hinteren Bereich einzuschalten der Lötkolben wird unter Anwendung des Schalter...

Page 5: ...ER HEIZELEMENTE DER HEISSLUFT ENTLÖTSTATION 1 Vor Auswechseln des Heizelementes muss überprüft werden dass die Heißluft Entlötstation vollkommen abgekühlt ist 2 Die Schrauben von der Abdeckung des Kolbens entfernen 3 Den Griff 2 lösen die Umfassung des Lötkolbens abnehmen 4 DenVentilator vorsichtig herausnehmen und die Schrauben welche die Platte mit den Leitungen verbindet vorsichtig herausdrehen...

Page 6: ...or Sie anfangen zu reinigen trennen Sie das Gerät von der Stromversorgung REGELMÄSSIGE PRÜFUNG DES GERÄTES Prüfen Sie regelmäßig ob Elemente des Gerätes Beschädigungen aufweisen Sollte dies der Fall sein wenden Sie sich an IhrenVerkäufer um Nachbesserungen vorzunehmen Was tun im Probl emfall Kontaktieren Sie IhrenVerkäufer und bereiten Sie folgende Angaben vor Rechnungs und Seriennummer letztere f...

Page 7: ...to the device and should always be acces sible for the users Instruct your employees how to use the device properly Make sure the hot air can circulate well and place the device more than10 cm away from walls and other electrical devices Aerate well the working area Do not place the device close to combustible materials It may happen that by first use the heating element produces a light smoke Thi...

Page 8: ... of the tempera ture After temperature stabilization desired air flow volume can be adjusted by knob 4 5 After work the SMD rework gun should be placed into the holder Turn off the SMD rework by switch 12 If the temperature at this moment is higher than 100 C the device will cool down the gun and turns off 6 If the device is not using for a long time it should be completely disconnected from the p...

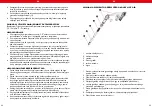
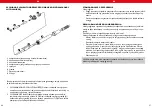
Page 9: ...rework gun may be covered with some dust The outlet should be cleaned on a regular basis in order to ensure undistur bed air flow 5 Too high temperature of the soldering iron may be the cause of reduction of the functionality of the soldering tips 6 Soldering iron tip must be cleaned regularly using sponge and plate on a layer of tin to prevent tips oxidation REPLACEMENT OF SMD REWORK HEATING ELEM...

Page 10: ...he appliance from the main power circuit REGULAR CONTROL OF THE DEVICE Control regularly that the device doesn t present any damage If it should be the case please contact your customer service to solve the problem What to do in case of problem Please contact your customer service and prepare following information Invoice number and serial number the latest is to be found on the technical pla te o...

Page 11: ...ulowaniem i naprawą urządzenia należy zlecić wyspecjalizowanemu personelowi W przypadku napraw dokonywanych przez osoby trzecie gwarancja wygasa Ogólne zalecenia odnośnie użytkowania Należy sporządzić i udostępnić instrukcję eksploatacji i przeszkolić osoby zatrud nione w zakresie zgodnego z przeznaczeniem obchodzenia się Instrukcja eksplo atacji musi być stale dostępna w miejscu eksploatacji urzą...

Page 12: ...kolbę należy umieścić w uchwycie i wyłączyć ją wyłączni kiem 12 Jeśli temperatura kolby w tym momencie będzie wyższa niż 100 C urządzenie schłodzi ją automatycznie po czym wyłączy się 6 W przypadku gdy urządzenie nie jest używane przez długi okres czasu należy odłączyć je od zasilania OBSŁUGA STACJI LUTOWNICZEJ 1 Urządzenie należy umieścić na stabilnym podłożu kolbę lutowniczą należy umie ścić w u...

Page 13: ...ła UWAGI ODNOŚNIE BEZPIECZEŃSTWA 1 Dysze należy instalować bez użycia przesadnej siły nie należy używać do tego celu obcęgów czy szczypiec Nie należy zbyt mocno przykręcać śrub mocujących dyszę 2 Dysze i końcówki można wymieniać gdy kolby są całkowicie zimne 3 Zabrania się używania urządzenia w pobliżu elementów gazów łatwopalnych lub innych tego typu obiektów Dysze oraz końcówki kolb jak również ...

Page 14: ...należy używać jakich kolwiek szczotek czy przyborów które mogłyby uszkodzić powierzchnię urzą dzenia Przed rozpoczęciem czyszczenia urządzenie należy odłączyć od źródła zasilania energią REGULARNA KONTROLA URZĄDZENIA Należy regularnie sprawdzać czy elementy urządzenia nie są uszkodzone Jeżeli ele menty te będą uszkodzone to należy zwrócić się do sprzedawcy z prośbą o ich na prawę Co należy zrobić ...

Page 15: ...28 NOTIZEN NOTES 29 NOTIZEN NOTES ...

Page 16: ...CE konform sind EN We hereby certify that the appliances listed in this manual are CE compliant FR Par la présente nous confirmons que les appareils présentés dans ce mode d emploi sont conformes aux normes Ce PL Niniejszym potwierdzamy że urządzenia opisane w tej instrukcji są zgodne z deklaracją CE ...

Page 17: ...n Möglichkeiten der Rückgabe oder Sammlung von Altgeräten 1 RICHTLINIE 2002 96 EG DES EUROPÄISCHEN PARLAMENTS UND DES RATES ÜBER ELEKTRO UND ELEKTRONIK ALTGERÄTE 2 Gesetz über das Inverkehrbringen die Rücknahme und die umweltverträgliche Entsorgung von Elektro und Elektronikgeräten Elektro und Elektronikgerätegesetz ElektroG Umwelt und Entsorgungshinweise CONTACT emaks spółka z ograniczoną odpowie...

Reviews: