8
9
17.05.2019
17.05.2019
EN
EN
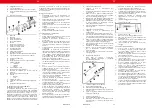
3.1. DEVICE DESCRIPTION
j)
Please keep this manual available for future
reference. If this device is passed on to a third party,
the manual must be passed on with it.
k)
Keep packaging elements and small assembly parts
in a place not available to children.
l)
Keep the device away from children and animals.
m) When working with the device, harmful fumes are
generated. The workplace must be well ventilated
to protect unauthorized persons from the harmful
effects of fumes.
2.3. PERSONAL SAFETY
a)
Do not use the device when tired, ill or under the
influence of alcohol, narcotics or medication which
can significantly impair the ability to operate the
device.
b)
The device is not designed to be handled by persons
(including children) with limited mental and sensory
functions or persons lacking relevant experience
and/or knowledge unless they are supervised by
a person responsible for their safety or they have
received instruction on how to operate the device.
c)
When working with the device, use common sense
and stay alert. Temporary loss of concentration while
using the device may lead to serious injuries.
d)
Use personal protective equipment as required
for working with the device, specified in section 1
(Legend). The use of correct and approved personal
protective equipment reduces the risk of injury.
e)
To prevent the device from accidentally switching on,
make sure the switch is on the OFF position before
connecting to a power source.
f)
The device is not a toy. Children must be supervised
to ensure that they do not play with the device.
2.4. SAFE DEVICE USE
a)
Do not overload the device. Use the appropriate
tools for the given task. A correctly-selected device
will perform the task for which it was designed better
and in a safer manner.
b)
Do not use the device if the ON/OFF switch does not
function properly (does not switch the device on and
off). Devices which cannot be switched on and off
using the ON/OFF switch are hazardous, should not
be operated and must be repaired.
c)
Disconnect the device from the power supply
before commencement of adjustment, cleaning and
maintenance. Such a preventive measure reduces
the risk of accidental activation.
d)
When not in use, store in a safe place, away from
children and people not familiar with the device who
have not read the user manual. The device may pose
a hazard in the hands of inexperienced users.
e)
Keep the device in perfect technical condition.
Before each use check for general damage and
especially check for cracked parts or elements and
for any other conditions which may impact the safe
operation of the device. If damage is discovered,
hand over the device for repair before use.
f)
Keep the device out of the reach of children.
g)
Device repair or maintenance should be carried out
by qualified persons, only using original spare parts.
This will ensure safe use.
h)
To ensure the operational integrity of the device, do
not remove factory-fitted guards and do not loosen
any screws.
i)
Do not leave this appliance unattended while it is in
use.
j)
Clean the device regularly to prevent stubborn grime
from accumulating.
k)
The device is not a toy. Cleaning and maintenance
may not be carried out by children without
supervision by an adult person.
l)
It is forbidden to interfere with the structure of
the device in order to change its parameters or
construction.
m) Keep the device away from sources of fire and heat.
n)
Always place the soldering iron on the holder if it is
not in use.
o)
Keep the soldering tip and parts that can get hot
away from your body, clothing and flammable
objects / substances.
p)
The soldering tip remains hot even after the power
is turned off. Before cleaning or replacing parts, wait
until the device has cooled down completely.
q)
Exercise caution and do not inhale solder fumes.
REMEMBER!
When using the device, protect
children and other bystanders.
3. USE GUIDELINES
The device is designed for soldering, desoldering or
shrinking electronic and electrical connections.
The user is liable for any damage resulting from
unintended use of the device.
ATTENTION!
Despite the safe design of the device
and its protective features, and despite the use of
additional elements protecting the operator, there
is still a slight risk of accident or injury when using
the device. Stay alert and use common sense when
using the device.
2.
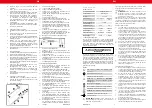
Set the desired temperature value using the knob
[H].
3.
After heating the [C] tip of the soldering iron, coat
the tip with solder. This will protect the tip and
extend its life.
4.
When you have finished work, always place the
soldering iron on the stand.
PLEASE NOTE: It is recommended to reduce the
tip heating temperature using the knob when the
device is not in use. Leaving the device set to high
temperature has a negative effect on the life of the
tip and other heating elements.
NOTE: Before inspecting or repairing electric cables,
etc., make sure that they are not live.
II.
Hot air soldering iron
A.
Use
1.
Before commencing work, select the appropriate
blow nozzle attached to the set and fit it at the sleeve
outlet [1].
2.
Start the device using the switch [11]. The
temperature value will appear on the display [12],
and the device will be operational.
3.
Set the value of desired temperature using the
temperature switch buttons [8].
4.
Set the required blow force using the knob [14].
5.
When the device warms up, direct the nozzle end
towards the soldered element.
6.
When you have finished work, always leave the
soldering iron on the gun support [4].
7.
When you have finished work, it is recommended to
first reduce the temperature to the minimum using
the [8] button, and also increase the blowdown force
for a while with the knob [14] to cool the device. This
procedure extends the life of heating elements.
8.
When you have finished work, reduce the blowdown
force using the knob [14], and then switch the device
off using the switch [11].
B.
Changing temperature scale
1.
Connect the power cord [15] to the power source.
2.
Ensure that the power switch [11] is in the "0"
position.
3.
Press and hold the temperature switch buttons [8]
until the scale symbol displayed on the display [12]
starts blinking.
4.
Select the appropriate scale (Celsius, Fahrenheit)
using the temperature switch buttons [8].
5.
After selecting the appropriate scale, wait
a few seconds. The device will automatically save the
settings.
6.
When the settings are confirmed, the device is ready
to work.
C.
Temperature adjustment
1.
Plug the power cord [15] to the power source.
2.
Start the device using the switch [11].
3.
When the temperature on the display [12] reaches
the required value (e.g. 300°C), measure the
temperature at the nozzle outlet.
4.
Press and hold the temperature switch buttons [8]
until the temperature value on the display [12] starts
blinking.
5.
Enter the appropriate value using the temperature
switch buttons [8].
6.
Confirm the selection by holding and pressing the
temperature switch buttons [8] for approximately
2 seconds. The device will automatically save the
settings.
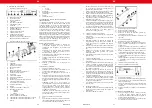
A.
Clamping sleeve
B.
Fastening nut
C.
Soldering tip
D.
Heater
E.
Heater fastener
F.
Rubber cap
G. LED
H.
Temperature control knob
I.
ON/OFF slider
J.
Soldering iron handle
K.
Cable strain relief
L.
Power cord
M. Internal control system (not part of the
image)
N.
Soldering iron stand and cleaner
(not part of the image)
I.
Soldering iron with tip
II.
Hot air soldering iron
1.
Sleeve
2.
Heater
3.
Hot air gun head
4.
Hot air gun support
5.
Fan impeller
6.
Motor
7.
Hot air gun holder
8.
Temperature switch buttons
9.
Internal control system
10. Rear panel
11. ON/OFF switch
12. Temperature display
13. Top cover
14. Flow control knob
15. Power cord (not part of the image)
III.
Additional accessories
a)
Case
b)
Hot air gun with cleaner
c)
Blow nozzle
•
13x13mm
•
10x10mm
•
8x8mm
d)
Solder wire in a tube
e)
Soldering tip (5 pcs.)
f)
Heater for the soldering iron with tip
g)
Heater for the hot air soldering iron
h)
Tweezers
•
Straight
•
Curved
i)
Tin suction
j)
Screwdriver with a set of tips (8 pcs.)
k)
Pliers
l)
Silicone working mat
3.2. PREPARING FOR USE
The temperature of environment must not be higher than
40°C and the relative humidity should be less than 85%.
Ensure good ventilation in the room in which the device
is being used. There should be at least 10 cm distance
between each side of the device and the wall or other
objects. The device should always be used when positioned
on an even, stable, clean, fireproof and dry surface, and
be out of the reach of children and persons with limited
mental and sensory functions. Position the device such that
you always have access to the power plug. The power cord
connected to the appliance must be properly grounded
and correspond to the technical details on the product
label.
ASSEMBLING THE APPLIANCE
1.
ATTENTION: Before carrying out any soldering work,
make sure that the power source is compatible with
the device.
2.
Carefully unpack all components and check them
for damage and / or missing items.
3.
Make sure that the device is not connected to
a power source.
4.
Place the device on an even and stable surface.
5.
Connect the other plug of the cord to the power
source.
6.
Start the device with the power switch.
3.3. DEVICE USE
I.
Soldering iron with tip
1.
Start the device by pushing the slider [I] to the "ON"
position. The LED [G] will turn on.
A
B
C
D
E
F G
H
I J K
L
1
2
3
4
5
6
7 8
9
10
14 13 11
12


