background image

DE

15

EN

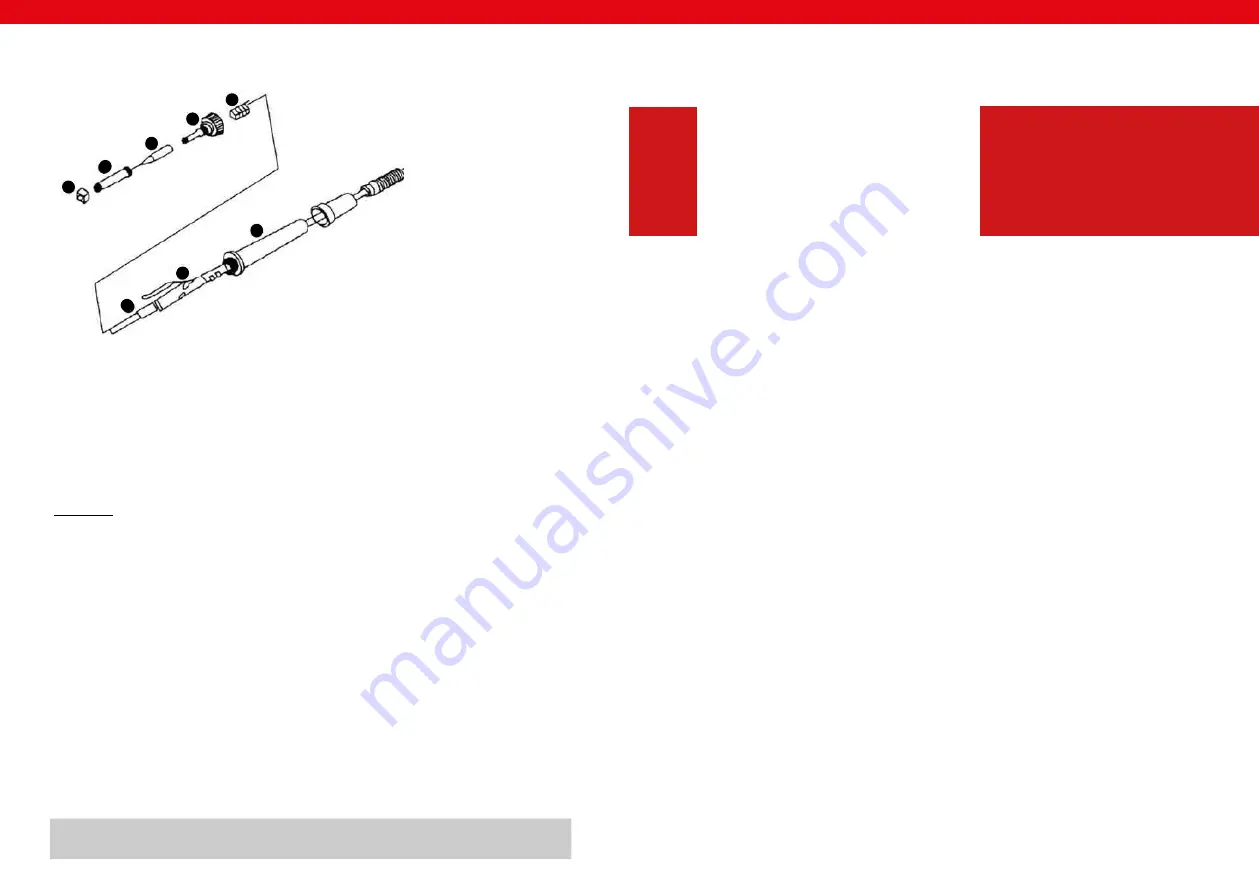
1. 

nut for mounting the soldering 
iron tip housing

2. 

soldering iron tip housing

3. 

soldering iron tip

4. 

plastic nut for mounting the hea-
ter and the board wires

5. 

spring

6. 

heater

7. 

wires board

8. 

handle

1

2

3

4

5

6

7

8

Before heater / soldering iron tip replacement make sure that the soldering iron is 

completely cold.

1.   SOLDERING IRON TIP REPLACEMENT: remove the nut for mounting the soldering iron tip housing 

and take off the housing. Replace the tip with the new one, place the housing and fix all with the 

plastic nut.

2.   HEATER REPLACEMENT: remove the nut for mounting the soldering iron tip housing and take off 

the housing along with the tip. Remove the nut for fixing the heater (4) and gently remove the heater 

(6) along with the board with wires (7). Replace the whole remembering the wires connection order.

REGULAR CLEANING

Generalities
•  

Never clean the device with a pressurized water-jet, industrial cleaners, and brushes or any other 
type of cleaning utensil that could damage the surface of the appliance.

•  

Before cleaning you must disconnect the plug from electricity supply, isolating the appliance from the 
main power circuit.

REGULAR CONTROL OF THE DEVICE

Control regularly that the device doesn´t present any damage. If there is any damage, please stop using the 
device. Please contact your customer service to solve the problem.

What to do in case of problem?

Please contact your customer service and prepare following information:
•  

Invoice number and serial number (the latest is to be found on the technical plate on the device).

•  

If relevant, a picture of the damaged, broken or defective part.

• 

It will be easier for your customer service clerk to determine the source of the problem if you give 

a detailed and precise description of the matter. Avoid formulations like “the device doesn´t heat”, 

which may mean that it doesn´t heat enough or even not at all. These two possibilities have a different 
causation!

The more detailed your information, the better the customer service will be able to answer your problem 

rapidly and efficiently!

CAUTION: Never open the device without the authorization of your customer service. This can lead to a 

loss of warranty!

14

REPLACEMENT OF THE SOLDERING IRON TIP AND SOLDERING IRON HEATING 
CORE ELEMENT

PL

Summary of Contents for soldering S-LS-17

Page 1: ...S LS 17 S LS 17 Basic w w w S T A M O S W E L D I N G c o m User manual Manuel d utilisation Istruzioni per l uso Manual de instrucciones BEDIENUNGSANLEITUNG...

Page 2: ...itteln und achten Sie darauf dass keine Fl ssigkeit in das Ger t eindringt bzw darin verbleibt Das Innere dieses Ger tes enth lt keine durch den Benutzer zu wartende Teile berlassen Sie Wartung Abglei...

Page 3: ...kolben in der Halterung zu befestigen und unter Anwendung des Schalters 8 auszuschalten 6 Sollte das Ger t lange Zeit nicht verwendet werden trennen Sie das Ger t von der Stromversorgung BEDIENGUNG NU...

Page 4: ...k Staub ansetzen Dieser ist regelm ig zu entfernen dass die Luftdurchl ssigkeit nicht beeintr chtigt wird 5 Eine zu hohe Arbeitstemperatur des L tkolbens kann die Funktionsf higkeit der Endst cke beei...

Page 5: ...und bereiten Sie folgende Angaben vor Rechnungs und Seriennummer letztere finden Sie auf dem Typenschild Ggf ein Foto des defekten Teils Ihr Servicemitarbeiter kann besser eingrenzen worin das Problem...

Page 6: ...vice Clean the device regularly to avoid permanent accumulation of dirt TECHNICAL DETAILS Model 6134 S LS 17 6135 S LS 17 Basic Voltage V 230 50Hz Rated current A 6 Power W 700 Work temperature C 0 40...

Page 7: ...t of the HOT AIR gun and the subject is 2 mm 7 Good ventilation of the room in which the appliance is used must be provided In addition the device should be placed in a location with good air circulat...

Page 8: ...cleaning you must disconnect the plug from electricity supply isolating the appliance from the main power circuit REGULAR CONTROL OF THE DEVICE Control regularly that the device doesn t present any d...

Page 9: ...mieszczeniu w kt rym jest ono u ytkowane Nale y upewni si e w pobli u urz dzenia nie znajduj si jakiekolwiek zapalne substancje lub przedmioty W niekt rych przypadkach podczas pierwszego u ycia z wn t...

Page 10: ...non stop W trybie automatycznym kolba wy cza si gdy zostanie umieszczona w uchwycie 7 Po sko czonej pracy kolb HOT AIR nale y umie ci w uchwycie i wy czy j wy cznikiem 7 8 W przypadku gdy urz dzenie n...

Page 11: ...ej i zdj obudow ko c wki Odkr ci nakr tk mocuj c grza k 4 i delikatnie wysun grza k 6 wraz z p ytk z przewodami 7 Wymieni ca o pami taj c o sposobie pod czenia przewod w PL STANDARDOWE CZYSZCZENIE Uwa...

Page 12: ...ur de l appareil ne doit pas tre nettoy entretenu par l utilisateur Confiez l entretien le r glage et les r parations une personne qualifi e La garantie ne sera plus valable en cas d interventions de...

Page 13: ...BRASAGE 1 L appareil doit se trouver sur une surface stable le fer souder doit tre install sur son socle 2 Alimentez la station au moyen du c ble d alimentation installez la panne de soudure d sir e...

Page 14: ...dessoudage air chaud il se peut que de la poussi re s accumule sa sortie Celle ci doit tre r guli rement limin e afin de ne pas nuire la perm abilit de l air 5 Une temp rature trop lev e du fer soude...

Page 15: ...Vos num ros de s rie et de facture que vous trouverez sur la plaque signal tique Une photo de l l ment endommag si tel est le cas Plus vos descriptions seront pr cises plus votre conseiller sera en m...

Page 16: ...rato y sus partes accesibles se calientan mucho durante el uso Por lo tanto es importante tener cuidado al tocar estos elementos Limpie regularmente el dispositivo para evitar que la suciedad se incru...

Page 17: ...el soporte 7 Despu s concluir el trabajo vuelva a colocar la pistola en el soporte y apague la unidad con el interruptor 7 8 Si no va a utilizar el dispositivo durante un periodo largo de tiempo desco...

Page 18: ...re la tapa de la resistencia 4 y desenrosque con cuidado la tuerca 6 junto con la placa con los alambres prestando especial atenci n a no da arlos ES LIMPIEZA EST NDAR Observaciones Evite mojar el dis...

Page 19: ...parte interna di questa apparecchiatura non deve essere manomessa in alcun modo dall utente Far eseguire qualsiasi operazione di manutenzione e riparazione esclusivamente da personale qualificato In c...

Page 20: ...imentazione corrisponda alle specifiche sulla scheda elettrica USO SOLO DELLA STAZIONE SALDANTE 1 L apparecchio deve essere posto su un piano stabile il saldatore deve essere montato sul supporto 2 Co...

Page 21: ...per evitare di compromettere la permeabilit dell aria 5 Una temperatura di lavoro troppo elevata del saldatoio pu compromettere il funzionamento delle parti terminali 6 La punta saldante deve essere...

Page 22: ...risolverlo Descrizioni del tipo l apparecchio non riscalda possono essere ambigue e significare che l apparecchio si riscalda troppo poco o che non si riscalda per niente Queste sono tuttavia cause di...

Page 23: ...kgabe oder Sammlung von Altger ten 1 RICHTLINIE 2002 96 EG DES EUROP ISCHEN PARLAMENTS UND DES RATES BER ELEKTRO UND ELEKTRONIK ALTGER TE 2 Gesetz ber das Inverkehrbringen die R cknahme und die umwelt...

Reviews: