Page 78
CP190i and CPF190i
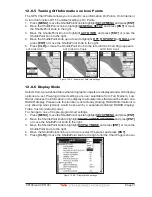
2. Move the ShuttlePoint knob to highlight
ROUTE
and press
[ENT]
.
3. Move the ShuttlePoint knob to highlight
DELETE
and press
[ENT]
or move the
ShuttlePoint knob to the right.
4. A Warning message appears to confirm. Move the ShuttlePoint knob to highlight
YES
and press
[ENT]
. The Route has been deleted.
WARNING
An active Route (one that you are navigating to) cannot be deleted until you stop navigating to the
Route.
9.8
OTHER SETTINGS IN ROUTE MENU
You will notice the
ROUTE
menu has other selections.
SELECT
Choose an available Route to create or choose a stored Route to show and follow on the Chart page.
REVERSE
Reverses the Route, when chosen Starting point is at the end of the Route.
COLOR
Allows changing the color of the navigation lines between each leg in the Route.
EDIT
The Edit Route (Route Report) menu is useful to show details of the Waypoints contained within the
Route. This menu also allows you to enter in your average speed and fuel consumption and calculate
the approximate fuel used when following the Route.
SEND
Sends the stored points to a external device (PC) capable of listening to NMEA RTE sentence.
RECEIVE
Receive the points from an external device (PC) capable of sending NMEA RTE sentence.
THICKNESS
Selection that allows the Route line to be easily seen; default selection is Thick.
9.8.0 Route Check
The Route Check function is used after you have created a Route to ensure you and your
vessel will not have problems while navigating. This is done by the CP190i and CPF190i by
reviewing the Route and looking for the following hazards that may effect safe navigation.
·
Land Areas
·
Shallow Water
·
Intertidal Areas
(areas emerged at low tide)
·
Rocks
·
Wrecks
·
Obstructions
·
Shoreline Constructions
·
Fishing Facility
·
Dredged Areas
·
Diffusers (
submarine pipeline
)
·
Mooring/Warping Facility
·
Production Installation (
an installation for the exploitation of natural resources
)
·
Pingos (
small conical hills having a large central core of ice formed from the
encroachment of permafrost and the resulting hydrostatic pressure
)
·
No Data Available (
no adequate data coverage
)
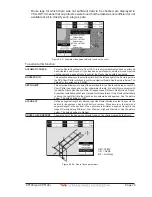
If any of these alarm conditions is detected, the function returns the list of dangerous objects
and the relative dangerous Route leg, that is drawn with a different color.
·
Route legs which were classified as dangerous are displayed in RED. It means that
there is at least one dangerous object in the vicinity of this leg and it has been found.
·
Route legs which were classified as safe are displayed in GREEN. It means that the
data was checked on detailed chart levels and no problems were found for all segments
of the leg.
Summary of Contents for CP190i
Page 1: ......
Page 5: ...Page 6 CP190i and CPF190i ...
Page 11: ...Page 12 CP190i and CPF190i 21 APPENDIX TERMS 147 ANALYTICALINDEX 151 ...
Page 15: ...Page 16 CP190i and CPF190i ...
Page 49: ...Page 50 CP190i and CPF190i ...
Page 63: ...Page 64 CP190i and CPF190i ...
Page 71: ...Page 72 CP190i and CPF190i ...
Page 83: ...Page 84 CP190i and CPF190i ...
Page 103: ...Page 104 CP190i and CPF190i ...
Page 109: ...Page 110 CP190i and CPF190i ...
Page 137: ...Page 138 CP190i and CPF190i ...
Page 139: ...Page 140 CP190i and CPF190i ...
Page 145: ...Page 146 CP190i and CPF190i ...
Page 149: ...Page 150 CP190i and CPF190i ...
Page 160: ......


