G
B
28
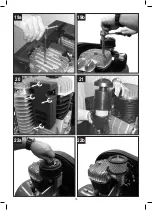
6.7 Tightening of head tension rods
(Fig. 19)
●
Check that all screws (in particular those of the head
of the unit) are tightly drawn up (
fig. 19a-19b
).
●
The check must be carried out prior to the first com-
pressor starting.
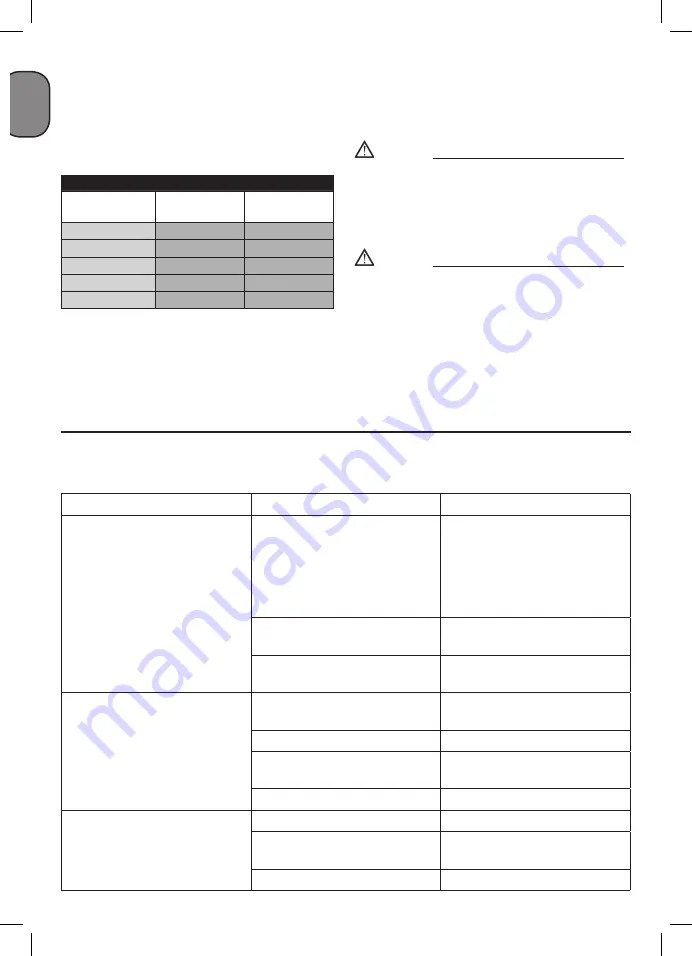
TIGHTENING OF HEAD TENSION RODS
Nm
Min. torque
Nm
Max. torque
Screw M6
9
11
Screw M8
22
27
Screw M10
45
55
Screw M12
76
93
Screw M14
121
148
6.8 Cleaning the intake filter
The intake filter prevents dust and dirt being drawn in.
It is essential to clean this filter after at least every 100
hours in service. A clogged intake filter will decrease the
compressor’s performance dramatically, while an ineffi-
cient filter causes harsher wear on the compressor. Re-
move the filter as shown in
figures 20, 21 and 22a-22b
.
Tap it to remove the dirt, blast it down with low-pressure
compressed air (approx. 3 bar) and re-insert it.
6.9 Storage
Warning!
Pull the mains plug out of the socket and ventilate
the appliance and all connected pneumatic tools.
Switch off the compressor and make sure that it is
secured in such a way that it cannot be started up
again by any unauthorized person.
Warning!
Store the compressor only in a dry location which
is not accessible to unauthorized persons. Always
store upright, never tilted!
7. DISPOSAL AND RECYCLING
The unit and its accessories are made of various types
of material, such as metal and plastic. Defective com-
ponents must be disposed of as special waste. Ask your
dealer or your local council.
8. POSSIBLE FAULTS AND RELATED PERMITTED REMEDIES
Request the assistance of a qualified electrician for operations on electric components (cables, motor, pressure
switch, electric panel, etc).
FAULT
CAUSE
REMEDY
Air leak from the valve of the
pressure switch.
Check valve does not perform its
function correctly due to wear or
dirt on the seal.
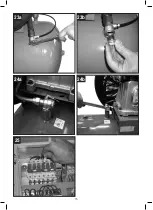
Unscrew the hex-shaped head of
the check valve, clean the housing
and the special rubber disk
(replace if worn). Re-assembler
and tighten carefully (
figures 23-
24
).
Condensate drainage cock open.
Close the condensate drainage
cock.
Rilsan hose not inserted correctly
in pressure switch.
Insert the Rilsan hose correctly
inside the pressure switch.
Reduction of efficiency, frequent
start-up. Low pressure values.
Excessively high consumption.
Decrease the demand of
compressed air.
Leaks from joints and/or pipes.
Change gaskets.
Clogging of the suction filter.
Clean/replace the suction filter
(
figure 20-21-22a-22b
).
Slipping of the belt.
Check belt tension (
fig. 18
).
The motor and/or the compressor
overheat irregularly.
Insufficient ventilation.
Improve ambient conditions.
Closing of air ducts.
Check and if necessary clean the
air filter.
Insufficient lubrication.
Top up or change oil.
Summary of Contents for BA 1100/11/500 (M)
Page 10: ...10 2b 2c 2a ON OFF ON 3a 2d OFF ON 3b...
Page 11: ...11 7 2 8 6 5 17 19 4 4 19 18 18 13 13 2 2 2 3 18 17 4a 4b 3...
Page 12: ...12 10 9 11 9 2 12 9 21 13a 15 min max 16 13b 15 min max 16...
Page 13: ...13 14a 14b 17 A A 15 11 16 18 1 2 cm...
Page 14: ...14 19a 20 19b 21 22a 22b...
Page 15: ...15 23a 23b 25 24a 24b...
Page 16: ...16...
Page 84: ...84 G R 1 5 C 40 C 4 5 50 cm S3 50 5 5...
Page 89: ...89 G R 2d 2a 2b 2c 25...
Page 129: ...129 R U 1 5 C 40 C 4 5 50...
Page 132: ...132 R U 2 12 2a 2b 2c I ON Tandem 12 12 6 6 1 6 2 15 11...
Page 135: ...135 R U 2d 2a 2b 2c 25...
Page 154: ...154 B G 1 5 C 40 C 4 5 50...
Page 157: ...B G 157 100 100 300 2a 2b 2c 10 I ON 12 12 6 6 1 6 2 15 11...
Page 159: ...B G 159 8 23 24 C C 20 21 22a 22b 18...
Page 160: ...160 B G 2d 2a 2b 2c 25...
Page 185: ...185 memo...
Page 186: ...186 memo...
Page 187: ...187 memo...

