9
ENGLISH
(Original instructions)
Use
Warning! Let the tool work at its own pace. Do not overload.
Switching on and off
u
To switch the tool on, depress the on/off switch (1) at the
"I" position.
u
To switch the tool off, depress the on/off switch (1) at
the"O" position.
Variable-Speed Dial
To operate the tool, select the speed setting you wish with the
speed dial (8) , and press the ON/OFF switch.
The speed setting can be adjusted either with the tool ON or
OFF.
Warning! Because the tool has a separate speed dial for
setting the speed, the tool will start at the speed where the
variable speed dial is set. Always ensure switch is off in the
"O" position before installing the battery pack.
Warning! Be sure to select the proper speed for your
sanding operation. If in doubt about the proper speed for your
operation, test the performance at low speed settings and
gradually increase until a comfortable speed is found.
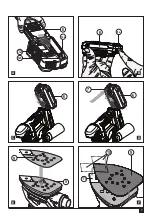
Operation (Fig.H)
Grasp the sander as shown in figure H and turn it ON
.
Move it
in long, sweeping strokes along the surface, letting it do
the work
.
Pushing down on the tool while sanding actually slows the
removal rate and produces an inferior quality finish.
Check your work often. Sander is capable of removing
material rapidly especially with coarse paper.
Precautions to take when sanding paint
Sanding of lead based paint is NOT RECOMMENDED due to
the difficulty of controlling the contaminated dust. The greatest
danger of lead poisoning is to children and pregnant women.
Since it is difficult to identify whether or not a paint contains
lead without a chemical analysis, we recommend the following
precautions when sanding any paint:
Personal safety
u
No children or pregnant women should enter the work
area where the paint sanding is being done until all clean
up is completed.
u
A dust mask or respirator should be worn by all persons
entering the work area. The filter should be replaced daily
or whenever the wearer has difficulty breathing. See your
local hardware store for the proper EN14683-approved
dust mask.
u
NO EATING, DRINKING or SMOKING should be done
in the work area to prevent ingesting contaminated paint
particles.
Workers should wash and clean up BEFORE eating,
drinking or smoking. Articles of food, drink, or smoking
should not be left in the work area where dust would settle
on them.
Environmental safety
u
Paint should be removed in such a manner as to minimize
the amount of dust generated.
u
Areas where paint removal is occurring should be sealed
with plastic sheeting of 4 mils thickness.
u
Sanding should be done in a manner to reduce tracking of
paint dust outside the work area.
Cleaning and disposal
u
All surfaces in the work area should be vacuumed and
thoroughly cleaned daily for the duration of the sanding
project. Vacuum filter bags should be changed frequently.
u
Plastic drop cloths should be gathered up and disposed
of along with any dust chips or other removal debris.
They should be placed in sealed refuse receptacles and
disposed of through regular trash pick-up procedures.
During clean up, children and pregnant women should be
kept away from the immediate work area.
u
All toys, washable furniture and utensils used by children
should be washed thoroughly before being used again.
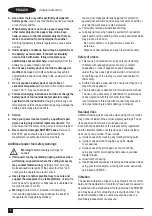
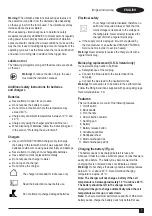
Dust Collection (Fig.I, J)
Warning! Collected sanding dust from sanding surface
coatings (polyurethane, linseed oil, etc.) can self=ignite and
cause fire. To reduce risk, strictly follow sander manual and
coating manufacturer’s instructions.
u
The dust bag should be emptied after every 10 minutes of
sanding.
u
To attach the dust bag to the sander, line up the grooves
(14) on the side dust bag collar (15) with the dust bag
locks (16) on the dust port (17) .
u
Slide the dust bag onto the dust port and turn the dust bag
clockwise to lock it in place as shown in Figure I.
u
To remove, turn the dust bag counterclockwise and slide
the dust bag off.
u
To empty the dust bag, remove it from the dust port
and dump the sanding debris into an appropriate trash
receptacle as shown in Figure J.
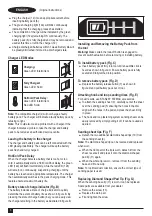
Connecting a vacuum cleaner)
u
Insert the hose of the vacuum cleaner into the dust port
(17).
Accessories
Warning! Since accessories, other than those offered by
STANLEY FATMAX, have not been tested with this product,
use of such accessories with this tool could be hazardous.


