17
ENGLISH
•
To check the stroke, measure the distance between the front face of the Jaw Guide
(1f)
and the front of
the Handle Upper
(9)
, BEFORE pressing the trigger and when the trigger is fully actuated. The stroke is
the difference between the two measurements. If it does not meet the minimum specification, repeat the
Priming Procedure.
6. MAINTENANCE
IMPORTANT
SAFETY WARNINGS APPEAR ON PAGE 7 & 8.
THE EMPLOYER IS RESPONSIBLE FOR ENSURING THAT TOOL MAINTENANCE INSTRUCTIONS
ARE GIVEN TO THE APPROPRIATE PERSONNEL. THE OPERATOR SHOULD NOT BE INVOLVED
IN MAINTENANCE OR REPAIR OF THE TOOL UNLESS PROPERLY TRAINED.
Every 500,000 cycles the tool must be completely dismantled and inspected Components must be replaced
where worn or damaged. All O rings and seals should be replaced with new ones and lubricated with Molykote
55M grease (07992-00075) for pneumatic sealing or Molykote 111 (07900-00755) for hydraulic sealing.
WARNING
The airhose must be disconnected before any servicing or dismantling is attempted unless specifically
instructed otherwise.
The dismantling operation must be carried out in clean conditions.
Before proceeding with dismantling, empty the oil from the tool as follows.
Before priming, empty the oil from tool as follows.
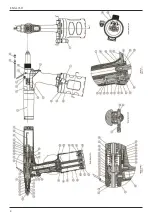
(Ref. fig. 1)
•
Switch OFF air supply at ON/OFF Valve (
7
.)
•
Remove all nose equipment (
1
.) Refer to section 3. 1.
•
Remove Bleed Screw (
4
)and Seal (
5.
)
•
Invert tool over suitable container, switch ON air supply at ON/OFF Valve (
7
)and actuate tool.
•
Residual oil in the tools hydraulic system will empty through bleed screw orifice.
For complete tool servicing we advise that you proceed with dismantling of sub-assemblies in the order
shown below.
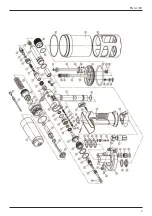
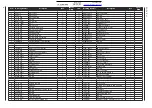
Refer to fig. 7 & 8
.
6.1 DISMANTLING THE TOOL
NOSE EQUIPMENT
•
Unscrew the Nose Housing Nut
69
, including O Ring
70
, the Nose Housing
1d
, the Nose Piece
1a
, and
O Ring
1e
.
•
Pull back the Jaw Guide Lock
1m
against the Spring
1n
and then unscrew the Jaw Guide
1f
.
•
Remove the Jaws
1g
from the Jaw Guide
1f
.
•
At this point the Jaws
1g
can be cleaned and a light coating of Moly Lithium grease applied or replaced if
worn.
•
Remove Jaw Pusher
1h
, Urethane Washer
1i
, Spring
1j
, and Mandrel Guide
1k
, from the Pulling Head
1l
.
•
Using spanners, loosen Locknut
8
and unscrew the Pulling Head
1l
, Jaw Guide Lock
1m
and Spring
1n
from the Hydraulic Piston
18
.


