7
ENGLISH
♦
Push the adaptor (8) into the dust extraction outlet (4).
♦
Connect vacuum cleaner hose to the adaptor (8).
RESIDUAL RISKS
Additional residual risks may arise when using the
tool which may not be included in the enclosed safety
warnings. These risks can arise from misuse, prolonged
use etc.
Even with the application of the relevant safety
regulations and the implementation of safety devices,
certain residual risks cannot be avoided. These include:
♦
Injuries caused by touching any rotating/moving parts.
♦
Injuries caused when changing any parts, blades or
accessories.
♦
Injuries caused by prolonged use of a tool. When
using any tool for prolonged periods make sure you
take regular breaks.
♦
Impairment of hearing.
♦
Health hazards caused by breathing dust developed
when using your tool (example:- working with wood,
especially oak, beech and MDF).
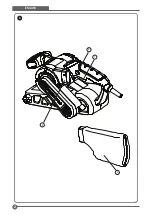
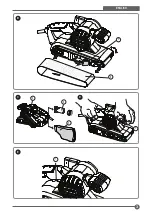
FEATURES (FIG. A-E)
WARNING: Never modify the power tool or any
part of it. Damage or personal injury could
result.
1 On/ Off switch
2 Lock-on button
3 Dust bag
4 Dust extraction outlet
5 Tension lever
6 Sanding belt
7 Variable Speed Control Dial
8 Dust adaptor
BEFORE USE
• Before using the tool for the first time, it is
recommended to receive practical information.
• Always check that the supply voltage is the same as the
voltage indicated on the nameplate of the tool.
• Do not work materials containing asbestos (asbestos is
considered carcinogenic).
• Dust from material such as paint containing lead,
some wood species, minerals and metal may be harmful
(contact with or inhalation of the dust may cause allergic
reactions and/or respiratory diseases to the operator
or bystanders); wear a dust mask and work with a dust
extraction device when connectable.
• Certain kinds of dust are classified as carcinogenic
(such as oak and beech dust) especially in conjunction
with additives for wood conditioning; wear a dust mask
and work with a dust extraction device when connectable.
• Follow the dust-related national requirements for the
materials you want to work with.
• Do not clamp the tool in a vice.
• Use completely unrolled and safe extension cords with
a capacity of 16 Amps.
AFTER USE
• After switching off the tool, never stop the rotation of the
accessory by a lateral force applied against it.
USE
Warning!
Let the tool work at its own pace. Do not
overload. The auto tracking feature of this sander allows
you to sand without adjusting the location of the sanding
belt (6).
♦
Make sure that the sanding belt (6) is centred over the
rollers during assembly.
♦
During use, if the sanding belt (6) begins to track
incorrectly, remove the belt sander from the work
piece and allow it to run briefly. The sanding belt (6)
will return to its centred position.
♦
If the sanding belt (6) does not return to the centred
position, allow the unit to cool for 5 minutes and
repeat.
Switching on and off (FIG. A.E)
♦
To switch the tool on, press the on/off switch (1).
♦
For continuous operation, press the lock-on button (2)
and release the on/off switch (1).
♦
To switch the tool off, release the on/off switch (1).
♦
To switch the tool off when in continuous operation,
press the on/off switch (1) once more and release it.
Emptying the dustbag
The dustbag (3) should be emptied every 10 minutes.
♦
Unzip the dustbag (3) and empty it before continuing.
Hints for optimum use
♦
Always hold the tool with both hands.
♦
Do not exert too much pressure on the tool.
♦
Regularly check the condition of the sanding belt (6).
Replace when necessary.
♦
Always sand with the grain of the wood.
♦
When sanding new layers of paint before applying
another layer, use extra fine grit.
♦
On very uneven surfaces, or when removing layers of
paint, start with a coarse grit. On other surfaces, start
with a medium grit. In both cases, gradually change
to a fine grit for a smooth finish.
♦
Consult your retailer for more information on available
accessories.
MAINTENANCE
Your STANLEY power tool has been designed to
operate over a long period of time with a minimum of
maintenance. Continuous satisfactory operation depends
upon proper tool care and regular cleaning.
Summary of Contents for SB90
Page 1: ...ENGLISH SB90 English Page 4 BAHASA INDONESIA Halaman 9 15 TI NG VI T Trang 21...
Page 2: ...ENGLISH 2 A 1 2 3 4...
Page 3: ...3 ENGLISH B C D E 5 6 4 3 7 1 8...
Page 15: ...15 SB90 Stanley 1 2 RCD RCD 3...
Page 16: ...16 4 5...
Page 17: ...17 EN 60745 2002 44 EC 30 Stanley STANLEY 3 1 5 2 30...
Page 18: ...18 V A n0 Hz II W min 2018 XX XX 1 1 1 1 1 1 B 6 5 6 6 6 6 6 5 6 D 7 C 3 4 3 C 8 8 4 8 MDF...
Page 19: ...19 A E 1 2 3 4 5 6 7 8 16 6 6 6 6 6 5 A E 1 2 1 1 1 3 10 3 6 STANLEY...
Page 27: ......
Page 28: ...N618118 201809...


