8
Operation
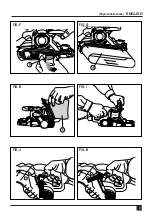
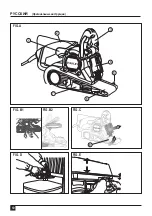
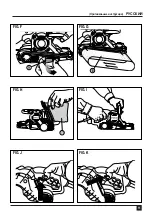
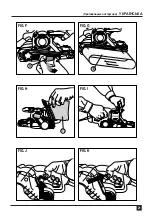
Using your belt sander (FIG. I)
Always hold belt sander firmly with both hands while sanding
as shown in FIG. I.
Note:
that sander bail handle can be adjusted to three
different positions as previously discussed.
Switch (FIG. J and K)
To start your belt sander, depress the on/off switch as
shown in FIG. J. To stop your belt sander release the on/ off
switch.
For continuous operation, depress the on/off switch then
depress the lock-on button (FIG. K) and release the on/off
switch. To stop your belt sander, depress the on/off switch to
release the lock-on button. Release the on/off switch.
Handy Hints
• Always start your belt sander before it is in contact with
the workpiece and do not switch it off until after it has
been lifted from the workpiece.
• Always hold your belt sander with two hands.
• Where possible, clamp the workpiece to a work bench or
similar sturdy surface.
• Use the correct grit sanding belt for your application.
The following is a suggested list of belt grits to use with
different materials.
Material
Belt Grit
Solid Wood
80
Veneer
150
Chipboard
60/80
Plastics
100
Steel
80 (remove dust bag)
Paint Removal
40/60
Balsa Wood
100
Acrylic
100
Tool Care And Maintenance
Your tool has been designed to operate over a long period of
time with a minimum of maintenance. Continuous
satisfactory operation depends upon proper tool care and
regular cleaning.
Never apply excessive force when you use your belt sander.
Too much force can result in an overload and cause damage
to the motor or the workpiece. If your belt sander becomes
too hot, operate it without load for 2 minutes. Always keep
the air cooling vents clear. To clean your belt sander,
proceed as follows:
Warning!
To prevent accidental operation, turn
off and unplug sander before performing the
following operations. Failure to do this could
result in serious personal injury.
• Use a clean dry paint brush to clear vents and ducts.
• Clean the housings using a clean damp cloth (do not
use solvents, gas or turpentine.)
Important
! To assure product SAFETY and
RELIABILITY, repairs, maintenance and
adjustment should be performed by authorized
service centers or other qualified service personnel, always
using identical replacement parts.
Accessories
The performance of your tool depends on the accessory
used. STANLEY accessories are engineered to high quality
standards and designed to enhance the performance of your
tool. By using these accessories you will get the very best
from your tool.
Use only 3” x 21” (76 x 533mm) sanding belts.
Recommended accessories for use with your tool are
available at extra cost from your local dealer or authorized
service center.
Notes
• STANLEY's policy is one of continuous improvement to
our products and, as such, we reserve the right to
change product specifications without prior notice.
• Standard equipment and accessories may vary by
country.
• Product specifications may differ by country.
• Complete product range may not be available in all
countries.
• Contact your local STANLEY dealers for range
availability.
ENGLISH
(Original instructions)
Summary of Contents for STBS720
Page 2: ...2 FIG A FIG B1 FIG B2 FIG C FIG E FIG D 1 2 3 4 6 8 5 7 ENGLISH Original instructions...
Page 3: ...3 FIG F FIG H FIG J FIG G FIG I FIG K 9 10 11 Original instructions ENGLISH...
Page 10: ...10 FIG A FIG B1 FIG B2 FIG C FIG E FIG D 1 2 3 4 6 8 5 7...
Page 11: ...11 FIG F FIG H FIG J FIG G FIG I FIG K 9 10 11...
Page 12: ...12 STANLEY 1 b 2 b d f RCD GFCI ELCB 3 a b...
Page 13: ...13 d f g 4 a b c d c f 5...
Page 14: ...14 NIOSH 4 STANLEY NIOSH OSHA...
Page 16: ...16 3 B1 B2 1 2 2 C D C 1 a b c D C 2 E E E F G 5 3 21 76 533 6 H 7 I I J J K...
Page 17: ...17 80 150 60 80 100 80 40 60 100 100 2 STANLEY 3 21 76 533 STANLEY STANLEY...
Page 20: ...20 FIG A FIG B1 FIG B2 FIG C FIG E FIG D 1 2 3 4 6 8 5 7...
Page 21: ...21 FIG F FIG H FIG J FIG G FIG I FIG K 9 10 11...
Page 22: ...22 STANLEY 1 b 2 b d f RCD GFCI ELCB 3 a b...
Page 23: ...23 d f g 4 a b c d f g 5...
Page 24: ...24 NIOSH 4 STANLEY NIOSH OSHA...
Page 26: ...26 C 1 a b c D C 2 G 5 3 21 76 533 6 H 7 I I J J K...
Page 30: ...30 FRAN AIS Instructions initiales FIG A FIG B1 FIG B2 FIG C FIG E FIG D 1 2 3 4 6 8 5 7...
Page 31: ...31 Instructions initiales FRAN AIS FIG F FIG H FIG J FIG G FIG I FIG K 9 10 11...
Page 38: ...38 PORTUGUESE Instru es Originais FIG A FIG B1 FIG B2 FIG C FIG E FIG D 1 2 3 4 6 8 5 7...
Page 39: ...39 Instru es Originais PORTUGUESE FIG F FIG H FIG J FIG G FIG I FIG K 9 10 11...
Page 53: ...53 ARABIC FIG F FIG H FIG J FIG G FIG I FIG K 9 10 11...
Page 54: ...54 ARABIC FIG A FIG B1 FIG B2 FIG C FIG E FIG D 1 2 3 4 6 8 5 7...
Page 55: ...90618261 01 2015...


