ENGLISH
(Original instructions)
6
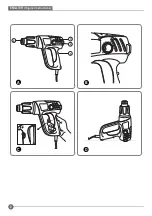
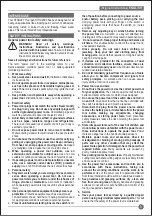
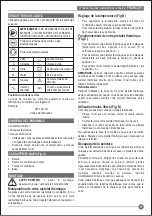
Setting the temperature (Fig B)
• To increase the temperature setting, turn the heat control
knob (2) anti-clockwise.
• To reduce the temperature setting, turn the heat control
knob clockwise.
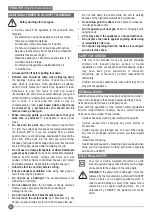
Operating your heat gun (Fig C)
• To switch your heat gun on at the low temperature setting,
press the switch (1) to depress to position “I”.
• To switch the tool on at the high temperature setting, set
the switch (1) to position “II”.
• To switch the tool off, set the on/off switch (1) to
position “0”.
Note:
Allow the element to heat up for a few seconds before
use. Initially, some smoke may emit from your heat gun. This
is normal and will soon cease.
Cooling down
In use, the nozzle (4) of your heat gun becomes extremely
hot. Great care is necessary when cooling your heat gun after
use.
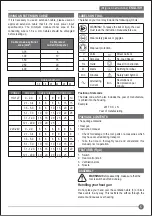
Hands free use (Fig D)
This tool can also be used in stationary mode.
• Place the tool onto a firm and stable surface as shown.
• Always point your heat gun away from you.
• Secure the cable to prevent pulling your heat gun off the
stand.
Do not touch the nozzle (4) and ensure that nothing is
dropped into the nozzle. Carefully switch off your heat gun and
then allow it to cool
Paint stripping
Your heat gun is designed to soften paint and lacquer enabling
it to be removed using a good quality hand scraper.
Proceed as follows: Direct the hot air onto the area to be
removed. When the paint softens, scrape firmly. Experiment to
establish the length of time necessary to apply the heat to
obtain optimum results. Scrape the softened paint immediately
or it will harden again.
Your heat gun is not suitable for stripping metal-framed
windows. This is because the heat from the heat gun is
conducted through the metal and can crack the glass. Scrape
with the grain of the wood wherever possible. Do not linger on
one spot for too long as the surface may char or ignite.
MAINTENANCE
Your tool has been designed to operate over a long period of
time with a minimum of maintenance. Continuous satisfactory
operation depends upon proper tool care and regular
cleaning.
WARNING!
Before performing any maintenance, switch off
and unplug the tool.
• Regularly clean the ventilation slots in your tool using a
soft brush or dry cloth.
• Regularly clean the motor housing using a damp cloth. Do
not use any abrasive or solvent-based cleaner.
Lubrication
Your power tool requires no additional lubrication.
Cleaning
WARNING!
Blow dirt and dust out of the main
housing with dry air as often as dirt is seen
collecting in and around the air vents. Wear
approved eye protection and approved dust mask when
performing this procedure.
WARNING!
Never use solvents or other harsh
chemicals for cleaning the nonmetallic parts of the
tool. These chemicals may weaken the material of
the parts. Use only mild soap and damp cloth to clean the tool.
Never let any liquid get inside the tool,cleaning of gasoline or
other chemicals, never immerse any part of the tool into liquid.
ACCESSORIES
The performance of your tool depends on the accessory used.
STANLEY accessories are engineered to high quality
standards and designed to enhance the performance of your
tool. By using these accessories you will get the very best
from your tool.
PROTECTING THE ENVIRONMENT
Separate collection. This product must not be
disposed of with normal household waste.
Should you find one day that your STANLEY product needs
replacement, or if it is of no further use to you, do not dispose
of it with household waste. Make this product available for
separate collection.
STANLEY provides a facility for the collection and
recycling of STANLEY products once they have
reached the end of their working life. To take
advantage of this service please return your product to any
authorised repair agent who will collect them on our behalf.
You can check the location of your nearest authorised repair
agent by contacting your local STANLEY office at the address
indicated in this manual. Alternatively, a list of authorised
STANLEY repair agents and full details of our after-sales
service and contacts are available on the Internet at:
www.2helpU.com.
NOTES
STANLEY’s policy is one of continuous improvement to our
products and as such, we reserve the right to change product
specifications without prior notice. Standard equipment and
accessories may vary by country. Product specifications may
differ by country.
Complete product range may not be available in all countries.
Contact your local STANLEY dealers for range availability


