background image

4

5

LUBRICATION OF COMPRESSOR

This compressor is OIL FREE. Therefore there  
is NO oil used for lubrication.

ASSEMBLY

This compressor MUST be fully assembled by you prior to 
use.  Failure to do so will result in the warranty being VOID.  
Failure to fully assemble this compressor may also result in 
personal injury.

SAFETY

Before attempting to operate this air compressor the 
following basic safety precautions should be taken to 
reduce the risk of fire, electric shock and personal injury.  
It is important to read the instruction manual and to 
understand applications, limitations and potential hazards 
associated with the air compressor.  This air compressor 
is not intended for use by persons (including children) 
with reduced physical, sensory or mental capabilities, or 
lack of experience and knowledge, unless they have been 
given supervision or instruction concerning the use of the 
appliance by a person responsible for their safety.

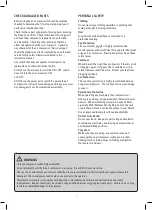
BEWARE OF CHILDREN AND PETS

Children and pets should be kept out of the work area.  
Children should not be allowed to touch or operate the air 
compressor, tools or extension cords.  This air compressor 
is not designed for use by young children or infirm persons 
without supervision.  The air compressor and tools should be 
kept out of reach of children, preferably stored or locked in a 
secure cabinet or room when not in use.

WORK AREA

Work areas and benches should be kept tidy.  Cluttered 
benches and work areas can cause accidents.  Floors 
should be kept clean and free from rubbish.  Special care 
should be taken when the floor is slippery due to sawdust 
or wax.  Always leave sufficient distance, at least 5 metres 
between the air compressor and the work area, especially 
when using tools designed for sanding or spraying liquids. 
If needed use a longer air hose to reach your work area.

WORK ENVIRONMENT

Do not expose your air compressor to rain or use in damp 
or wet conditions.  Keep the work area well lit.  Always 
ensure your compressor is level and stable.  Using your 
compressor on unlevel or unstable ground may cause it to 
tip over, this damage will not be covered under warranty. 
Do not use your air compressor in the same area that you 
are spray painting or sanding.  Always use your compressor 
in clean air.  If needed use a longer air hose to reach your 
work area.

GUARD AGAINST ELECTRIC SHOCK

Avoid body contact with earthed or grounded surfaces  
(e.g. pipes and refrigerators).

DO NOT OVERLOAD AIR COMPRESSORS

The air compressor will do a better, safer job and give you 
much better service if it’s used at the duty cycle for which it 
was designed.  The duty cycle will only take effect after the 
initial (1st ) tank fill for the day.  This air compressor’s duty 
cycle is 75%.  Duty cycle is the proportion of time during 
which the air compressor is operated.  This means after 45 
seconds of operation, motor pumping, the air compressor 
must be left for 15 seconds resting, motor not pumping.  
When the motor is pumping the attached air tool can not be 
used.  Only use the attached air tool while the compressor 
is not pumping.  Stop using the attached tool as soon as the 
air compressor starts pumping.

USE THE RIGHT TOOL

Select the right tool for the job.  Do not use a tool for a 
job for which it was not designed.  Do not force a small air 
compressor to do the job of a heavy–duty air compressor.  
Do not use the air compressor for purposes not intended.

Summary of Contents for SXAC1521121

Page 1: ...3616 10 18 MODEL NO SXAC1521121 AIR COMPRESSOR 1 5HP 21L For service spare parts or product information please contact Smart Marketing Group Pty Ltd AUST 1300 660 457 N Z 0800 474 876...

Page 2: ...tool wishing to be used to ensure that it is within this air compressor s air output Section Page Contents 2 Suggested Applications 2 Introduction 3 Guarantee 3 4 General Safety Instructions 5 7 Elec...

Page 3: ...h parts and components of similar quality grade and composition where an identical part or component is not available Products presented for repair may be replaced by refurbished products of the same...

Page 4: ...rts of the product with parts and components of similar quality grade and composition where an identical part or component is not available Products presented for repair may be replaced by refurbished...

Page 5: ...or wax Always leave sufficient distance at least 5 metres between the air compressor and the work area especially when using tools designed for sanding or spraying liquids If needed use a longer air h...

Page 6: ...authorised service facility Keep handles clean dry and free from oil and grease Ensure that ventilation slots are kept clean and free from dust at all times Blocked ventilation slots can cause overhe...

Page 7: ...ards and safety requirements Repairs should only be carried out by qualified persons using original spare parts Failure to do so may result in considerable danger to the operator PERSONAL SAFETY Cloth...

Page 8: ...changes and when changing attachments such as air hoses tools Always use the correct type of tool for the operation to be carried out Never use the air compressor if any part of the unit is damaged A...

Page 9: ...5 Rubber stopper 6 Safety Valve 7 Tank pressure gauge 8 Front handle 9 Pressure switch 10 On Off button red colour 11 Outlet pressure gauge 12 Air outlet nitto style socket 13 Outlet pressure regulato...

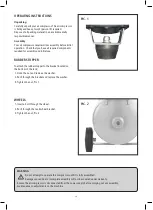
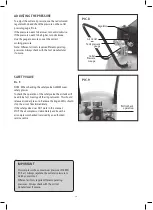
Page 10: ...TOPPER To attach the rubber stopper to the bracket located on the bottom of the tank 1 Undo the nut and remove the washer 2 Push through the bracket and replace the washer 3 Tighten the nut Pic 1 WHEE...

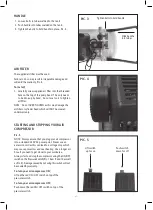
Page 11: ...essure switch To turn your air compressor OFF Push down the red ON OFF switch on top of the pressure switch AIR FILTER The supplied air filter must be used Failure to do so may result in irreparable d...

Page 12: ...e connected air tools the compressor will start and stop without warning This is controlled by the pressure switch These pressure settings are factory set and should not be changed IMPORTANT Pumping s...

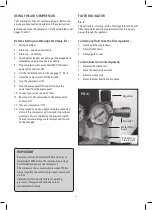
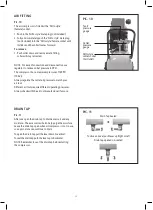
Page 13: ...owly open the tank drain tap see page 16 This allows excess air and moisture water to vent 7 Leave the tank drain tap open This allows any moisture to drain while the air compressor is stored NOTE Use...

Page 14: ...To check the operation of the safety valve the air tank will need to be full Gently pull the ring outwards This should release air under pressure Release the ring and this should stop the air out flow...

Page 15: ...ressor is fitted with a Nitto style female socket 1 Push in the Nitto style male plug not included 2 Fully and completely push the Nitto style male plug not included into the Nitto style female socket...

Page 16: ...e pressure decreases to 115PSI If these tips do not work please have your unit checked by an authorised service centre Call Smart Marketing Group for your closest centre Australia 1300 660 457 N Z 080...

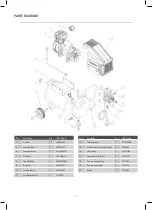
Page 17: ...9 Drain Tap 1 95 BRC95DT 10 Cushion Foot Set 1 95 BRC95RS 11 Unloading Tube Set 1 95 STDDUT Part Description Qty SMG Part No 14 Filter Regulator 1 95 STREGWT 15 Outlet Nitto Style Socket Female 1 95...

Page 18: ...145PSI Number of Outlets 1 For any queries or assistance call Customer Service AUST 1300 660 457 NZ 0800 474 876 Hours of operation Monday to Friday 8 00am 5 00pm AEST Do not return to place of purcha...

Reviews: