background image

39 


620-7922 Rev B 


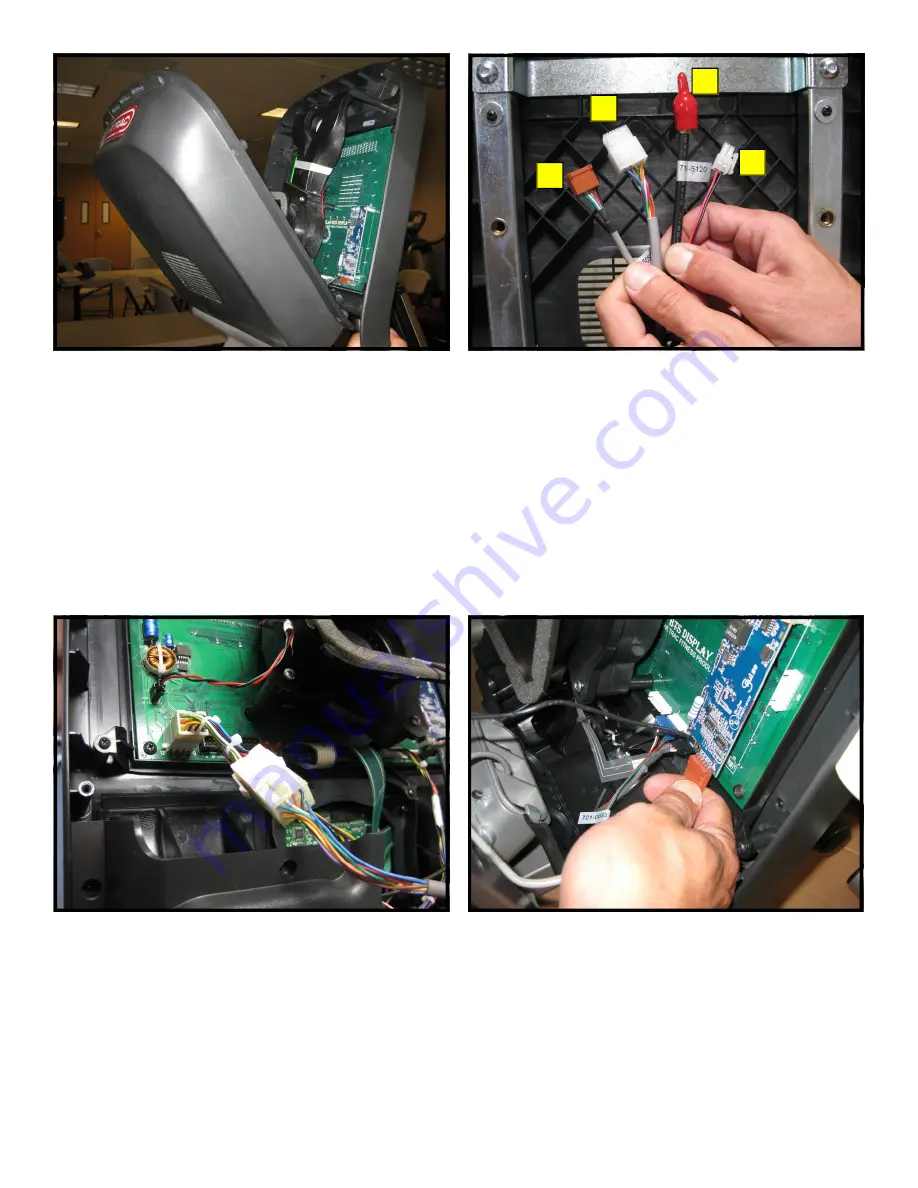
Step 25.  

Take the front display plastics with the new cen-
ter console to the base unit.  Hold the front dis-
play plastics at the top with one hand while con-
necting the cables and harnesses with the 
other. 

Step 26.  

Identify  the  four  cables  coming  out  of  the  neck 
and mounting bracket: 
1.  Heart rate cable 
2.  Main I/O cable 
3.  Coax cable 
4.  DC power cable 

Note: 

The coax and DC power cables are part of the 

PVS and embedded kits and should be tucked down 
the neck for possible future use. 

Step 27. 

Plug-in the 12-pin main I/O cable from the neck 
into the new 12 pin adaptor. 

Step 28.  

Next, plug-in the heart rate cable from the neck 
into  the  heart  rate  board  connector  on  the  dis-
play. 

Summary of Contents for E-UB

Page 1: ...4 620 7922 Rev B E UB Upright Bike E UB UPRIGHT BIKE INSTALLATION INSTRUCTIONS...

Page 2: ...r powered impact tool for any part of the assembly Complete the assembly checklist is completed on each Star Trac product Complete the final programming functional and cosmetic checklists for each Sta...

Page 3: ...ps Step 2 Open the box and remove top cover Then re move items from top packaging foam E UB UPRIGHT BIKE UNPACKING INSTRUCTIONS Step 4 Lift the unit off of the box base and place it on the floor Remov...

Page 4: ...ing ma terials and lay all components on the floor 1 2 3 4 5 6 7 Step 8 Verify the following hardware is included in the kit Step 7 Verify the following tools are included in the kit 1 2 3 4 5 1 2 3 4...

Page 5: ...rews Tighten all 4 screws to 200 lb in of torque Step 4 Hold and identify left and right pedals Note Left pedal is marked L right pedal is marked R Step 3 Carefully slide the seat post into the seat t...

Page 6: ...for later use Step 7 Remove the packaging tape that holds the dis play assembly together then separate the back of the display from the front Step 6 Attach left pedal to left pedal crank then tighten...

Page 7: ...of the neck where the two pieces came together Tighten the screws to 150 lb in of torque Step 10 Keep hold of the cables and rotate the display up Now slide the neck over the two mounts in the lower...

Page 8: ...on the display frame Step 15 Next plug in the heart rate cable into the HR board connector Step 14 Plug in the 12 pin main I O cable into the front display circuit board at J4 connector Step 13 Positi...

Page 9: ...Then adjust leveling feet to assure that the unit is leveled to the floor and does not rock back and forth Step 18 Next secure the front display to the back with 8 M4 Phillips head screws Step 17 Asse...

Page 10: ...installation of the E Series Upright Bike 1 All parts and hardware in the package are accounted for 2 All screws are tightened down to their specified values 3 Upper neck is properly mounted and secur...

Page 11: ...24 620 7922 Rev B E UBe Upright Bike E UBe RBe EMBEDDED DISPLAY CONSOLE INSTALLATION INSTRUCTIONS E RBe Recumbent Bike...

Page 12: ...the display and place it face down on top of a non scratching surface to protect it from being damaged Step 4 Remove the back cover from the embedded dis play assembly and place it in a safe place for...

Page 13: ...for later use Step 6 Mount the back cover to the display mounting bracket using four 4 M4 x 0 7 x 19mm long Phillips head screws and four 4 M4 flat wash ers Step 7 Attach the ground cable to upper le...

Page 14: ...y plastics at the top with one hand while connecting the cables and harnesses with the other Step 11 Identify the four cables coming out of the neck and mounting bracket 1 Heart rate cable 2 Main I O...

Page 15: ...5 Now plug in the DC power cable from the base neck into DC connectors on the embedded dis play assembly Step 13 Plug in the 12 pin main I O cable from the neck into the 12 pin connector on the FitCPU...

Page 16: ...take the power supply from the kit and plug it into the DC input Then take the power adapter cable from the kit and plug it into the power sup ply and the electrical receptacle Step 17 Plug in the gr...

Page 17: ...assembly is clear of any scratches or damage 3 All screws are tightened down to their specified values 4 Display s mounting bracket and back cover are properly mounted and secured 5 All cables and ha...

Page 18: ...31 620 7922 Rev B THIS PAGE INTENTIONALLY LEFT BLANK...

Page 19: ...32 620 7922 Rev B E UB RB iPod CENTER CONSOLE INSTALLATION INSTRUCTIONS E UB Upright Bike E RB Recumbent Bike...

Page 20: ...ation prior to mounting the display assembly onto the frame Step 3 Using a 2 Phillips screwdriver remove the 8 screws on the back of the display plastic Set the screws aside you will need them for re...

Page 21: ...rd and the display mount Step 6 Disconnect the 12 pin serial connector from the display Step 7 Now disconnect the heart rate connector from the display Step 8 Be careful with the display and place it...

Page 22: ...red away for any possible future use Note You will no longer need those covers and they can be stored away for any possible future use Step 11 Using a Phillips head screwdriver remove the 4 screws tha...

Page 23: ...y the cables coming out of the new center console 1 Center console keypad ribbon cable 2 Headphone jack cable 3 Center console ground cable 4 Seven pin interface cable Step 15 Connect the center conso...

Page 24: ...tach the male 12 pin connector to the fe male 12 pin connector on the display board Then connect the 2 DC power connectors to the center console Note The DC power cables can be plugged to ei ther one...

Page 25: ...ews saved from the earlier step to secure the display bottom Tighten the screws so they are snug Note Take special care to not pinch any of the ca bles between the plastics Step 24 Connect the CSAFE p...

Page 26: ...ables coming out of the neck and mounting bracket 1 Heart rate cable 2 Main I O cable 3 Coax cable 4 DC power cable Note The coax and DC power cables are part of the PVS and embedded kits and should b...

Page 27: ...ts to gether by sliding the bottom of the front display under the 2 tabs at the base first then pressing front display against the back cover Next secure the front display to the back with 8 M4 Philli...

Page 28: ...e the checklist below to ensure the proper installation of iPod kit on the E Bike 1 All parts tools and hardware in the package are accounted for 2 Center console assembly is properly mounted and secu...

Page 29: ...42 620 7922 Rev B THIS PAGE INTENTIONALLY LEFT BLANK...

Page 30: ...43 620 7922 Rev B E UB RB MYE ENTERTAINMENT CENTER CONSOLE INSTALLATION INSTRUCTIONS E UB Upright Bike E RB Recumbent Bike...

Page 31: ...then perform this installation prior to mounting the display assembly onto the frame Step 2 Using a 2 Phillips screwdriver remove the 8 screws on the back of the display plastic Set the screws aside...

Page 32: ...display Step 7 Be careful with the display and place it face down on top of a non scratching surface to protect it from being damaged Step 8 Using a 2 Phillips head screwdriver remove the 4 screws tha...

Page 33: ...n place then remove the center console Note You will no longer need the center console and it can be stored away for any possible future use Step 11 Insert the new center console into the front dis pl...

Page 34: ...round cable 4 Seven pin interface cable Step 14 Connect the center console keypad cable to J8 connector on the display board Step 15 Connect the seven pin interface cable from the console to J14 conne...

Page 35: ...nto display console Step 18 Now connect iPod cable from the iPod cra dle to J10 connector on the center console board Step 19 Slide off and remove the CSAFE power connec tor from the old bottom plasti...

Page 36: ...DC power cable Note The coax and DC power cables are part of the PVS and embedded kits and should be tucked down the neck for possible future use Step 24 Plug in the 12 pin main I O cable from the ne...

Page 37: ...sconnect tab on the display mount Step 25 Next plug in the heart rate cable from the neck into the heart rate board connector on the dis play Step 28 Assemble the front and back display parts to gethe...

Page 38: ...ay to the back with 8 M4 Phillips head screws Step 30 Turn power on Perform a visual inspection and test the features and functions of the unit prior to use Note Refer to the User s Manual for other s...

Page 39: ...e the proper installation of the MYE kit on the E Bike 1 All parts tools and hardware in the package are accounted for 2 Center console assembly is properly mounted and secured 3 All screws are tighte...

Page 40: ...53 620 7922 Rev B THIS PAGE INTENTIONALLY LEFT BLANK...

Page 41: ...54 620 7922 Rev B E UB Upright Bike E UB RB PERSONAL VIEWING SCREEN INSTALLATION INSTRUCTIONS E RB Recumbent Bike...

Page 42: ...m the display PERSONAL VIEWING SCREEN PVS INSTALLATION INSTRUCTIONS Step 2 Remove all content from the hardware kit packaging and verify that you have the following parts 1 2 3 4 5 6 7 Item Descriptio...

Page 43: ...d and the display mount Step 6 Disconnect the 12 pin serial connector from the display Step 7 Now disconnect the heart rate connector from the display Step 8 Be careful with the display and place it f...

Page 44: ...provided 5mm Hex key Retain screws for later use Note You will no longer need the cross brace and if desired you can store it away for any possible fu ture use Step 11 Mount the PVS assembly on the m...

Page 45: ...no longer need the headphone jack cover and it can be stored away for any possible future use Step 15 Using a Phillips head screwdriver remove the 4 screws that hold the original center console in pl...

Page 46: ...s Press firmly to insure the cable is seated into the cradle Step 19 Now install the new head phone jack mount Use the screw saved from the earlier step to secure the mount to the display Step 20 Iden...

Page 47: ...the center console board Step 24 Next replace the bottom cover Use the screws saved from the earlier step to secure the display bottom Tighten the screws so they are snug then plug in the CSAFE power...

Page 48: ...jack cable 3 DC power cable 4 Data interface cable 5 Video cable 6 Audio cable Step 28 Connect the coax cable coming out of the base unit with the coax cable coming out of PVS neck Secure tightly 1 2...

Page 49: ...p from the PVS kit bind the cables from the PVS neck to one side of the display mount Take the tie and put it through the hole on one of the display mount tubes Step 31 Plug in the 12 pin main I O cab...

Page 50: ...power cable from the PVS neck into the other DC con nectors on same center console board Step 34 Plug the data interface cable coming from the PVS neck into the center console board Step 35 Plug the...

Page 51: ...tab on the display mount Step 39 Plug the headphone jack cable coming from the PVS neck into the newly installed headphone jack on the front of display Step 40 Assemble the front and back display part...

Page 52: ...rom the kit and plug it into the power supply and the electrical receptacle Step 43 Turn power on Perform a visual inspection and test the features and functions of the unit prior to use Note Refer to...

Page 53: ...allation of PVS on the E Bike 1 All parts and hardware in the package are accounted for 2 Personal Viewing Screen assembly is properly mounted and secured 3 Center console assembly is properly mounted...

Page 54: ...67 620 7922 Rev B STAR TRAC 14410 Myford Road Irvine California 92606 Telephone 800 228 6635 714 669 1660 Fax 714 508 3303 http www startrac com...

Page 55: ...E UB Upright Bike E RB Recumbent Bike O W N E R S M A N U A L...

Page 56: ...ART key The items that you may display and change with the previous keys are Lowest Highest Default Item Value Value Value Meaning Serial Number 0 65535 0 E SERIES BIKE serial number set by factory Da...

Page 57: ...to Pilot Program was run since last reset IHR Program 0 65535 0 Number of times the Interval Heart Rate Control Program was run since last reset CHR Program 0 65535 0 Number of times the Constant Hear...

Page 58: ...detected during self test I Key Down One or more keys on the display panel are stuck in the on position This can occur if a user presses keys before the system is turned on Call Star Trac Product Supp...

Reviews: