5
© Copyright 2018 Star Water Systems. All rights reserved.
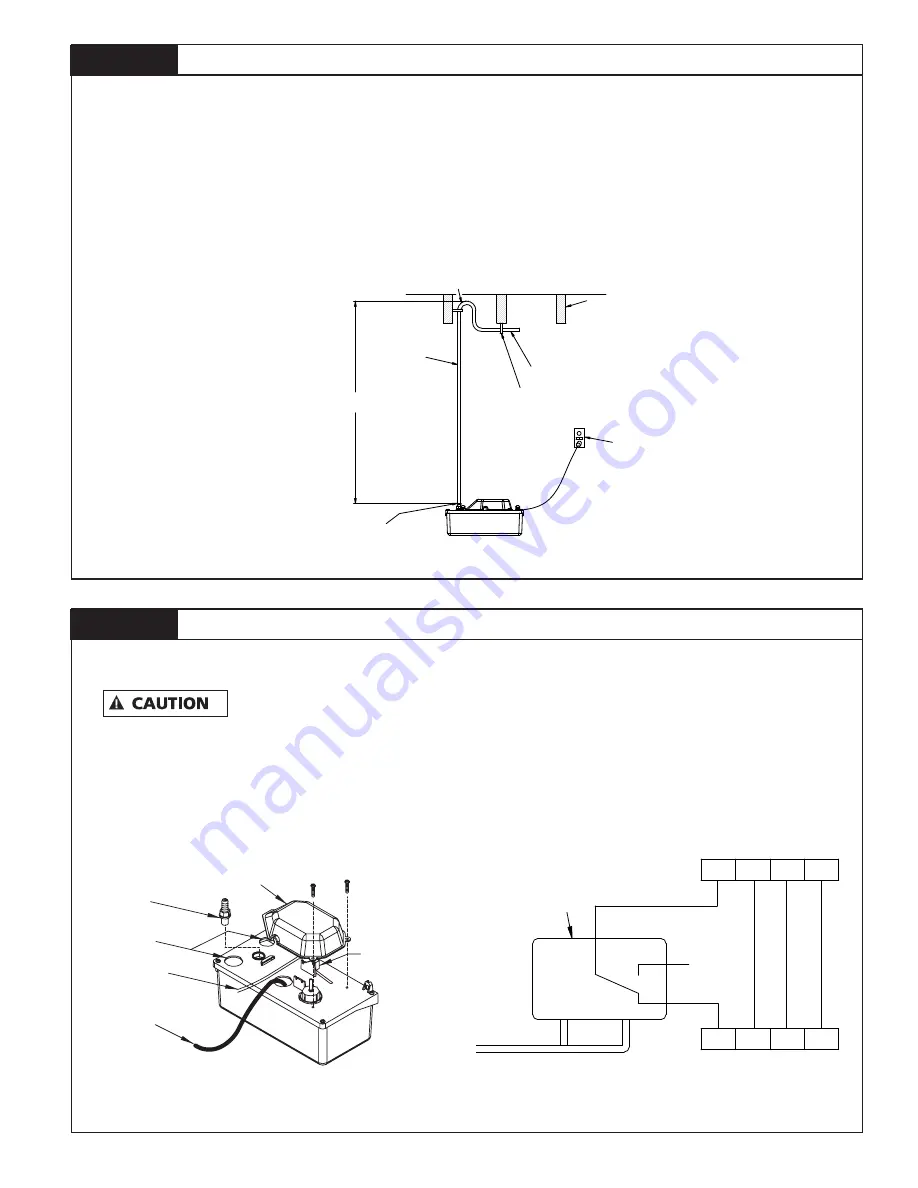
NOTE: If the unit does not have the Safety Switch feature, then skip to STEP 5.
Connect power cord to a constant voltage source, not a fan or other device which may run
intermittently.
4.1)
The unit can be wired directly to the appliance thermostat to shut the pump and the appliance down in the
event pump fails. Refer to Figure 4.1 for access to the Safety Switch. Refer to Figure 4.2 for typical wiring
diagram.
NOTE: The alarm can be wired into the Safety Switch at the normally open (NO) contact.
Figure 4.1
Note:
Do not use flexible tubing larger than 3/8” ID. A hose clamp (not included) is recommended.
3.1) Extend the discharge pipe, from the barbed check valve, to the highest point possible. Refer to Figure 3.1
3.2) From this point, direct the discharge line to the location of the main drain, maintain a continuous downward
slope.
Note:
If a continuous downward slope is not possible, then make an inverted “U” at the highest point of the discharge
line.
Note:
Make sure the 3/8” ID tube is supported in a way it will not “Kink or Pinch off” blocking flow.
Figure 3.1
SK1764
STEP 3
Installation of Discharge Line
STEP 4
Installation of Safety Switch
(RECOMMENDED, NOT INCLUDED)
GFCI Outlet
Pipe Supports
To Main Drain
Floor Joists
HOSE CLAMP
3/8" ID Tubing
15 FT
Max.
Inverted "U"
Note: Condensate Drain Lines
not Shown. Refer to Step 2 for
Installation of Drain Lines.
Figure 4.1
Leads to Install
Safety Switch
Main Power Cord
Overflow Safety
Switch
Switch Cap
Inlet(s)
Discharge
Fitting
IL1877
Thermostat Terminal
Connections at Appliance
NC
R
NO
Y
G
Typical Thermostat
R
G
Y
Overflow Safety
Switch


