CAUTION
This equipment is designed and sold for commercial use only by personnel trained and experienced
in its operation and is not sold for consumer use in and around the home nor for use directly by
the general public in food service locations. For equipment to be used by the general public,
please contact the factory.
GENERAL OPERATING PROCEDURES
Follow these simple instructions for the setup and operation of your new dispenser.
1. Lift unit out of shipping container and remove all tapes and packing materials. Do not
discard carton until dispenser is completely assembled and working.
2. Ensure magnetic impeller and wire grate are installed by lifting plastic lid and looking down
into bowl. The word "TOP" should be visible on impeller body. Metal grate should be
installed over impeller.
3. Add liquid to be heated/dispensed. If working with a powder, mix with water prior to pouring
into bowl. For best results, use hot liquid when mixing with powder. This improves mixing
and greatly reduces time to reach serving temperature. Do not place chocolate or cocoa
powder directly into bowl. Mix fi rst.
4. Plug unit into 115V AC outlet.
WARNING
DO NOT CONNECT TO DIRECT CURRENT (DC).
5. Turn switch on front right side of unit to ON position. This controls indicator light, heating
element and motor. Power is indicated by switch light.
6. The recessed area below spigot is intended for use as a drip tray.
7. Your new Star dispenser is equipped with a worry-free, trouble proof, pre-set thermostat
that maintains the product at proper serving temperature.
DISPENSER CLEANING INSTRUCTIONS
1. For best results and customer satisfaction, thoroughly clean dispenser daily.
CAUTION
TURN UNIT OFF AND UNPLUG PRIOR TO CLEANING.
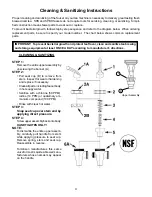
2. Remove contents of bowl before lifting and cleaning. Product removed from the bowl may
be placed in a suitable container for overnight refrigerated storage.
3. Lift cover and remove grate and impeller.
4. After allowing unit to thoroughly cool, remove front of unit by pulling on both sides at the
top with your fi ngers. Release latch to loosen bowl from element band and swing clamp
to left.
5. Raise bowl until faucet shank touches top of frame, then tilt bowl forward and upward until
faucet shank clears unit.
6. Clean and dry inset bowl, replacing it in unit by reversing operations of step 5. Tighten
latch for heating element.
7. Reinstall impeller such that the word "TOP" is again visible, and also metal grate.
MAINTENANCE AND REPAIRS
Contact the factory, a service representative or a local service company for service or required
maintenance.
3

