background image

2M-Z16001  Owners Manual for Countertop 30LB Electronic Fryer

1

MAINTENANCE & REPAIR 

xi

SPECIFICATIONS 1

FEATURES & OPERATING CONTROLS 

2

PRECAUTIONS & GENERAL INFORMATION 

3

INSTALLATION 4

OPERATION 

5, 6

CAUTIONS FOR ALL DEEP FAT FRYERS 

7

CARE OF FAT 

8

HANDY FRYING CHART 

9

WARRANTY 10

WIRING DIAGRAM 

  11

EXPLODED VIEW & PARTS LIST 

  12- 14

Proper installation, professional operation and consistent maintenance of this appliance will ensure that   

it gives you the very best performance and a long, economical service life. 
This manual contains the information needed to properly install this appliance, and to use and care for  

the appliance in a manner which will ensure its optimum performance.

TABLE OF CONTENTS

SPECIFICATIONS

INTRODUCTION

12” (30.4 CM)

24” 

(60.9 CM)

24” 

(60.9 CM)

21 7/16” 

(54.4 CM)

4” 

(10.1 CM)

1 1/4” 

(3.1 CM)

5” 

(12.7 CM)

6”

(15.2 CM)

16 3/4”

(42.5 CM)

CENTERLINE OF

CONDUIT CONNECTION

CENTERLINE OF

CONDUIT CONNECTION

ELEMENT HANDEL

SWINGS DOWN FOR

EXTRA CLEARANCE

36 11/32” 

(97.3 CM) ref.

IL3103

16” 

(40.6 CM)

Model

Voltage

kW

Amps

Dimensions

Weight

Width

Depth

Height

Installed

Shipping

530TF

208V

8,638

41.5

24”

24”

16.75”

69 lbs  

(31.3 kg

81 lbs  

(36.7 kg)

240V

11,500

47.5

530TEF

208V

6,910

33.2

240V

9,200

38.3

Summary of Contents for 530TEF

Page 1: ...e for TRAINING OPERATORS of this appliance Additional manuals are available from your DEALER THIS MANUAL MUST BE READ AND UNDERSTOOD BY ALL PERSONS USING OR INSTALLING THIS APPLIANCE Contact your deal...

Page 2: ...esponsible for errors or omissions in information provided or conclusions reached as a result of using the specifications By using the information provided the user assumes all risks in connection wit...

Page 3: ...al service life This manual contains the information needed to properly install this appliance and to use and care for the appliance in a manner which will ensure its optimum performance TABLE OF CONT...

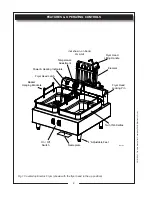
Page 4: ...Feet Nameplate On Off Switch Twin 15lb Kettles Fryer Head Locking Pin Fryer Head Lifting Handle Element Power Heating Indicators Fryer Head Latch Basket Hanging Brackets Temperature Adjustment not sho...

Page 5: ...T submerge this appliance in water This appliance is not jet stream approved DO NOT direct water jet or steam jet at this appliance or at any control panel or wiring DO NOT splash or pour water on in...

Page 6: ...ng materials Store all accessories in a convenient place for later use ELECTRICAL INSTALLATION This fryer is equipped for the voltage and wattage indicated on the nameplate mounted on the bottom of th...

Page 7: ...turns power on or off An indicator light Power On is located on the control housing 2 THERMOSTAT CONTROL Located on the Control Housing this control allows you to select the desired frying temperature...

Page 8: ...w to drain Raise the element to the vertical position and siphon the oil out of the kettle Once drained the kettle can be washed out with warm water and wiped dry before returning it to the unit DO NO...

Page 9: ...il is flammable Keep open flames away from hot oil and its vapors Never allow water or ice to get in hot oil IT CAN EXPLODE WARNING ENVIRONMENT Keep your floors clean and free of grease and all other...

Page 10: ...t to break down it becomes unsuitable for frying in fact browning is impossible In addition to filtration you can prolong the usefulness of fat by sweetening it with fresh compound every day replacing...

Page 11: ...or breading 350 5 Clams Batter 350 1 Scallops Breading 350 4 Shrimp Batter Some prefer soaking 1 2 hour in cold seasoned milk 350 3 Smelts Breading Cut spinal cord several 350 4 MEATS Chicken Fried St...

Reviews: