11
WATER SOFTENER TROUBLE SHOOTING
JUST INSTALLED UNIT AND WATER IS NOT SOFT
WHAT TO CHECK
HOW TO CORRECT
Has unit been properly installed
Re-read instructions to see that all steps were followed
By-pass in plumbing
On a 3-way by-pass valve system, open valves on piping
coming into and out of softener. The valve in between
MUST be closed and in good condition. Most units include
a by-pass valve which is connected to the control valve.
Make certain that it is in the service position.
Is unit piped in backwards
Check arrows where pipe threads into valve head and make
sure water is flowing consistent with the direction arrows
are pointing.
Hot water tank hardness
Allow sufficient time for hardness that has built up in your
water heater and pipes to run through system. Repeated
flushing of the water heater tank can also be done.
Is there resin in tank
Softeners ship with resin already in the tank. Make sure the
resin has not been emptied or dumped. Put a trouble light
behind resin tank and you should be able to see the resin
thru the mineral tank. The tank should be approx. 2/3 full.
Valve head is not working correctly and causing water flow
not to go through softener
Shut off water supply, de-pressurize the unit*, unscrew the
valve head from unit and exchange it.
Softener has been undersized and does not effectively
remove the amount of hardness in your water
Draw a sample of untreated water before it goes through
the softener and a sample of treated water after the
softener. Have the samples analyzed to see if any hardness
is being removed.
Water flow rate going through the softener is not allowing
time for the unit to soften
Open an outside faucet and fill a measured bucket up with
water for 1 minute. The amount of gallons in the bucket tells
you how many gallons per minute are being run through
the softener. Call 1-800-545-2206 to see what the GPM
limit is on the specific unit you have purchased. Add a flow
control accessory to your unit if needed.
*To depressurize the unit, refer to valve instructions for your particular unit.
WATER TASTES SALTY OR BRINE TANK FILLS WITH WATER
WHAT TO CHECK
HOW TO CORRECT
Is backwash water flowing freely down to drain with an air
gap and no back siphoning
Put valve into “Backwash” position and follow water flow
down to drain. If over 20 ft., use 3/4” (or larger) drain
tubing. Drain line should be no more than 8 ft. lift.
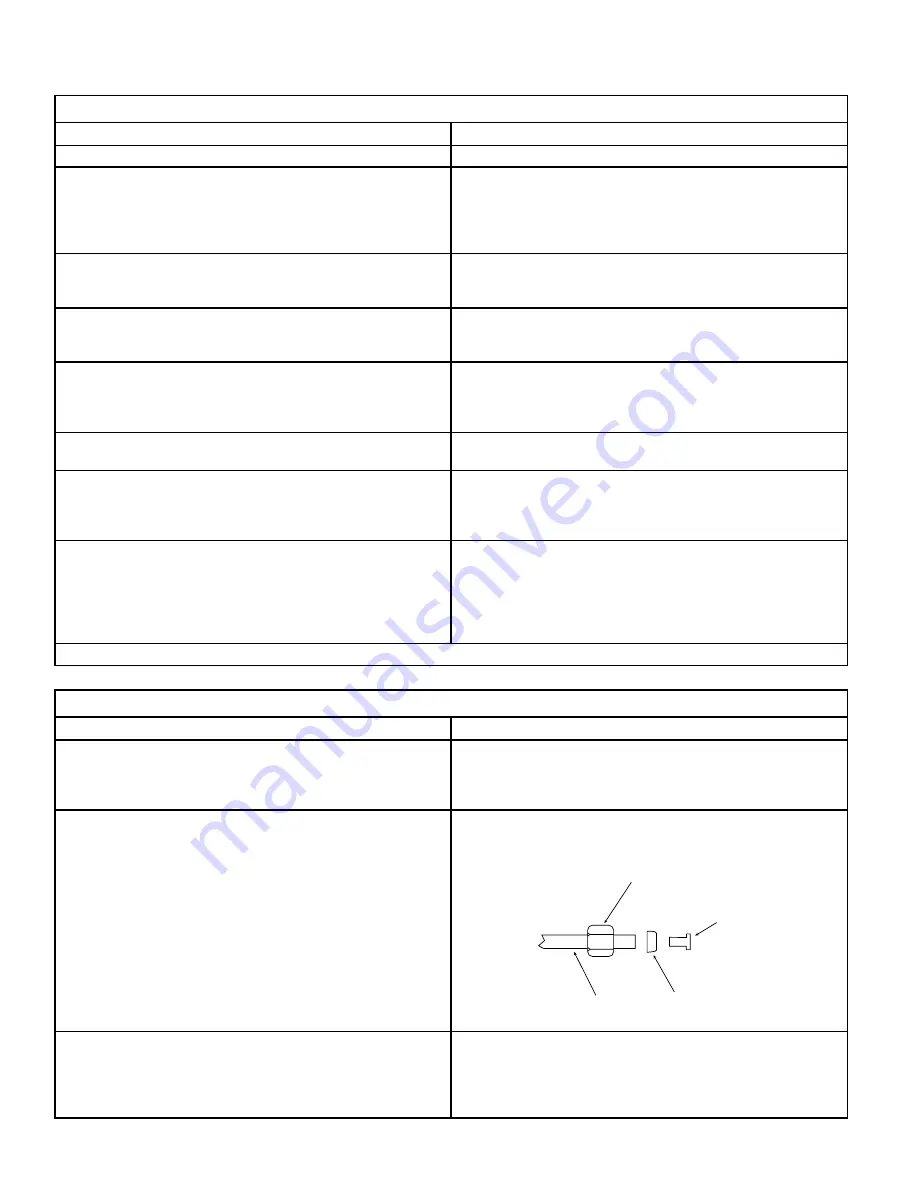
Brine salt tube and connections not allowing salt solution
into mineral tank to regenerate
Visually check tubing for cracks or kinks. Check fittings for
proper assembly and tightness as diagrammed.
Brass
Compression
Nut
Brass
Insert
Plastic
Ferrule
Poly
Tubing
IL0707
Injector or injector screen plugged
Put softener in by-pass position and de-pressurize the unit
by putting into “Backwash” position. There will be 2 screws
on neck of valve where the salt rinse line goes into softener.
Remove the 2 screws and clean screen and remove any
chunks of salt, etc.


