background image


English Sea 

Data 


Due to different shapes of hulls, the log transducer has to be calibrated on all boats. See 4.2.5 
 

For mounting of depth transducer, see instruction included with transducer. 


2.3 

Electrical installation 

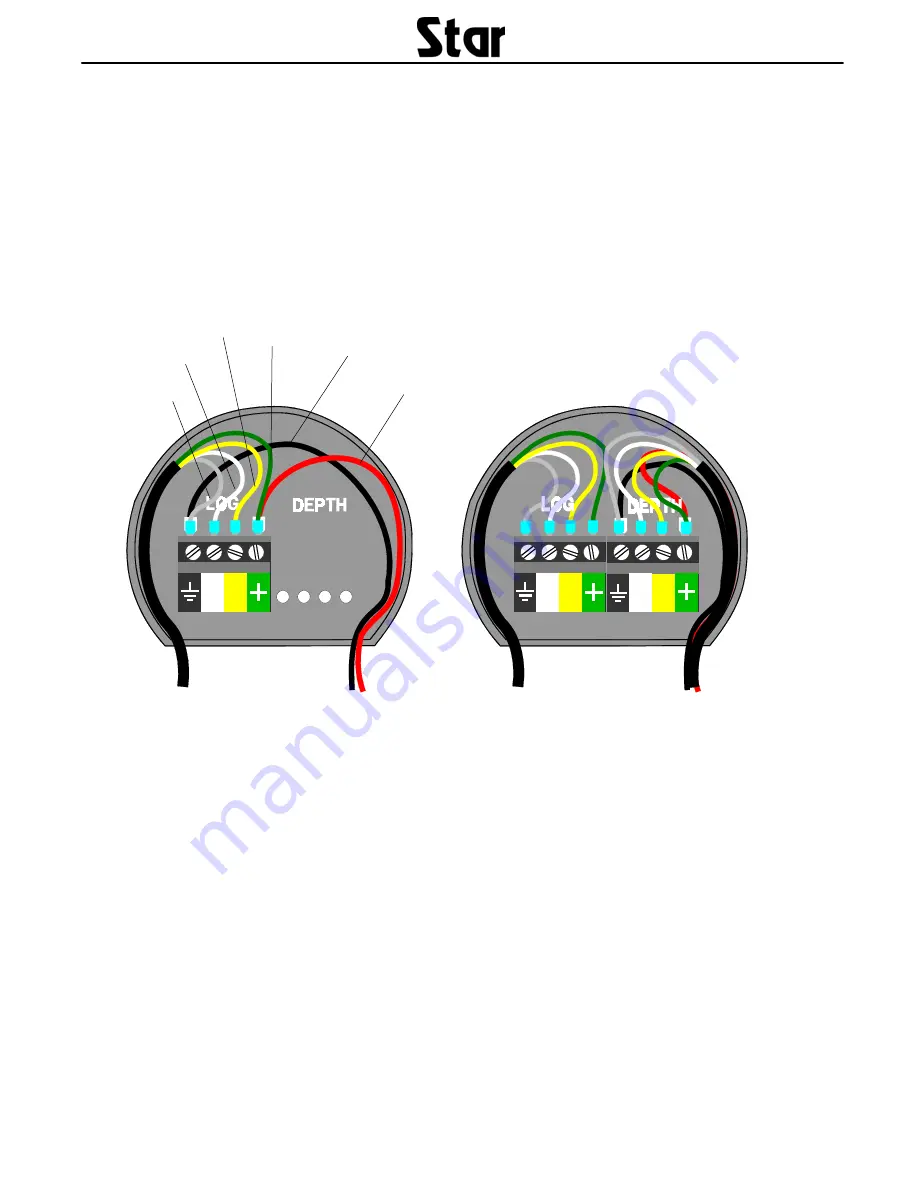
On the back of the instrument there are eight pins; Four for the screw connector for the log 
transducer and four for the depth transducer. The connector is colour coded with green, yellow 
white and ground sign. Connect the four wires from the log transducer according to the colours 
to the connector for LOG, the blank wire is ground. If a depth transducer is connected use the 
DEPTH connector for that. Power supply is either connected to green and ground for DEPTH or 
LOG. 


Log transducer and power supply 

Log and depth transducers and  

 power 

supply 


Connect a 5 Ampere fast fuse between the power battery and instrument on the red plus 
lead

White


Yellow 

Screen


Green


Black


Red 


Summary of Contents for Sea Data

Page 1: ...Installation and User Manual Sea Data English ...

Page 2: ...Sea Data English 1 ...

Page 3: ...English Sea Data 2 This manual is written for Silva Star Sea Data Edition May 2004 ...

Page 4: ... Illumination 8 3 4 Depth functions optional 9 3 4 1 Boat speed 9 3 4 2 Shallow alarm 9 3 4 3 Deep alarm 9 3 4 4 Silencing an alarm 9 3 4 5 Activate Deactivate an alarm 9 4 Calibration 10 4 1 Enter and exit calibration 10 4 2 Calibration groups 10 4 2 1 C10 Return RET 10 4 2 2 C11 Damping SEA MID 10 4 2 3 C12 Instrument type Type LOG 10 4 2 4 C13 Unit for speed Unit KTS 10 4 2 5 C14 Speed calibrat...

Page 5: ...tance 0 19999 99 Nm non resetable Stored in permanent memory Depth 0 5 150 m Deep alarm Adjustable Shallow alarm Adjustable 1 1 Part specifications Star SEA Data is delivered with all mounting material Make sure all these parts are in the pack age QTY ITEM QTY ITEM 1 Instruction for use 1 Drill template 1 Warranty card 4 Mounting screws 1 Instrument SEA Data 4 Rubber plugs 1 Instrument cover 1 Red...

Page 6: ...drill through the instruments four mounting holes as the gasket may be dam aged and thus cause leakage The warranty is not valid for damage caused by drilling through the mounting holes 2 2 Installing transducer The log and depth transducers need to be positioned carefully The transducer must remain in the water at all speeds Turbulent water causing air bubbles must be avoided The best position fo...

Page 7: ... transducer The connector is colour coded with green yellow white and ground sign Connect the four wires from the log transducer according to the colours to the connector for LOG the blank wire is ground If a depth transducer is connected use the DEPTH connector for that Power supply is either connected to green and ground for DEPTH or LOG Log transducer and power supply Log and depth transducers ...

Page 8: ...n Log mode and Depth mode One short press changes between the two modes To select light levels press mode for more than two seconds 3 1 2 Down button This button is used to move down in the sub function list or to decrease a value in set mode 3 1 3 Up button This button is used to move up in the sub function list or to increase a value in set mode 3 1 4 KEY button This button is used to lock unloc...

Page 9: ... is dis played To clear the trip distance press UP and DOWN together Range 0 199 99 Nm 3 2 4 Total distance To view the total distance press UP or DOWN Total distance is not possible to clear and will be stored in the instruments permanent memory Range 0 19999 99 Nm 3 2 5 Depth To view depth press UP or DOWN until the text DPT is displayed The depth function is only displayed if instrument type is...

Page 10: ... To change the alarm value unlock with KEY increase decrease the value with UP DOWN move to the next figure with MODE button and lock the value again with KEY 3 4 3 Deep alarm To get to the deep alarm function press UP or DOWN until the text DEEP is displayed To change the alarm value unlock with KEY increase decrease the value with UP DOWN move to next figure with MODE button and lock the value a...

Page 11: ... Instrument type Type LOG The Star SEA Data instrument can either be operating as a log instrument LOG a depth instrument DPT or as a combined log depth instrument ALL There is also a demonstration mode built into the instrument DEM If LOG is selected only log functions will be displayed If DPT is selected only depth functions will be displayed In demonstration mode DEM all values are simulated wi...

Page 12: ... from either the keel or the water surface Example Your boat has a draft of two metres and the transducer is mounted one half metre below the water surface 1 If you want the reading from the water surface you have to add 0 5 m 2 If you want the reading from the keel you have to subtract 1 5 m Note Calibration should be carried out in the same unit chosen for dis play 4 2 8 C17 Unit for temperature...

Page 13: ... function and press KEY and MODE together the display is flashing Go to the depth functions by pressing MODE and lock with KEY It is possible to move two functions one under speed and one under depth The last customised display is the display the instrument starts up in after power on If you want the instrument to start up displaying speed and trip after power on go to the trip function under spee...

Page 14: ...Sea Data English 13 5 Warranty ...

Page 15: ...English Sea Data 14 ...

Page 16: ...Sea Data English 15 Copyright Silva Sweden AB Kuskvägen 4 191 62 Sollentuna Sweden Tel 46 0 8 623 43 00 Fax 46 0 8 92 76 01 www silva se 22172 3 Edition 2 ...

Reviews: