background image

3

Precautions prior to Installation

Precautions prior to Installation

1. Before installation, please refer to the (Package Contents and Accessories) and ensure 


necessary parts are fully provided. Contact the original distributor in case of any missing or

 damaged 

item.


2. Please use the power cord that comes with the package to connect the power supply. Do 


not disassemble or modify the device without authorization. Be sure to use 100-240V,  


60Hz, power supply. Any unauthorized disassembly or modification may cause damage to 


the electronic parts and deprive you of the benefit under the warranty. 

STARDOM

 is not 


liable and responsible for any damage due to unauthorized disassembly or modification, if 


such unauthorized disassembly or modification results in data damage or loss, or causes 


the operating system unable to start.

3. Please carefully go through the Quick Installation Guide and back up your data on the 


hard drive before installating or using the newly purchased hard drive to avoid data loss 


in case of inadvertent operation. 

STARDOM

 is not reliable and responsible for any data 


damage due to inadvertent operation, if such inadvertent operation results in 


data damage or loss, or causes the operating system unable to start.

4. Hardware Requirements:


A. Before installing Windows XP Professional, please make sure your system meet the 

  following 

hardware 

requirements:


a.  PC with 233MHz or faster (or equivalent)


b.  128MB of RAM recommended (64MB minimum required)


c.  1.0 GB of available hard disk space (for installing the RAID management software)

  d. 

VGA 

monitor


e.  Keyboard, mouse or compatible pointing device, CD-ROM drive (for installing the

    RAID 

management 

software)


f.  SATA II 3.0 GHz interface


B. Before installing Macintosh, please make sure your system meet the following 

  hardware 

requirements:


a.  128 MB of RAM recommended (64 MB minimum required)


b.  1.0 GB of available hard disk space (for installing the RAID management software)

  c. 

VGA 

monitor


d.  Keyboard, mouse or compatible pointing device, CD-ROM drive (for installing the  

    RAID 

management 

software)


e.  SATA II 3.0 GHz interface


C.Check Hardware Compatibility


a.  Please use a motherboard with SATA II (3.0 GHz) interface to enhance compatibility 

    and 

transmission 

efficiency.


b.  Please purchase an interface card supporting at least 4Ports SATA II (3.0 GHz) .

5. OS Software Requirements


A. This product is applicable to the following operating systems:

  a. 

Windows 

2000/2003/XP

  b. 

Mac 

OS 

10.3.5 

or 

higher

  c. 

Linux 

2.6.13 

or 

later

Summary of Contents for ST5610-4S-S2

Page 1: ...SOHOTANK Series Four in One JBOD External Storage Manual ST5610 Series...

Page 2: ...SOHOTANK Series w w w s t a r d o m c o m t w Your Data Security Guardian...

Page 3: ...SOHOTANK Series ST5610 4S S2 Quick Installation Guide Version 1 0...

Page 4: ...nts and Accessories 2 Hardware Introduction 2 Precautions prior to Installation 3 Hardware Installation Procedure 4 Hard Drive Format Procedure 7 Product Description 9 Frequently Asked Questions 10 Me...

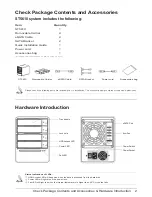
Page 5: ...Accessories Hardware Introduction ST5610 system includes the following Item Quantity ST5610 1 Removable Carrier 4 eSATA Cable 4 SATA Bracket 2 Quick Installation Guide 1 Power cord 1 Accessories bag 1...

Page 6: ...h inadvertent operation results in data damage or loss or causes the operating system unable to start 4 Hardware Requirements A Before installing Windows XP Professional please make sure your system m...

Page 7: ...lied plastic key into the lock hole on the removable tray and carefully remove the tray as shown in Figure 1 B Remove the holder from the removable tray with a screwdriver be careful not to damage the...

Page 8: ...eSATA connecting wires and SATA bracket which are in the accessory package and abiding by SATA using standard Computer Case 5 Hardware Installation Procedure Carefully push the removable tray into th...

Page 9: ...ATA interface on the RAID CARD and connect the other end of the eSATA II bracket to SATA cable to the eSATA port on the ST5610 Make sure the screws on the bracket are fastened and the eSATA connector...

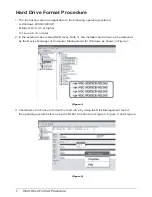
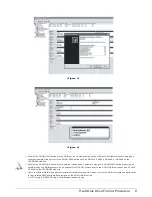
Page 10: ...the external case mode RAID level Note 1 the installed hard drive can be detected by the Device Manager of Computer Management for Windows as shown in Figure 1 3 Customers can choose to format the ha...

Page 11: ...Customers may use a SOHOTANK series product as an external case or a RAID system with an optional RAID CARD Please refer to the SOHO RAID series such as ST3620 ST6600 on the STARDOM web site 3 There...

Page 12: ...with models like SR6600 ST6600 and i302 It provides easy access and better mobility For example you just need to carry the ST5610 removable HDD tray between office and home by simply removing the HDD...

Page 13: ...I use the storage device in the operating system even the system BIOS has detected the hard drive A 1 Please refer to the Hardware Installation Procedure Hard Drive Format Procedure in the Quick Inst...

Page 14: ...Memo 11 Memo...

Reviews: