background image

SAFE INFORMATIONS 

WARNING: 

When assembling and using this product, basic safety precautions should always be


followed to reduce the risk of personal injury and damage to equipment. Please read all


instructions before assembly and usage.

Some parts may contain sharp edges, wear protective gloves if necessary.

This unit is heavy! Do not assemble this item alone. At least two or more people are


recommended for safe assembly.

Keep all children and pets away from assembly area.

Begin assembly not less than 6 feet from any obstruction such as fence, garage, house,


overhanging branches, laundry line or electrical wires.

Install on level ground. This gazebo cannot be permanently staked or attached to


concrete floor or platform. The provided stakes are for soft ground use only. If


assembling on a hard surface like a deck or concrete, other forms of attachment must


be used such as expansion bolts that can be purchased locally.

This gazebo is intended for decorative and sunshade purposes only and is not meant to


withstand inclement weather including high winds, rain and snow. Gazebo fabric is


water resistant, not water proof and may leak during exposure to precipitation.

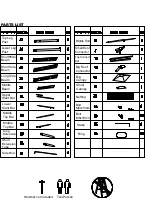
Please lay out all parts before assembling, checking to make sure all parts are there. If


any parts are missing, please email  

pioneerleisure@163.com

 and parts will be


expedited to you.

Do not leave the gazebo where there is a risk of high wind, as possible damage will


occur to the structure.


Remove all excess snow from the roof.

Do not climb on top of the gazebo. Falling off the gazebo can result in serious injury.

KEEP ALL FLAME AND HEAT SOURCES AWAY FROM THIS GAZEBO FABRIC. This


Gazebo 

is made with fabric that meets CPAI-84 specifications for flame resistance. It is


not fire 

proof. The fabric will burn if left in continuous contact with any flame source.


The 

application of any foreign substance to the gazebo fabric may render the flame-

resistant properties ineffective.

Summary of Contents for PT0248C2S

Page 1: ...e that you enjoy the unmatched quality comfort and style of your new patio item Every piece is meticulously considered all the way down to the smallest details exclusively for you by our world class d...

Page 2: ...as expansion bolts that can be purchased locally This gazebo is intended for decorative and sunshade purposes only and is not meant to withstand inclement weather including high winds rain and snow G...

Page 3: ...ddle Beam Upper Slant Bar Lower Slant Bar Middle Top Bar Middle Top Bar Long Extension Tube Short Extension Tube Side Rod Ring Stake Bolt M6x18mm Bolt M6x15mm Netting Small Canopy Big Canopy Big Roof...

Page 4: ...E BEAM x 2 ASSEMBLY OF THE UPPER POST TO LONG SIDE BEAM x 2 Step 1 Connect Long Side Beam D1 to Middle Long Side Beam both end D3 fix by using Bolt BB Step 2 Connect Upper Post A1 to assembled Long Si...

Page 5: ...RT SIDE BEAM TO UPPER POST x 2 Step 3 Connect Short Side Beam C1 and C2 to assembled Upper Post A1 fix by using Bolt BB ASSEMBLY OF ACROSS BEAM x 2 Step 4 Connect assembled Short Side Beam C1 and Shor...

Page 6: ...ep 5 Insert Long Side Netting Rod E1 to Middle Rod E2 then attach assembled Netting Rod E1 E2 to assembled Beam D1 fix by using Bolt BB Step 6 Insert Top Connect Bar T1 into Small Top Connector J conn...

Page 7: ...le Top Bar H2 into Middle Upper Bar H1 ASSEMBLY OF SHORT SIDE ROOF BAR TO ACROSS BEAM Step 8 Attach Upper Top Bar H1 to Top Connector J attach Lower Top Bar H2 to assembled Short Side Beam C1 C2 fix b...

Page 8: ...op Connector T2 attach Lower Top Bar H2 to assembled Long Side Beam D3 and Middle Long Side Netting Rod E2 together by using Bolt BB ASSEMBLY OF TOP FRAME Step 10 If assembled Middle Netting bar E2 in...

Page 9: ...ASSEMBLY OF TOP SLANT BAR SETTING OF BIG CANOPY ON ROOF Step 11 Insert Upper Slant Bar G1 into Small Top Connector J connect Lower Slant bar G2 and Upper Post A1 Step 12 Put Big Canopy 01 on frame...

Page 10: ...L CANOPY ON ROOF FRAME Step 13 Insert Slant Bar G1 into Short Extension Tube K4 insert Slant bar G2 into Long Extension Tube K5 Step 14 Put Small Canopy 02 on Top frame fix four corner to Short Extens...

Page 11: ...FRAME ASSEMBLY OF GAZEBO POST Step 15 Insert Middle Top Bar H2 into Big Canopy edge pocket 01 then fix Big Canopy four corner to Long Extension Tube K5 adjust Tube to suitable length Step 16 Connect L...

Page 12: ...SETTING OF NETTING ASSEMBLY ASSEMBLED GAZEBO ON GROUND Step 17 Hang Netting P1 on Netting Bar E1 E2 by using Ring LL Step 18 Fix assembled gazebo Lower Post A2 on ground by using Stake II...

Page 13: ...f 1 year from the date of purchase provided the item was factory sealed at the time of purchase and is maintained with care and used only for personal residential purposes Should any manufacturing def...

Reviews: