background image

17

The Periodic Brake Performance Test should be performed regularly as an evalua-
tion of braking system performance. It is useful as a method of identifying subtle 
loss of performance over time.

The purpose of this test is to compare the braking performance of vehicle to the 
braking performance of new or “known to be good” vehicle or to an established ac-
ceptable stopping distance. Actual stopping distances will be influenced by weath-
er conditions, terrain, road surface condition, actual vehicle weight (accessories 
installed) and vehicle speed. The test is conducted by latching the parking brake 
to eliminate different pedal pressures and to include the effects of errors in linkage 
adjustment.

Establish the acceptable stopping distance by testing a new or “know to be good” 
vehicle and recording the stopping location or stopping distance. For fleets of ve-
hicles, several vehicles should be tested when new and the range of stopping loca-
tions or distances recorded.

Drive the vehicle at maximum speed on a flat, dry, clean paved surface. Quickly 
depress the brake pedal to latch the parking brake at the line or marker in the test 
area and remove foot from pedal. The vehicle should stop aggressively. 

The wheel brakes may or may not lock. Observe the vehicle stopping location or 
measure the vehicle stopping distance from the point at which the brakes were 
latched. The vehicle should stop within the ‘normal’ range of stopping distances. If 
the vehicle stops more than 4 ft. (3.0m) beyond the acceptable stopping distance or 
pulls to one side, the vehicle has failed the test and should be tested again.

If the vehicle fails the second test, it should immediately be removed from service.

Lubrication

Checking the Lubricant Level

To Clean the area around the check/fill plug and remove plug. The correct lubricant 
level is just below the bottom of the threaded hole. If lubricant is low, add lubricant 
as required. Add lubricant slowly until lubricant starts to seep from the hole. Install 
the check/fill plug. In the event that the lubricant is to be replaced, the vehicle must 
be elevated and the oil pan removed or the oil siphoned through the check/fill hole.

CAUTION:

 Do not use more than ½ - ¾ of grease in any grease fitting at any one 

Summary of Contents for BN72-08-AC-Autodrive-M

Page 1: ...Owner s Manual and Service Guide M Series Shuttle Bus BN72 08 AC Autodrive M BN72 11 AC Autodrive M BN72 14 AC Autodrive M and BN72 23 AC ADS M...

Page 2: ...e instructions will help you to obtain maximum enjoyment from your new Star EV If you have any questions about the operation or maintenance of your M Series Bus please consult your Star EV dealer Read...

Page 3: ...on and Service Before initial use Controls Vehicle cleaning and care Periodic service schedule Periodic test for mechanical brake Lubrication Batteries and charging Troubleshooting Battery Terms Expla...

Page 4: ...or for incidental or consequential or consequential damages that result from the use of the material in this manual These vehicles are designed and manufactured for off road use Some communi ties may...

Page 5: ...e trained and qualified to do so Follow the manufacturer s maintenance procedures for the vehicle Be sure to disable the vehicle before performing any maintenance Disabling includes removing the key f...

Page 6: ...Be aware of pedestrians at all times Do not drive the vehicle in a manner that would endanger anyone Riding on the vehicle by persons other than the operator is authorized only on personnel seat prov...

Page 7: ...ectric Vehicles The user should require battery changing and charging facilities and procedures to be in accordance with appropriate paragraphs of ANSI NFPA 505 The user should periodically inspect fa...

Page 8: ...zardous area operation should be inspected to ensure that maintenance preserves the original approved safe operating features Vehicles should be kept in a clean condition to minimize fire hazards and...

Page 9: ...or of the nature of the hazard and stating the proper precautions to be taken to avoid the hazard Vehicle Pedestrian Interference Areas Areas where pedestrians and the vehicle interfere should be avoi...

Page 10: ...s plastic Fiberglass plastic Front Suspension Independent suspension coil over shock Independent suspension coil over shock Rear Suspension Leaf spring and shock Leaf spring and shock Steering System...

Page 11: ...and injected mold Front Suspension Independent suspension coil over shock Independent suspension coil over shock Independent suspension coil over shock Rear Suspension Leaf spring and shock Leaf spri...

Page 12: ...ar plastic that protect the seat bottom and back rest during shipping before placing the vehicle in service WARNING To prevent overheating that may cause serious damage to the charger and create the p...

Page 13: ...onmental factors which affect the terrain and the ability to control the vehicle Use extra care and reduced speed when driving on poor surfaces such as loose dirt wet grass gravel etc Stay in designat...

Page 14: ...damage to seals plastics seat material body finish or electrical system Do not use pressure in excess of 700 psi to wash exterior of vehicle Clean windshield with lots of water and a clean cloth Minor...

Page 15: ...tteries Clean batteries and terminals check charge condition and all connections Wiring Check all wiring for loose connections and broken insulation Charger Receptacle Clean connections keep receptacl...

Page 16: ...ease leakage Rack End Ball Joint Lubricate use wheel bearing grease Rear Axle Check for unusual noise and loose or missing mounting hard ware Annually Front Wheel Bearings Check and adjust as required...

Page 17: ...t dry clean paved surface Quickly depress the brake pedal to latch the parking brake at the line or marker in the test area and remove foot from pedal The vehicle should stop aggressively The wheel br...

Page 18: ...nstalling them spilled electrolyte can cause burns and damage The electrolyte in a storage battery is an acid solution which can cause severe burns to the skin and eyes Treat all electrolyte spills to...

Page 19: ...n reduce the life of the battery Battery Charging The battery charger is designed to fully charge the battery set If the batteries are severely deep cycled some automatic battery chargers contain an e...

Page 20: ...eceptacle housing for dirt or debris Charge the batteries after each day s use Monthly Inspect all wiring for fraying loose terminations corrosion or deteriora tion of insulation Check that the electr...

Page 21: ...smoke near batteries Do not over tighten terminals Doing so can cause post breakage post meltdown or fire Battery Cleaning CAUTION To prevent battery damage be sure that all battery caps if equipped a...

Page 22: ...eparing Acid Neutralizing Solution Allow the solution to sit for at least three minutes Use a soft bristle brush or cloth to wipe the tops of the batteries to remove any conductive residue Rinse the e...

Page 23: ...the increase in volume of the electrolyte that results from the charging cycle CAUTION Do not overfill batteries The charging cycle will expel electro lyte and result in component damage A battery be...

Page 24: ...tering must be done at the right time and in the right amount or else the battery s performance and longevity suffers Water should always be added after fully charging the battery Prior to charging th...

Page 25: ...battery racks and the battery hold downs tightened to 45 55 in lbs 5 6 Nm torque to prevent movement but not tight enough to cause distortion of the battery cases Inspect all wires and terminals Clea...

Page 26: ...ger controller and other electronic devices need to be disconnected since they will contribute to the premature discharge of batteries During periods of storage the batteries will need attention to ke...

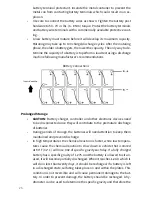
Page 27: ...important things to avoid Freezing Avoid locations where freezing temperature is expected Keeping a battery at a high state of charge will also prevent freezing See following table 31 Heat Avoid dire...

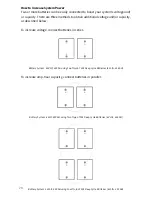
Page 28: ...y as described below To increase voltage connect batteries in series Battery System 12 Volt 225 AH using Two Trojan T105 Deep Cycle Batteries 6 Volts 225 AH To increase amp hour capacity connect batte...

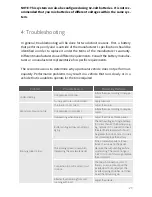
Page 29: ...ording to require ments Turning parts are not lubricated Apply lubricant Abnormal abrasion on tire The toe in is not correct Adjust the toe in Tire pressure is not correct Inflate the tire according t...

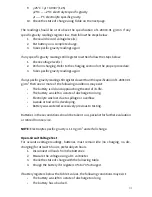
Page 30: ...rotection After the temperature of the con troller comes down the protection status should recover Specific Gravity Testing A cost effective way to identify a poorly performing battery is to use a hyd...

Page 31: ...g conditions may exist The battery is old and approaching the end of its life The battery was left in a state of discharge too long Electrolyte was lost due to spillage or overflow A weak or bad cell...

Page 32: ...aterials react with sulfuric acid during charging and discharging Ampere Amp A unit of measurement for the electron flow or current through a circuit Ampere Hour Amp Hr AH A unit of measure for a batt...

Page 33: ...nt DC power from a battery into standard alternating current AC house power Primary Battery An energy storage device that can deliver energy but cannot be recharged i e disposable flashlight battery S...

Page 34: ...34 6 Electrical Diagrams...

Page 35: ...35...

Page 36: ...possible in literal and figurative description as well as technical description on the ba sis of existing data At the same time JH Global reserves the right to alter the content of this manual and th...

Reviews: