background image

16

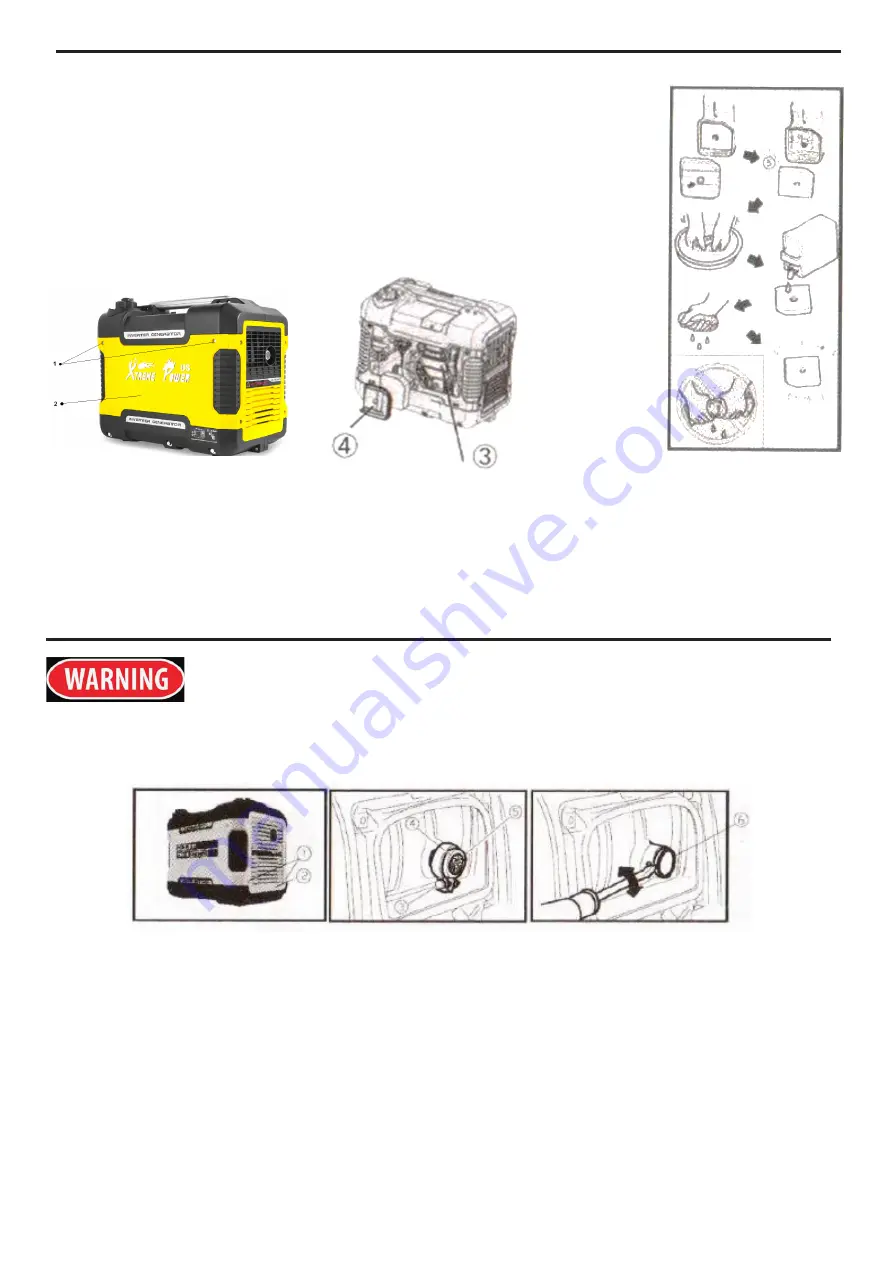
AIR FILTER

1. Remove the screws (1) and then remove the cover (2). 

2. Remove the screw (3) and then remove the air filter case cover (4)

3. Remove the foam element, wash it in solvent and dry it. 

4. Oil the foam element and squeeze out excess oil. The element should 

not be dripping. Do not wring out the foam element when squeezing as 

6. Insert the foam element into the filter case. Be sure the element sealing surface matches the air 

filter. Never run the engine without the foam element in the correct position. 
5. Install the air filter case cover and tighten the screws. 

6. Install the over and tighten screws.

MUFFLER SCREEN AND SPARK ARRESTER

THE ENGINE AND MUFFLER WILL BE VERY HOT AFTER THE ENGINE HAS BEEN RUN. 

AVOID TOUCHING THE ENGINE AND/OR MUFFLER WHILE STILL HOT. SERIOUS INJURY 

CAN OCCUR. 

1. Remove the screws (1) and pull outward on the areas of the cover (2)

2. Loosen the bolt (3) then remove the muffler cap (4the muffler screen (5) and 

spark arrester (6) 

3. Clean the carbon deposits on the muffler screen and spark arrested using a 

wire brush.

4. Check the muffler screen and spark arrester, replace if damaged. 
5. Install the spark arrester, muffler screen, muffler cap and cover, to be sure to 

tighten the screws. 

Summary of Contents for 65064

Page 1: ...LY OPERATING INSPECTION MAINTENANCE AND CLEANING PROCEDURES WRITE THE PRODUCT S SERIAL NUMBER ON THE BACK OF THE MANUAL NEAR THE ASSEMBLY DIAGRAM OR MONTH AND YEAR OF PURCHASE IF PRODUCT HAS NO NUMBER OWNER S MANUAL AND SAFETY INSTRUCTIONS ITEM 65064 65065 FOR QUESTIONS PLEASE CALL OUR CUSTOMER SUPPORT 909 628 4900 MON FRI 9AM TO 3PM PST ...

Page 2: ...stor may be required The operator should contact local fire agencies for laws or regulations relating to fire prevention requirements Set up and use only on a flat level well ventilated surface All connections and conduits from the Generator to the load must only be installed by trained and licensed electricians and in compliance with all relevant local state and federal electrical codes and stand...

Page 3: ...tion manual of the product to be powered to make sure that it can be safely and efficiently powered by a portable generator Before connecting an appliance or power cord to the generator Make sure that it is in good working order Faulty appliances or power cords can create a potential for electrical shock Do not exceed the running wattage of the generator Make sure that the total electrical rating ...

Page 4: ... not wear loose clothing or jewelry Keep hair clothing and gloves away from moving parts Loose clothes jewelry or long hair can be caught in moving parts Parts especially exhaust system components get very hot during use Stay clear of hot parts Do not cover the generator during operation Keep the generator and surrounding area clean at all times Do not smoke or allow sparks flames or other sources...

Page 5: ...aintained Do not attempt any service or maintenance procedures not explained in this manual or any procedures that you are uncertain about your ability to perform safely or correctly Store equipment out of the reach of children Follow scheduled engine and equipment maintenance If you intend for this generator to be connected to a home power supply as a standby the connection should be performed by...

Page 6: ...COMPONENTS AND CONTROLS 5 ...

Page 7: ... remove them 4 After checking restart the engine TIP The overload indicator light may come on for a few seconds at first when using electric devices that require a large starting current such a compressor or submergible pump However this is not a malfunction AC PILOT LIGHT GREEN The AC pilot light comes on when the engine starts and produces power DC PROTECTOR The DC protector turns to OFF automat...

Page 8: ...fuel tank cap is securely tightened NOTICE Immediately wipe off spilled fuel with a dry clean cloth Fuel can deteriorate painted surfaces or plastic parts Use only unleaded gasoline The use of leaded gasoline will cause sever damage to internal engine parts Remove the fuel tank cap and fill the fuel into the tank up to the red level indicator RECOMMENDED FUEL Unleaded gasoline FUEL TANK CAPACITY T...

Page 9: ... short time Operate the engine in a well ventilated area Before starting the engine do not connect any electric devices TIP The generator can be used with the rated output load at standard atmospheric conditions Ambient temperature 25 C Barometric pressure 100kPa Relative humidity 30 The output of the generator varies due to change of temperature altitude and humidity The output of the generator i...

Page 10: ...ly TIP The choke knob is not required to start a warm engine push the choke knob back in into the original position 6 Grasp the generator handle to steady the unit Pull slowly on the recoil starter until it is engaged then pull it briskly 7 After the engine starts warm up the engine until the engine does not stop when the choke knob is returned to the original position ...

Page 11: ... C 41 F the engine will run at the rated r min 4500r min for three minutes to warm up the engine The ECS unit operates normally after the above time period while the ECS is ON STOPPING THE ENGINE Turn off the electric devices 1 Turn the ECS black switch to OFF 2 Disconnect any electric devices 3 Turn the red engine switch to STOP 4 Turn the fuel cock knob to OFF 5 Turn the fuel tank cap air vent k...

Page 12: ...sure the AC pilot light is on 5 Turn on any electric devices TIP The ECS must be turned to OFF to increase engine speed to rated rpm If the generator is connected to multiple loads or electricity consumers remember to first connect the one with the highest starting current then lastly connect the one with the lowest starting current BATTERY CHARGING The generator DC rated voltage is 12V Start the ...

Page 13: ...wner s manual for the battery to determine the end of battery charging Measure the specific gravity of electrolyte to determine if the battery is fully charged At full charge the electrolyte specific gravity is between 1 26 and 1 28 It is advisable to check the specific gravity of the electrolyte at least once every hour to prevent overcharging the battery NEVER SMOKE OR MAKE AND BREAK CONNECTIONS...

Page 14: ...ying precision equipment electronic controllers computers microcomputers or battery charges Keep the generator a sufficient distance away to prevent electrical interference from the engine Also ensure that electrical noise from the engine does not interfere with any other electrical devices located near the generator Some electrical appliances or general purpose electric motors have high starting ...

Page 15: ... appliances or general purpose electric motors have high starting currents and cannot be used even if they lie within the supply ranges given in the above table STOP THE ENGINE BEFORE SERVICING PUT THE ENGINE ON A LEVEL SURFACE AND REMOVE THE SPARK PLUG CAP TO PREVENT THE ENGINE FROM STARTING DO NOT OPERATE THE ENGINE IN A POORLY VENTILATED ROOM OR ENCLOSED AREA BE SURE TO KEEP THE WORKING ROOM WE...

Page 16: ... 2 turn past finger tight However the spark plug should be tightened to the specified torque as soon as possible 6 Install the spark plug and spark plug cover ENGINE OIL REPLACEMENT Avoid draining the engine oil immediately after stopping the engine The oil is hot and should be handled with care to avoid burns 1 Place the generator on a level surface and warm up the engine for several minutes Stop...

Page 17: ...ion 5 Install the air filter case cover and tighten the screws 6 Install the over and tighten screws MUFFLER SCREEN AND SPARK ARRESTER THE ENGINE AND MUFFLER WILL BE VERY HOT AFTER THE ENGINE HAS BEEN RUN AVOID TOUCHING THE ENGINE AND OR MUFFLER WHILE STILL HOT SERIOUS INJURY CAN OCCUR 1 Remove the screws 1 and pull outward on the areas of the cover 2 2 Loosen the bolt 3 then remove the muffler ca...

Page 18: ...mp then open the fuel valve to check for a leak 6 Install the cover and tighten the screws DRAINING THE FUEL 1 Turn the engine switch to OFF 1 2 Remove the fuel tank cap and remove the filter Extract the fuel from fuel tank then install the fuel cap 3 Start the engine and let it run until it stops The engine should stop in approximately 20 minutes by running out of fuel 4 Remove the screws then th...

Page 19: ... 10W 30 into the spark plug hole then reinstall the spark plug Recoil start the engine by turning over several times to coal the cylinder walls with oil 2 Pull the recoil starter until you feel compression then stop pulling 3 Clean the exterior of the generator and store in a dry well ventilated area with the cover placed over it TROUBLESHOOTING ...

Page 20: ...TROUBLESHOOTING 19 ...

Page 21: ...SPECIFICATIONS WIRING DIAGRAM 20 ...

Page 22: ...TATES THAT ALL REPAIRS AND PARTS REPLACEMENTS SHOULD BE UNDERTAKEN BY CERTIFIED AND LICENSED TECHNICIANS AND NOT BY THE BUYER THE BUYER ASSUMES ALL RISK AND LIABILITY ARISING OUT OF HIS OR HER REPAIRS TO THE ORIGINAL PRODUCT OR REPLACEMENT PARTS THERETO OR ARISING OUT OF HIS OR HER INSTALLATION OF REPLACEMENT PARTS THERETO Record Product s Serial Number Here Note If product has no serial number re...

Reviews: