background image

3

2

Overview


Features, Controls and Identifi cation . . . . . . . . . . . 3

Preparation

 Batteries . . . . . . . . . . . . . . . . . . . . . . . . . . . . . . . . . 4


Battery Indicators . . . . . . . . . . . . . . . . . . . . . . . . . . 6


Insertion and Removal . . . . . . . . . . . . . . . . . . . . . . 8

Operation


On & Off . . . . . . . . . . . . . . . . . . . . . . . . . . . . . . . . . 9


Volume Control  . . . . . . . . . . . . . . . . . . . . . . . . . . . 10


Summary of Settings  . . . . . . . . . . . . . . . . . . . . . . . 11

Hearing System Care


Instrument Care . . . . . . . . . . . . . . . . . . . . . . . . . . . 12


Service and Repair . . . . . . . . . . . . . . . . . . . . . . . . . 12


Troubleshooting Guide  . . . . . . . . . . . . . . . . . . . . . 13

Tips for Better Communication


For You . . . . . . . . . . . . . . . . . . . . . . . . . . . . . . . . . . 14


For Your Family and Friends . . . . . . . . . . . . . . . . . . 15

FDA Information


Required Information . . . . . . . . . . . . . . . . . . . . . . . 16

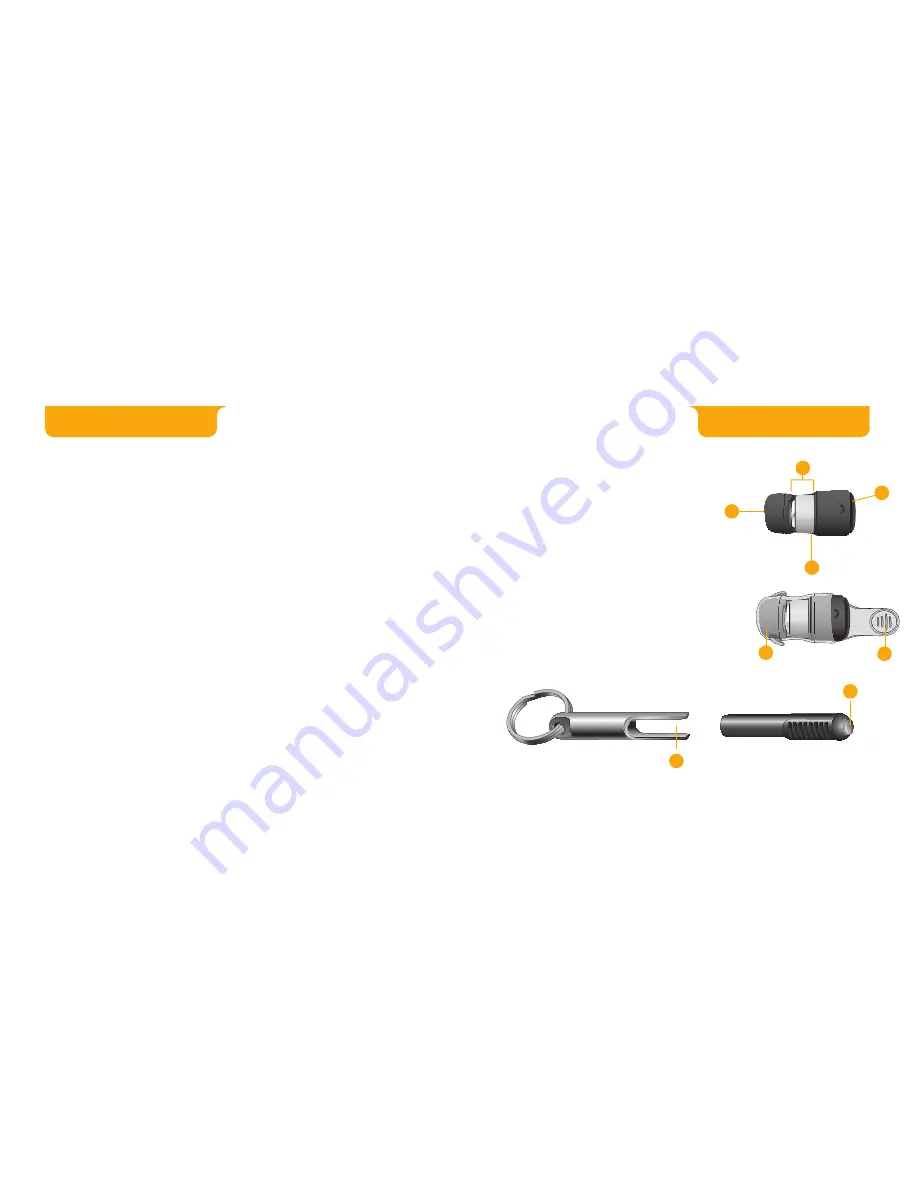
Features, Controls and Identifi cation

Your hearing system controls include:

1. Microphone opening
2.  Sound outlet (receiver) 
3. Battery compartment (on/off control)
4. Removal handle
5. Location of serial number
6. Sleeve
7.  AMP wand 
 

a) Power on/off and volume control


b) Optional battery removal tool

Your hearing system can be identifi ed by 
the R or L on the device

Introduction

Overview

4

6

1

2

3

5

7a

7b

Summary of Contents for AMP

Page 1: ...1 O p e r at i o n s M a n ua l ...

Page 2: ...ommunication For You 14 For Your Family and Friends 15 FDA Information Required Information 16 Features Controls and Identification Your hearing system controls include 1 Microphone opening 2 Sound outlet receiver 3 Battery compartment on off control 4 Removal handle 5 Location of serial number 6 Sleeve 7 AMP wand a Power on off and volume control b Optional battery removal tool Your hearing system...

Page 3: ... the battery 1 Remove the clear sleeve 2 Remove old battery using the battery removal tool side of the AMP wand or simply push the battery out from the side with your fingers 3 Remove the tab from the new battery 4 Line up the battery s sign flat side of the battery with the on the case above the product name 5 Insert AMP into clear sleeve Preparation 1 2 3 4 Preparation ...

Page 4: ...ofessional is your best source for lifespan estimates and verification that you are using the proper size and type Warnings Batteries are dangerous if swallowed To help prevent the accidental ingestion of batteries Keep out of reach of children and pets Check your medications before taking them batteries have been mistaken for pills Never put batteries in your mouth as they can easily be swallowed...

Page 5: ...move the wand within one second or less A tone series indicates that the hearing device is off Insertion and Removal To insert the hearing instrument 1 Hold the instrument with your thumb and forefinger grasping the removal handle 2 Gently insert the canal tip of the instrument into your ear canal Softly press the instrument into place with your finger To remove the hearing instrument Grasp the re...

Page 6: ...ou may have up to five volume steps Your hearing instruments are programmed to beep each time you change the volume Volume Settings Your hearing system has been set to a specific volume level by your hearing care professional If sounds are generally too loud or too soft please contact your hearing care professional for advice and adjustment Operation Step Tone Up two steps from programmed gain Fiv...

Page 7: ...to clean debris from around the microphone receiver and the battery compartment Never use water solvents cleaning fluids or oil to clean your instrument The plastic sleeve can be cleaned with soapy water Your hearing care professional can provide further information on additional maintenance procedures for your hearing system if needed Helpful Hints When not in use remove the batteries completely ...

Page 8: ...round noises may be frustrating at first remember you have not heard them for a while Let others know what you need keep in mind that people cannot see your hearing loss Develop realistic expectations of what your hearing instruments can and cannot do Better hearing with hearing instruments is a learned skill combining desire practice and patience For Your Family and Friends Your family and friend...

Page 9: ... will give you a written statement that states that your hearing loss has been medically evaluated and that you may be considered a candidate for a hearing instrument The physician will refer you to an audiologist or hearing instrument dispenser as appropriate for a hearing instrument evaluation The audiologist or hearing instrument dispenser will conduct a hearing instrument evaluation to assess ...

Page 10: ...pairs on your hearing instrument shall not extend the duration of the warranty period Any repairs performed on your hearing instrument after the warranty period has expired shall be considered good will repairs which shall not alter the terms of this Limited Warranty HOW TO OBTAIN WARRANTY SERVICE Deliver your hearing instrument at your expense to the Starkey authorized hearing professional from w...

Page 11: ...20 0086 2011 All Rights Reserved 84689 007 6 11 BKLT0226 01 EE XX Rev B 6700 Washington Avenue South Eden Prairie MN 55344 3476 800 328 8602 ...

Reviews: