background image

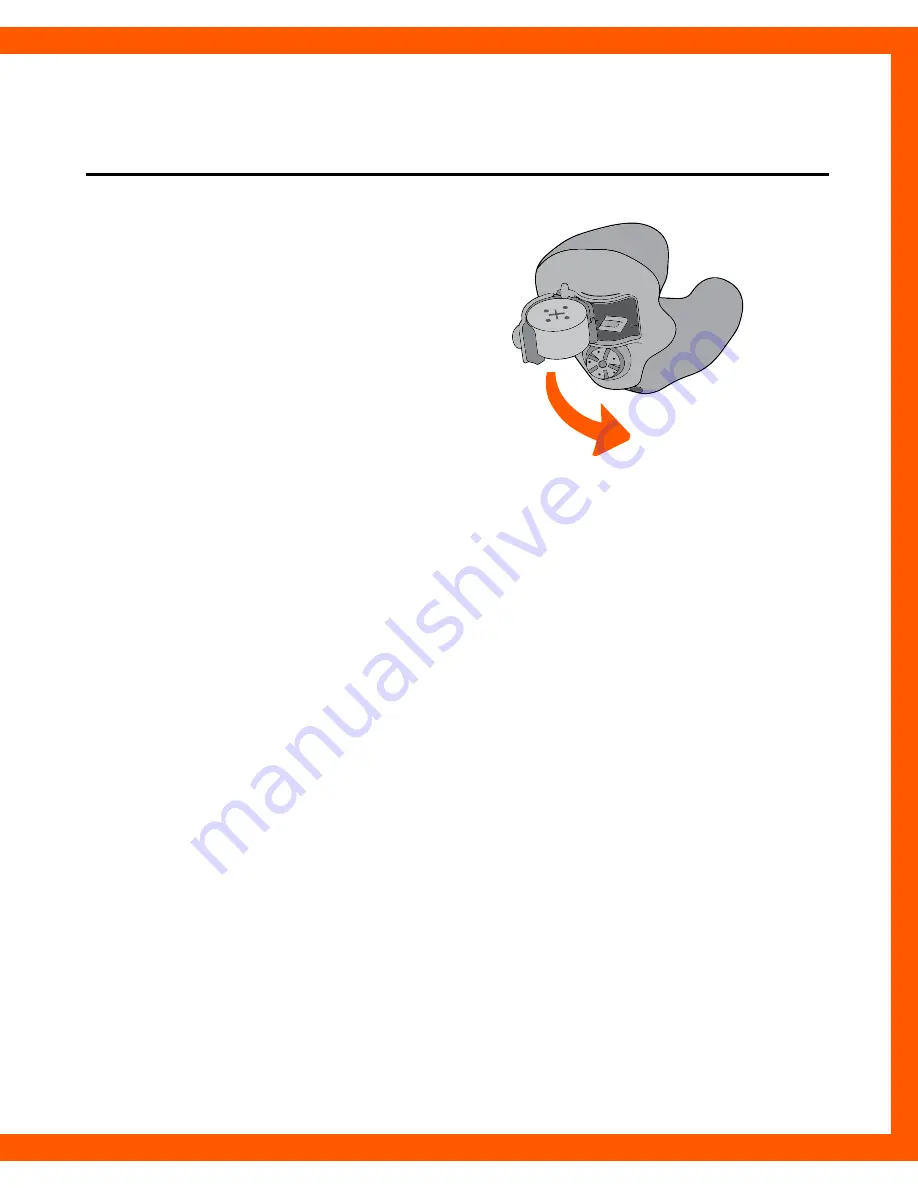
On & Off

To turn On:

Insert a battery and completely  
close the battery door. 

Rotate the volume control 
forward to turn device on.

To turn OFF:

Open the battery door until the battery is no longer 
touching the battery contacts. 

CusTom

oPeraTIon

25

Summary of Contents for SoundGear

Page 1: ...O p e r at i o n s M a n ua l ...

Page 2: ... My SoundGear is an Instant Fit In The Canal device Go to page 4 My SoundGear is a Custom device Go to page 18 My SoundGear is a Behind The Ear device Go to page 32 ...

Page 3: ...follow all instructions provided here and or by your hearing health professional It is vital that you wear your instrument s at all times when using or near firearms power tools or loud industrial machinery Proper use will greatly reduce but not eliminate the risk of damage to your hearing as a result of exposure to noise that exceeds 85dB Hearing loss can occur for a variety of reasons including ...

Page 4: ... Removal 12 System Care Instrument Care 14 Troubleshooting Guide 16 CUSTOM Overview Features Controls and Identification 18 Preparation Batteries 20 Battery Indicators 22 Insertion and Removal 23 Operation On Off 25 Volume Control 26 Multimemory Settings 27 Telephone Use 28 System Care Instrument Care 29 Service and Repair 30 Table of Contents ...

Page 5: ...rtion and Removal 38 Operation On Off 41 Volume Control 41 Multimemory Settings 42 Telephone Use 43 System Care Instrument Care 44 Service and Repair 45 TECHNICAL SPECIFICATIONS Instant Fit In The Canal 46 Custom 47 Behind the ear 48 NOISE PROTECTION INFORMATION Required Information 49 LIMITED WARRANTY Limited Warranty Information 50 ...

Page 6: ... play simply insert the devices into your ear and proceed with your activities Features Controls and Identification Your device controls include 1 Microphone opening 2 Sound outlet receiver 3 Battery compartment 4 Location of serial number 5 Removal handle 6 Large orange sleeves shown Six additional sleeves two small black two large black and two small orange also included in package 4 ...

Page 7: ...Instant Fit In The Canal Overview 1 2 3 4 6 5 5 ...

Page 8: ...he battery To insert or replace the battery 1 To remove the device from the sleeve gently push the device out from the end opposite the removal handle 2 Remove old battery by pushing it out from the side of the device with your fingers 3 Remove the tab from the new battery 4 Place battery in device by lining up the battery s sign flat side of the battery with the on the case The sign is on the wid...

Page 9: ...Instant Fit In The Canal Preparation 1 2 3 4 7 ...

Page 10: ...se levels and brand of battery used Helpful Hints Because of their size it s a good idea to change and replace batteries above a table or desk to reduce the risk of dropping the device or battery Dispose of used batteries immediately in the proper waste or recycling container Because batteries can vary in size and performance a hearing care professional is your best source for lifespan estimates a...

Page 11: ... batteries Keep out of reach of children and pets Check your medications before taking them batteries have been mistaken for pills Never put batteries in your mouth as they can easily be swallowed National Button Battery Ingestion Hotline 202 625 3333 Instant Fit In The Canal Preparation 9 ...

Page 12: ...Place battery in device by lining up the battery s sign flat side of the battery with the on the case The sign is on the wider end of the device which is engraved with SoundGear 4 Insert device back into sleeve making sure the SoundGear label is visible The narrow end of the device should rest against the tip of the sleeve 10 ...

Page 13: ...Instant Fit In The Canal Preparation 1 4 2 3 11 ...

Page 14: ...ear canal or causes discomfort in the outer ear canal 2 Gently insert the canal tip of the device into your ear canal Softly press the device into place with your finger until the ear canal is completely sealed Do not push device into your ear where the removal handle cannot be reached Fit should be snug to ensure product is properly sealing the ear canal and achieving listed NRR To remove the dev...

Page 15: ...or irritation and inflammation may occur as your ear becomes accustomed to having an object in it if so please contact a hearing care professional If an actual allergic reaction occurs contact a hearing care professional Severe swelling discharge from the ear excessive wax or other unusual conditions warrant immediate consultation with a physician 13 ...

Page 16: ...eeve then use cleaning brush provided in the package to clean debris from around the microphone receiver and battery compartment Never use water solvents cleaning fluids or oil to clean your instrument The plastic sleeve can be cleaned with soapy water Allow the plastic sleeve to dry completely before inserting the device back into sleeve A hearing care professional can provide further information...

Page 17: ...mpletely place your devices in the storage container and store In a dry safe place Away from direct sunlight or heat to avoid extreme temperatures Where you can easily find them Safely out of reach of pets and children Do not take apart your devices or insert the cleaning tool inside them 15 ...

Page 18: ...emove and clean the plastic sleeve Hearing change Contact a hearing care professional Inconsistent Performance Low battery Replace battery Unclear Distorted Performance Low battery Replace battery Defective device Contact via email CustomerSupport soundgearhearing com Dead Low battery Replace battery Wax or debris in the microphone or receiver Clean both microphone and receiver with brush Remove a...

Page 19: ......

Page 20: ...and wax protection system 4 Multimemory button 5 Volume control on off control 6 Location of serial number RED Right BLUE Left Personally customized to the exact shape of your ear these devices are designed to overcome the sensation of wearing an earplug The user controls allow for personalization of environmental volume and or sound quality SoundGear Platinum Only 18 ...

Page 21: ...CUSTOM OVERVIEW 00 00000000 1 4 2 5 6 3 19 ...

Page 22: ...ge color code on the packaging To insert or replace the battery 1 Use the nail grip on the battery door 2 Open the battery door gently and remove the old battery 3 Remove the tab from the new battery 4 Line up the battery s sign flat side of the battery with the on the battery door 5 Close the battery door CUSTOM Preparation 20 ...

Page 23: ...3 1 2 4 5 CUSTOM Preparation 21 ...

Page 24: ...erious damage if the door will not close securely check that the battery is inserted correctly Do not open the battery door too far or damage is likely to occur Because of their size it s a good idea to change and replace batteries above a table or desk to reduce the risk of dropping the instrument or battery Dispose of used batteries immediately in the proper waste or recycling container Because ...

Page 25: ...t your hand slightly forward and gently insert the canal tip of the instrument into your ear canal and rotate the instrument backward Softly press the instrument into place with your fingertip To remove your SoundGear Grasp the instrument with your thumb and forefinger gently rotate forward as you pull outward 1 2 CUSTOM Preparation 23 ...

Page 26: ...sual conditions warrant immediate consultation with a physician It is extremely important that your instrument is inserted properly to ensure that you receive maximum noise protection CUSTOM Preparation Warnings Batteries are dangerous if swallowed To help prevent the accidental ingestion of batteries Keep out of reach of children and pets Check your medications before taking them batteries have b...

Page 27: ...nsert a battery and completely close the battery door Rotate the volume control forward to turn device on To turn OFF Open the battery door until the battery is no longer touching the battery contacts CUSTOM Operation 25 ...

Page 28: ... You should feel it click on if the instrument was correctly turned off 1 To make sounds louder continue to rotate the control forward toward your face 2 To make sounds softer use your fingertip to rotate the control toward the back of your head 1 On or Volume Increase 2 Decrease Volume or Off CUSTOM Operation 26 ...

Page 29: ...ward When you press the Multimemory button you may hear an indicator or a tone series indicating the instrument has changed to the next program SoundGear Platinum Program 1 Normal Program 2 High Frequency Boost Program 3 Phone Telecoil Program 4 Mute SoundGear Silver Program 1 Normal CUSTOM Operation SoundGear Platinum Only 27 ...

Page 30: ...en needed Manually switched telecoils are activated by choosing the telecoil setting using the Multimemory button General Telephone Use Your SoundGear may work best by holding the phone close to but not fully covering your ear In some instances if you encounter whistling feedback tilt the receiver at an angle until the whistling stops Your hearing professional can give instructions and techniques ...

Page 31: ...ument Your hearing care professional can provide further information on additional maintenance procedures for your hearing system if needed Helpful Hints When not in use remove the batteries completely place your SoundGear in the storage container and store In a dry safe place Away from direct sunlight or heat to avoid extreme temperatures Where you can easily find them Safely out of reach of pets...

Page 32: ...y are you likely to violate any applicable warranties or insurance you could easily cause further damage Should your SoundGear fail or perform poorly contact your hearing care professional for advice and assistance or contact SoundGear at customersupport soundgearhearing com or call at 800 769 8605 CUSTOM System Care 30 ...

Page 33: ......

Page 34: ...ft ear 6 Tamper resistant battery compartment lock 7 Volume control Your SoundGear can be identified by 8 Location of serial number 9 Location of manufacturer s name and model name Worn over the ear these devices are designed to overcome the sensation of wearing an earplug The user controls allow for personalization of environmental volume and or sound quality Behind The Ear Overview 32 ...

Page 35: ...2 3 4 00 000000 9 5 6 1 7 8 Serial Number Behind The Ear Overview 33 ...

Page 36: ...r code on the packaging To insert or replace the battery 1 Use the nail grip on the battery door 2 Open the battery door gently and remove the old battery 3 Remove the tab from the new battery 4 Line up the battery s plus sign flat side of the battery with the on the battery door 5 Close the battery door Behind The Ear Preparation 34 ...

Page 37: ...1 2 3 4 5 Behind The Ear Preparation 35 ...

Page 38: ...oximately 20 minutes to replace the battery A different tone lasting two seconds will sound just before the battery stops working Actual time between low battery indicator and shut down will vary depending on environmental noise levels and brand of battery used Behind The Ear Preparation 36 ...

Page 39: ...on of batteries Keep out of reach of children and pets Check your medications before taking them batteries have been mistaken for pills Never put batteries in your mouth as they can easily be swallowed National Button Battery Ingestion Hotline 202 625 3333 Behind The Ear Preparation 37 ...

Page 40: ...the tubing 2 Tilt your hand slightly forward and gently insert the canal tip of the Earmold into your ear canal 3 Softly press the Earmold into place with your fingertip 4 Carefully place the BTE behind your ear wrapping the earhook over the top of your ear 5 Foam Earmold Tip ONLY Foam Earmold Tip will expand after a few seconds to create a seal To remove the SoundGear and Earmold Take the instrum...

Page 41: ...1 2 3 4 Behind The Ear Preparation 39 ...

Page 42: ...lease contact your hearing care professional If an actual allergic reaction occurs alternative earmold materials are available contact your hearing care professional Severe swelling discharge from the ear excessive wax or other unusual conditions warrant immediate consultation with a physician Behind The Ear Preparation 40 ...

Page 43: ...y is no longer touching the battery contacts Behind The Ear Operation Volume Control To make sounds louder continue to rotate the control upward Your hearing instruments may be programmed to beep when you reach the correct setting To make sounds softer use your fingertip to rotate the control toward the back of your head 41 ...

Page 44: ...rd When you press the Multimemory button you may hear an indicator or a tone series indicating the instrument has changed to the next program SoundGear Platinum Program 1 Normal Program 2 High Frequency Boost Program 3 Phone Telecoil Program 4 Mute SoundGear Silver Program 1 Normal Program 2 Mute Behind The Ear Operation 42 ...

Page 45: ...ded Manually switched telecoils are activated by choosing the telecoil setting using the Multimemory button General Telephone Use Your SoundGear may work best by holding the phone close to but not fully covering your ear In some instances if you encounter whistling feedback tilt the receiver at an angle until the whistling stops Your hearing professional can give instructions and techniques for yo...

Page 46: ... Never use water solvents cleaning fluids or oil to clean your instrument Helpful Hints When not in use remove the batteries completely place your SoundGear in the storage container and store In a dry safe place Away from direct sunlight or heat to avoid extreme temperatures Where you can easily find them Safely out of reach of pets and children Do not take apart your SoundGear or insert the clean...

Page 47: ...ly to violate any applicable warranties or insurance you could easily cause further damage Should your SoundGear fail or perform poorly contact your hearing care professional for advice and assistance or contact SoundGear customer support at customersupport soundgearhearing com or call us at 800 764 8605 Behind The Ear System Care 45 ...

Page 48: ...Attenuation Data Measurements were made according to American National Standards Institute Specifications ANSI S3 19 1974 NRR 25dB Total Frequency Hz Mean Attenuation dB Standard Deviation dB 125 30 6 4 6 250 30 3 5 0 500 32 7 4 8 1000 32 8 4 4 2000 37 6 4 7 3150 41 8 3 5 4000 40 7 3 9 6300 43 4 5 5 8000 43 2 4 5 46 ...

Page 49: ...ents were made according to American National Standards Institute Specifications ANSI S3 19 1974 Total Frequency Hz Mean Attenuation dB Standard Deviation dB 125 26 3 7 250 24 3 2 6 500 30 0 3 2 1000 30 5 3 6 2000 35 4 4 6 3150 39 8 3 8 4000 41 2 4 6 6300 43 5 4 2 8000 43 5 2 7 NRR 24dB 47 ...

Page 50: ...rements were made according to American National Standards Institute Specifications ANSI S3 19 1974 NRR 26dB Total Frequency Hz Mean Attenuation dB Standard Deviation dB 125 26 9 5 6 250 28 1 4 0 500 33 7 3 3 1000 36 0 3 7 2000 35 8 4 4 3150 39 6 3 5 4000 40 3 4 2 6300 42 4 3 5 8000 43 7 4 5 48 ...

Page 51: ... environments dominated by frequencies below 500 Hertz Hz the C weighted environmental noise levels should be used Improper fit of this device will reduce its effectiveness in attenuating noise Consult the enclosed instructions for proper fit Although hearing protectors can be recommended for protection against the harmful effects of impulsive noise the Noise Reduction Rating NRR is based on the a...

Page 52: ... OF STATE LAW INCLUDING ANY IMPLIED WARRANTY OF MERCHANTABILITY AND OR ANY IMPLIED WARRANTY OF FITNESS FOR A PARTICULAR PURPOSE ARE LIMITED IN DURATION TO THE WARRANTY PERIOD There is no warranty of any nature made by Starkey Hearing Technologies beyond this Limited Warranty No person has authority to enlarge amend or modify this Limited Warranty Starkey Hearing Technologies is not responsible for...

Page 53: ...e a fee for services he or she provides Performance of warranty repairs on your hearing protection device shall not extend the duration of the warranty period Any repairs performed on your device after the warranty period has expired shall be considered good will repairs which shall not alter the terms of this Limited Warranty HOW TO OBTAIN WARRANTY SERVICE Deliver your hearing protection device a...

Page 54: ...ncidental damages so the above exclusions may not apply to you YOUR LEGAL REMEDIES THIS LIMITED WARRANTY DOES NOT EXTEND TO FUTURE PERFORMANCE ANY ACTION TO ENFORCE THIS LIMITED WARRANTY OR ANY IMPLIED WARRANTIES MAY AND SHALL NOT BE COMMENCED MORE THAN 90 DAYS AFTER THE EXPIRATION OF THE WARRANTY PERIOD THE PERFORMANCE OF REPAIRS SHALL NOT SUSPEND THIS LIMITATIONS PERIOD FROM EXPIRING UNDER NO CI...

Page 55: ......

Page 56: ... 2013 SoundGear Hearing All Rights Reserved 81311 007 10 13 BKLT2671 00 EE XX Rev A SoundGear Hearing Eden Prairie MN www soundgearhearing com 800 769 8605 ...

Reviews: