10
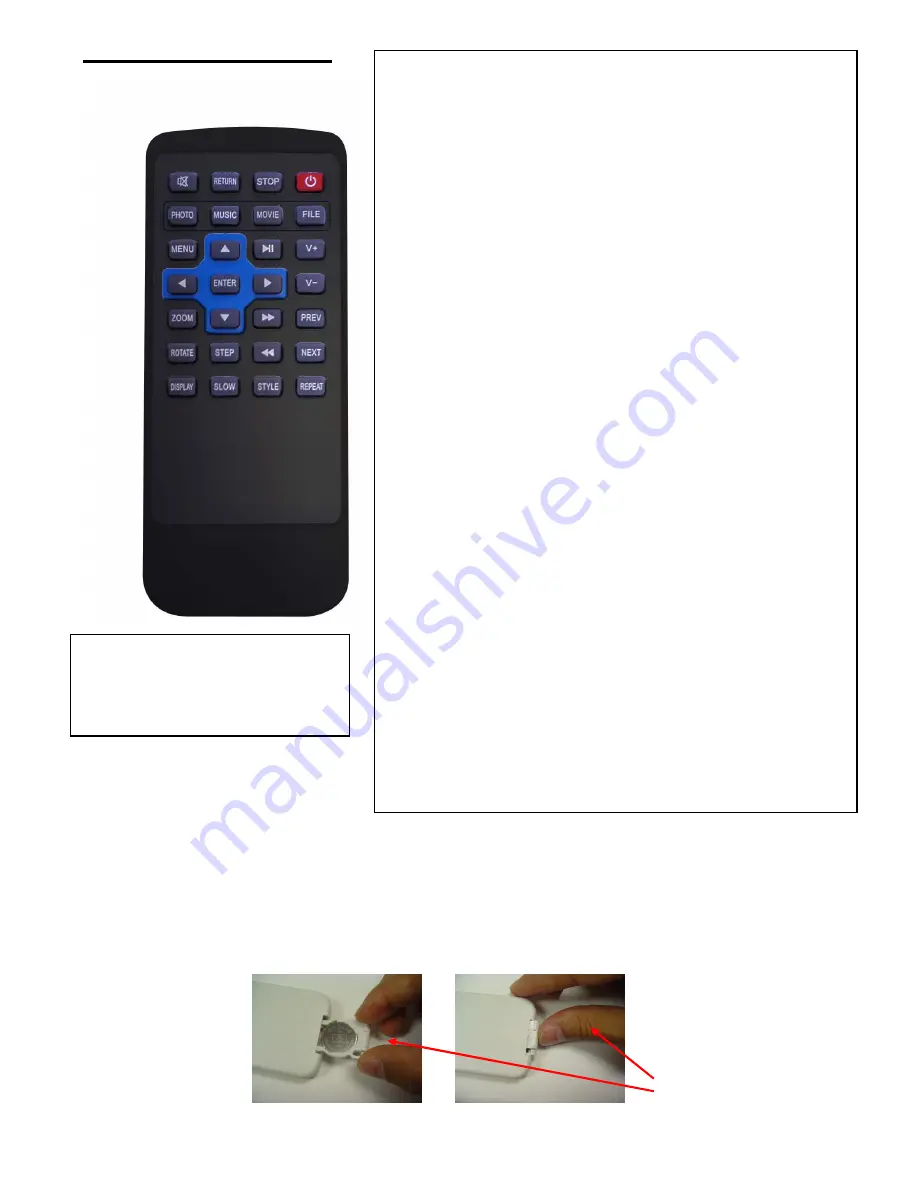
Remote Control Layout
Changing the Battery in the Remote Control
Hold the remote control, squeeze the button to the right, and pull the battery tray out. Then re-place the battery (model
CR2025) inside the tray with the “+” polarity facing up, and then push the tray back to its place.
FPO
1. MUTE: Mutes the volume.
2. RETURN: Returns to the OSD main menu.
3. STOP: Stops the selected file or action.
4. POWER: Turns the unit on or off.
5. PHOTO: Goes to the Photo Setup and displays the photo files.
6. MUSIC: Goes to the Music Setup and displays the music files.
7. MOVIE: Goes to the Movie Setup and displays the movie files.
8. FILE: Goes to the file library and shows all files.
9. MENU: Goes to the main OSD Menu.
10. UP: Moves the cursor up when making a selection.
11. PLAY/PAUSE: Play/pause the media program.
12. V+: Increases the volume.
13. Left: Moves the cursor to the left when making a selection.
14. ENTER: Access the function selected.
15. Right: Moves the cursor to the right when making a selection.
16. V-: Decreases the volume.
17. ZOOM: Zooms in on the picture x 4 (photos only).
18. DOWN: Moves the selector down when making a selection.
19. FW: Forwards the movie.
20. PREV: Goes to the previous file.
21. ROTATE: Rotates the photo in 90° clockwise intervals.
22. STEP: Synchronizes play of picture and music.
23. RW: Rewinds the movie.
24. NEXT: Advances to the next file.
25. DISPLAY: Display the file information of selected picture.
26. SLOW: Adjusts the interval time between pictures as they appear
on the screen.
27. STYLE: Selects how the picture will change from frame to frame.
28. REPEAT: Plays the file repeatedly until stopped.
Note: The working distance for the
remote control is up to 9.84 feet away
from the Digital Photo Frame.


