background image

11

E

N

11

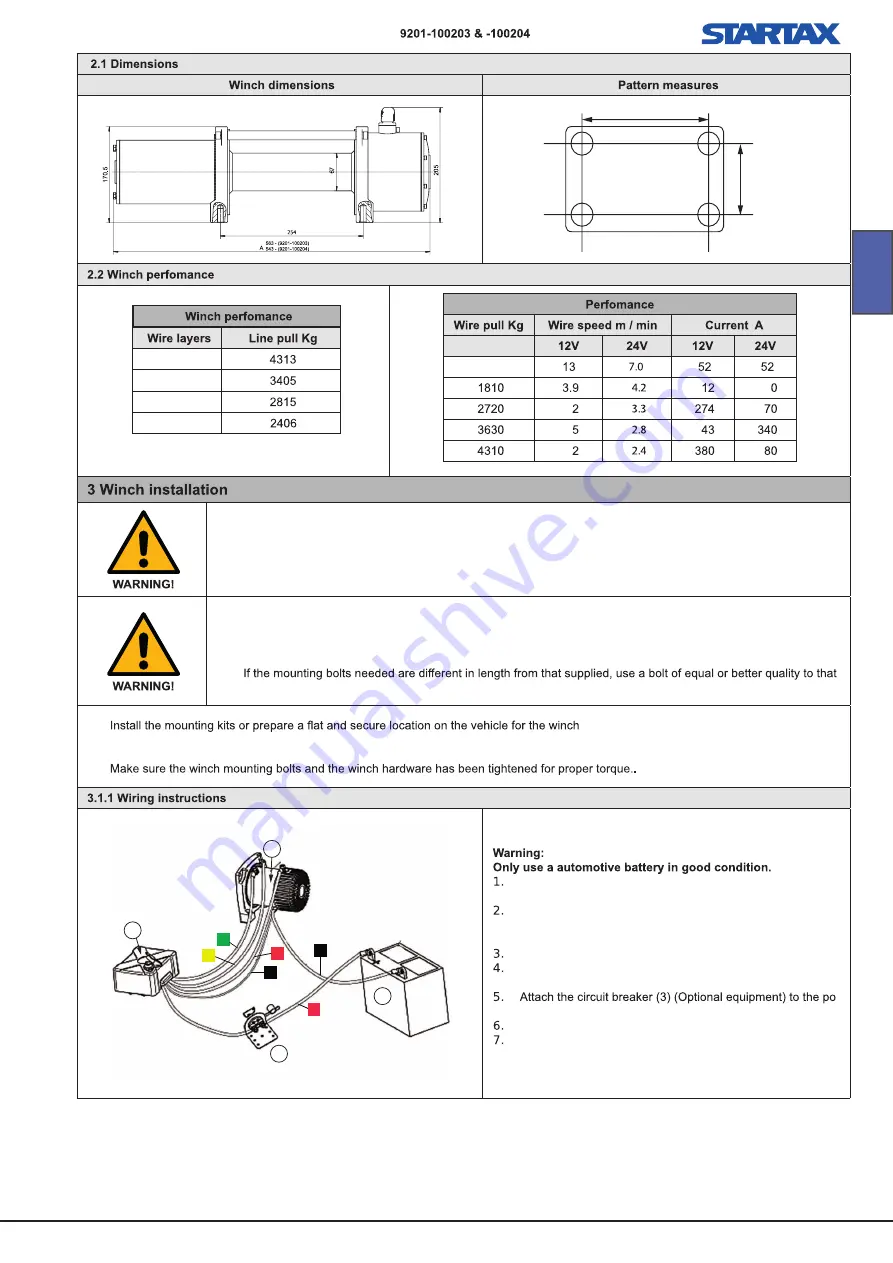
Do not begin the installation until you are sure that you have technically understood the manual and perform the work 

only in the order provided in this manual! The manual must be available during all work performed on the system, third 

parties included.

This is general instruction for the installation. Instructions may have to be applied due to the vehicle model. If you

are uncertain about the installation, get the winch installed by a professional

Disconnect the battery cables before installing the winch!

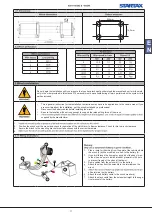
Be sure the location will be strong enough to support the rated pulling force of the winch.

supplied by the manufacturer

1.

2.

Position the winch over the mount and check for operation of the clutch lever to frame clearance. Check for tire to winch clearance.

3.

Secure the winch to the mounting bracket or surface chosen with the correct hardware.

4.

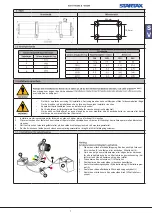
Plan a route for the wiring from the point of the vehicle where

the winch (2) will be mounted, or used, to the battery (4).

If you drill through the bumper or any part of the body to rou-

te the wires, be sure to install a rubber grommet in the hole

to prevent fraying of the wires at that point.

Route cables from the solenoid (1) to the battery

Attach the wires from the solenoid to the terminals on the

winch

-

sitive terminal on the battery.

Attach the red battery cable to the circuit b)

Attach the black cable from the solenoid straight to the nega-

tive terminal of the battery.

254 mm

114,3mm

1
2
3
4

0

.0

2

21

3.

2

2.

3

2.

3

2

1

3

4

G

BK

Y

R

R

BK

Summary of Contents for 9201-100203

Page 1: ...nent magnet 12V 24V DC 9201 100 12V 9201 100 24V RU Vartotojo instrukcijos 26 29 LT LV NO Bruksanvisning 18 21 ET User instructions 14 17 EN User instructions 10 13 SV Bruksanvisning 6 9 FI K ytt ohje...

Page 2: ...ss Suunnittele ja mittaa tarkasti vinssin asennuskohta ennen kuin poraat asennusrei t Varo polttoainetankkiin tai s hk johtoihin poraamista J t rummulle v hint n 5 kierrosta vaijeria Ripusta vinssin...

Page 3: ...ja turvallinen kiinnityskohta vinssille Tasainen pinta v hent vinssin runkoon tule via j nnityksi 2 Sovita vinssi asennuspaikalle ja varmista ett vapaa tila riitt normaaliin toimintaan 3 Kiinnit vins...

Page 4: ...sikuormitteinen salpa on kunnolla lukittunut 3 J t aina v hint n 5 kierrosta vaijeria rummulle Katso vinssin turvaohjeet ja varoitukset ennenkuin jatkat 4 Aseta raskas peite tai matto ei mukana vaijer...

Page 5: ...ia kevyseti jotta jumiutuneet kon taktit irtoavat Vaihda kaukos din Tarkasta j nnite py rij st Tarkastuta moottori am mattlaisella Anna vinssin kuivua Vie yksikk asiantuntevalle korjaamolle Moottori t...

Page 6: ...r h llas s kort som m jligt Annars kan vinschen verhettas Undvik olyckor och materiella skador genom att t nka ordentligt p vad du g r Utforma och m t upp den exakta platsen f r vinschen innan du bor...

Page 7: ...llan v xelspaken och ramen r tillr ckligt Kontrollera spelet mellan d cket och vinschen 3 S tt fast vinschen i monteringsf stet eller p den valda monteringsytan med r tt monteringsmaterial 4 Se till a...

Page 8: ...dra ut kabeln till nskad l ngd 2 Haka fast den i f rem let i en dragpunkt bogserrem tr dband eller kedja St p ett s kert avst nd bredvid vinschens dragstr cka och h ll knappen f r inrullning intryckt...

Page 9: ...Byt ut fj rrkontrollen armaturens utg ng L t den tappas ur och torka Ta enheten till en auktoriserad repara tionsverkstad Motorn r ig ng men st llinans trumma roterar inte Kopplingen r inte ilagd F r...

Page 10: ...e the winch may oherheat To avoid accidents and damage think carefully what you are doing Design and measure the exact location of the winch before drilling the mounting holes Be careful not to drill...

Page 11: ...he winch over the mount and check for operation of the clutch lever to frame clearance Check for tire to winch clearance 3 Secure the winch to the mounting bracket or surface chosen with the correct h...

Page 12: ...2 Hook onto the object using a pulling point tow strap tree strap or chain 4 Place a heavy rag or carpet not inclucded over the wire rope span 1 8 m from the hook to help absorb the force released if...

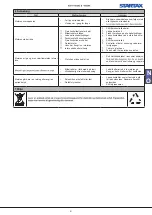
Page 13: ...all cable connections Tap solenoid to loosen contacts Replace remote Check for voltage at armature port Allow to drain and dry Motor runs but wire rope drum does not turn Clutch is not engaged Move t...

Page 14: ...ja kahju ennetamiseks m elge alati hoolikalt l bi mida te teete Enne kinnitusavade puurimist joonestage ja m tke vintsi t pne asukoht Veenduge et te ei puuriks k tusepaaki ega elektrikaableid J tke tr...

Page 15: ...i valmistage s idukil vintsi jaoks ette tasase pinnaga ja ohutu ala 2 Asetage vints kinnituse peale ja kontrollige siduri juhthoova ja kere vahekaugust Kontrollige rehvi ja vintsi vahekaugust 3 Kinnit...

Page 16: ...pulling point tow strap tree strap or chain 4 Place a heavy rag or carpet not inclucded over the wire rope span 1 8 m from the hook to help absorb the force released if the wire rope breaks Seiske vi...

Page 17: ...alikult kinni Koputage kontaktide avamiseks solenoidi Vahetage kaugjuhtimispult v lja Kontrollige ankrupinge olemasolu Laske veest t hjeneda ja kuivada Mootor t tab aga trossitrummel ei p rle Kytkin e...

Page 18: ...vinsjen overopphetes Tenk n ye over hva du gj r for unng ulykker og skader Planlegg og m l opp n yaktig plassering av vinsjen f r du borer monteringshullene La det v re minst fem omdreininger med vaie...

Page 19: ...ttene eller klargj r et plant og sikkert sted p kj ret yet for vinsjen 2 Plasser vinsjen over festet og kontroller at avstanden mellom clutchspaken og rammen er tilstrekkelig Kontroller avstanden mell...

Page 20: ...gjenstanden i et trekkpunkt en tauestropp et treb nd eller et kjede 3 La det v re minst fem omdreininger med vaier p trommelen Les sikkerhetsadvarslene og forholdsreglene for vinsjen f r du fortsetter...

Page 21: ...e ved sl lett p sole noiden Skift fjernkontrollen Kontroller at det er spenning ved arma turutgangen T m ut og t rk den Ta enheten til et autorisert verksted Motoren er i gang men vaiertrommelen roter...

Page 22: ...22 L V 22 1 2 3 4 5 6 1 2 3 4 5 6 karst 9201 10103 9201 10079 Jauda hp kW 1 9 5mm 86dB IP klase IP67 12V 24V 3 8 254x114 3mm 5 x16 x2 mm Svars 3 Kg CE hp kW 5 x16 x2 mm Kg...

Page 23: ...23 L V 23 1 2 3 4 0 0 2 3 2 2 3 2 3 1 2 3 4 jai spailei 3 spailei 254 mm 114 3mm 2 1 3 4 G BK Y R R BK...

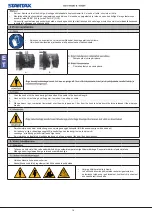
Page 24: ...d pull the cable to the desiired length 2 Hook onto the object using a pulling point tow strap tree strap or chain 4 Place a heavy rag or carpet not inclucded over the wire rope span 1 8 m from the ho...

Page 25: ...25 L V 25 Motor does not turn on sies Pievelciet visu vadu savienojumu uzg kontaktus salabotu...

Page 26: ...2 3 4 Nelieskite lyno arba kreipiamojo skriemulio kai jie naudojami 5 6 9201 10103 9201 10079 Galia kW 1 Plieninis lynas 9 5mm 86dB IP vertinimas IP67 12V 24V Kablys 3 8 254x114 3mm 5 x16 x2 mm Svori...

Page 27: ...27 1 2 3 4 0 0 2 21 3 2 2 3 2 3 tik vadove nurodyta tvarka asmenys 1 2 3 4 akumuliatoriaus 4 Nutieskite laidus nuo selenoido 2 iki akumuliatoriaus 1 gnybto 3 riaus gnybto 254 mm 114 3mm 2 1 3 4 G BK Y...

Page 28: ...28 L T 28 B A 1 2 4 1 2 1 2...

Page 29: ...29 L T 29 sies Pievelciet visu vadu savienojumu uzg kontaktus salabotu...

Page 30: ...30 R U 30 1 2 3 4 5 6 1 2 3 4 5 6 9201 10079 9201 10103 9201 10079 kW 1 9 5mm 86dB IP67 12V 24V 3 8 254x114 3mm 5 x16 x2 mm 3 Kg CE kW 5 x16 x2 mm Kg...

Page 31: ...31 R U 31 1 2 3 4 3 254 mm 114 3mm 1 2 3 4 0 0 2 21 3 2 2 3 2 3 2 1 3 4 G BK Y R R BK...

Page 32: ...32 R U 32 B A 1 2 4...

Page 33: ...33 R U 33...

Page 34: ......

Page 35: ......

Page 36: ...istontie 138 33880 Lemp l www startax net 358 0 3 275 050 AS Startax L ike tee 20 Peetri alevik Rae vald 75312 Harjumaa tel 372 615 0170 www startax net Maskin Teknisk AS rosenholmveien 20 N 1252 OSLO...

Reviews: