


Instruction Manual
9
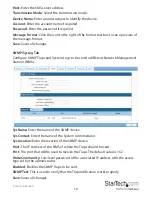
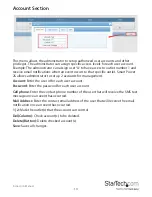
Email Server Tab
Configure the Mail Server settings to send notifications when an event has occurred.
Host:
Enter the Hostname or IP address of the SMTP Mail Server that will be used to
send emails from the PDU. If entering a Hostname, you will also be required to enter
the DNS Address on the Network tab.
Port:
Enter the port number for the SMTP server. The default port is 25.
‘From’ Address:
This must be a legitimate email address.
Subject:
Enter a subject line to easily identify the device.
Authorization:
Select this box if the Mail Server requires authentication to send emails.
Username:
Enter the account name if SMTP authentication is required.
Password:
Enter the password if SMTP authentication is required.
Save:
Saves all changes.
SMS Server Tab
Configure the SMS Server settings to send text notifications when an event has
occurred.


