18 • Residen al Electric Water Heater Use and Care Guide
TROUBLESHOOTING
WARNING! Working near an
energized circuit can result in severe
injury or death from electrical shock.
WARNING! When you are
fi
nished,
be sure all covers are secured to re-
duce the risk of
fi
re and electric shock.
No Hot Water
The most likely reasons for an electric wa-
ter heater to produce NO hot water are:
• No electric power—a common
problem with new installations
• Burned out upper element (Dry
Fired) — a common problem with
new installations
• Tripped Energy Cut Off (red button
on upper thermostat)
• The water heater’s inlet and outlet
connections are reversed (usually
only in new installations)
• Broken upper thermostat (or wiring)
• A leak in the hot water side of the
plumbing system that exceeds the
water heater’s heating capacity and
makes it appear that the water heat-
er is producing little to no hot water
Follow these steps to diagnose and
correct common electrical problems:
1
Check the electric power to
the water heater.
No hot
water is o en caused by a
problem with the home’s electrical
wiring or circuit breakers. You’ll need a
non-contact circuit tester. Follow these
guidelines:
• Locate the water heater’s circuit
breaker and turn it off (or remove
the circuit’s fuses).
• Locate the electrical junction box
on top of the water heater and
remove the cover.
• Identify the two power wires. The
power wires are usually black/black
or black/red—the green or copper
wire is the ground wire.
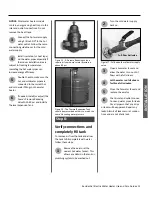
Figure 21 -
Use a non-contact circuit
tester to check for electrical power.
• Turn the circuit breaker back on
(or install the fuses) and check the
power on both incoming power
wires using a non-contact circuit
tester.
• Turn the power off and replace the
cover on the electrical junction box.
If the water heater is not ge ng
power, contact a quali
fi
ed person to
have your home’s wiring or circuit
breakers checked.
2
Check the upper hea ng
element.
If the water heater is
ge ng electrical power, check
to see if the upper hea ng element has
burned out. If the upper element is
burned out, you’ll have no hot water.
To check the upper element, you’ll
need a mul meter capable of reading
resistance.
• Turn the power OFF at the circuit
breaker or remove fuses.
• Remove the upper access panel.
• Remove the insulation to access
the upper thermostat and heating
element.
3
Check the top two screws of
the upper thermostat using a
non-contact circuit tester and
con
fi
rm that power is o
ff
(
screw
terminals 1 and 3 in photo on next
page).
• With the electrical power o
ff
, remove
the two power wires from the upper
hea ng element.
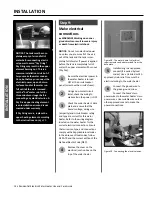
Figure 22 -
Use a multimeter to check
the resistance of the upper heating
element.
4
Check the resistance of the
upper hea ng element using
a mul meter.
Measure the
resistance between the two screw
terminals on the upper hea ng
element. A good element will have a
resistance ranging between 5 and 25
Ohms. If the resistance is:
Outside this range.
Replace the ele-
ment (see the Rou ne Maintenance
sec on on page 21). On a new water
heater, a burned out upper hea ng
element is almost always caused by
turning the power on before the tank
was completely full of water (Dry Fire).
(See Step 8 in the Installa on sec on.)
Within this range.
Rea ach the power
wires, making sure the wires are in
good condi on and the connec ons
are clean and ght. Next, check the
following:
TR
OUBLE
SHOO
TING


